
CloudFlare began as a company providing content delivery network (CDN) and distributed DNS services to enhance website performance and security. It has since evolved into a major internet infrastructure provider offering a comprehensive suite of performance, security, and edge computing solutions. Compared to other cloud providers, CloudFlare provides a lot of value for a low price or even for free. With competitive pricing and unique features like built-in DDoS protection and a global network, it often offers more cost-effective solutions for web performance and security enhancements.
In this article, we’re going to learn how to create a CRUD API using nothing but Cloudflare Workers (wrangler) and a D1 database (still in public beta). We’ll walk through setting up the environment, creating endpoints, and integrating the D1 database to handle data storage and retrieval. While there are challenges to using Cloudflare Workers for an API, the main one being that it does not run on Node.js, limiting the packages we can depend on, with a little creativity we can make it happen. Running on Cloudflare’s V8 runtime, we get a blazing fast API that leverages the power and simplicity of Cloudflare Workers and D1.
Creating Our Project
We’ll bootstrap our project using the new method to create a CloudFlare worker:
Choose “create a default hello world worker” and choose “use TypeScript.” It will ask if you want to deploy your worker right away, choose “No,” unless you’ve run wrangler login.
Next, we’ll install our dependencies:
npm i bcryptjs uuid tiny-request-router
npm i -D @types/bcryptjs @types/uuid
We’ll be using tiny-request-router for mapping URL based routes to route handlers. The uuid library is for generating, well, uuids, and bcryptjs is a vanilla JavaScript BCRYPT implementation that we’re going to use to hash user passwords.
Creating Our Database
First, we need to define our database schema, so create a file called schema.sql in the root project directory:
— Create users table
CREATE TABLE
users (
id UUID PRIMARY KEY,
firstName TEXT,
lastName TEXT,
email TEXT UNIQUE,
phone TEXT UNIQUE,
password TEXT,
role TEXT,
status TEXT,
openIdSub TEXT NULL DEFAULT NULL,
createdAt TIMESTAMP DEFAULT CURRENT_TIMESTAMP,
updatedAt TIMESTAMP DEFAULT CURRENT_TIMESTAMP
);
— Seed users table
INSERT INTO
users (
id,
firstName,
lastName,
email,
phone,
password,
role,
status,
createdAt,
updatedAt
)
VALUES
(
‘f34bd970-052a-4e26-bbc8-626a586023c5’,
‘John’,
‘Doe’,
‘john.doe@example.com’,
‘1234567890’,
— password: Password123! – bcrypt hash salt: 10 rounds
‘$2a$10$4ix9iLrjxItWjuvS1JLT3uIB6sD6YSN5mY6..6uCZPE7fsbxsxYc.’,
‘admin’,
‘active’,
CURRENT_TIMESTAMP,
CURRENT_TIMESTAMP
);
— Create tokens table
DROP TABLE IF EXISTS tokens;
CREATE TABLE
tokens (
id UUID PRIMARY KEY,
userId UUID,
token TEXT,
type TEXT,
device TEXT,
ipAddress TEXT,
createdAt TIMESTAMP DEFAULT CURRENT_TIMESTAMP,
expiresAt TIMESTAMP
);
This will create a users table with a test user and a tokens table for storing login tokens. Note that CloudFlare D1 syntax is identical to SQLite.
Next, we need to create our database resource using wrangler:
The result of this command will be a configuration snippet that you can copy and paste into your wrangler.toml project config file:
binding = “DB” # available in your Worker on env.DB
database_name = “cf-crud-example”
database_id = “<unique-ID-for-your-database>”
Now let’s run our migration script:
This will create our tables on the local development SQLite server that wrangler automatically installs. To run against the D1 cloud instance, simply change –local to –remote.
You can test if the script worked by running:
Finally, you’ll want to run npm run cf-typegen to add the DB variable to the Env global interface. You’ll run this command any time you add injected services to your worker (KV, etc.)
Putting It All Together
Now that we have our stack, let’s build our API. We’ll start by defining two CRUD classes to match our tables. I won’t post the code for those classes here, though, for sake of brevity. The full code for the project is available on GitHub (link below).
Now let’s edit our index.ts:
import { User } from ‘./classes/User.class‘;
import { Token } from ‘./classes/Token.class‘;
// Import Tiny Request Router
import { Router, Method, Params } from ‘tiny-request-router‘;
// Import route handlers
import routeTest from ‘./routes/test‘;
import routeLogin from ‘./routes/login‘;
import routeParams from ‘./routes/params‘;
type Handler = (params: Params) => Promise<Response>;
export default {
async fetch(request: Request, env: Env, ctx: ExecutionContext): Promise<Response> {
const { DB } = env;
// Initialize CRUD classes with the database connection
User.initialize(DB);
Token.initialize(DB);
// Initialize the router and define routes
const router = new Router<Handler>();
router.get(‘/test‘, () => routeTest(request));
router.post(‘/login‘, () => routeLogin(request));
// Define a route with a URL filename parameter called “foo”
router.get(‘/params/:foo‘, params => routeParams(request, params));
const { pathname } = new URL(request.url);
const match = router.match(request.method as Method, pathname);
if (match) {
// Call the matched route handler with the URL parameters
return match.handler(match.params);
} else {
// Return a 404 Not Found response if no route matches
return new Response(‘Not Found‘, { status: 404 });
}
},
};
Next, let’s create another type declaration file called index.d.ts in the project root:
success: boolean;
message?: string;
data?: any;
}
declare type Optional<T, K extends keyof T> = Omit<T, K> & Partial<Pick<T, K>>;
This creates our global interface for all API responses. It also create an Optional type that we can use for implementing interfaces in our CRUD classes.
Lastly, here is the code for our /login route handler:
import usePost from ‘../hooks/usePost‘;
import useResponse from ‘../hooks/useResponse‘;
import { IUserPublic } from ‘../classes/User.class‘;
interface ILoginRequest {
email: string;
password: string;
}
interface ILoginResponse {
token: string;
user: IUserPublic;
}
const failLoginMessage = ‘Invalid email or password‘;
export default async function routeLogin(request: Request) {
const post = usePost<ILoginRequest>(request);
post.requireParam(‘email‘);
post.requireParam(‘password‘);
const response = useResponse<ILoginResponse>();
try {
const data = await post.getObject();
const user = await User.findByField(‘email‘, data.email);
if (!user) {
return response.error(failLoginMessage, 400);
}
if (!user.comparePassword(data.password)) {
return response.error(failLoginMessage, 400);
}
const deviceId = ‘not-implemented‘; // TODO: Implement device ID based on user agent, etc.
const token = await user.createAccessToken({
device: deviceId,
ipAddress:
request.headers.get(‘CF-Connecting-IP‘) ||
request.headers.get(‘X-Forwarded-For‘) ||
request.headers.get(‘X-Real-IP‘) ||
request.headers.get(‘X-Client-IP‘) ||
request.headers.get(‘X-Host‘) ||
”,
});
const userData = user.exportPublic();
return response.success({
token: token.token,
user: userData,
});
} catch (e: any) {
return response.error(e.message, 400);
}
}
Note, that I’ve created two hooks that we can use in all our route handlers. The first usePost is for processing POST requests:
const body: any = {};
const requiredParams: string[] = [];
const requireParam = (param: string) => {
requiredParams.push(param);
};
const validateParams = () => {
for (const param of requiredParams) {
if (!body[param]) {
throw new Error(`Missing required parameter: ${param}`);
}
}
};
const getObject = async () => {
try {
const json = await request.json();
Object.assign(body, json);
} catch (e) {
throw new Error(‘Invalid JSON Request‘);
}
validateParams();
return body as T;
};
return {
requireParam,
getObject,
};
}
It has a handy method to allow us to assert required params. Feel free to add other cool things like input validation. You could even use a library like Yup as it should run without issue on V8.
And here is the code for our universal response handler:
const success = (data: T) => {
return new Response(
JSON.stringify({
success: true,
data,
}),
{
headers: {
‘Content-Type‘: ‘application/json‘,
},
}
);
};
const error = (message: string, status: number = 400) => {
return new Response(
JSON.stringify({
success: false,
message,
}),
{
status,
headers: {
‘Content-Type‘: ‘application/json‘,
},
}
);
};
return {
success,
error,
};
}
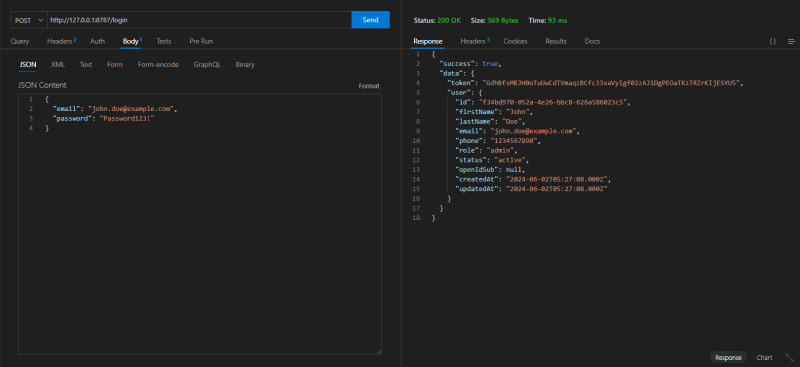
Testing Our API
To fire up our dev server, simply run npx wrangler dev. This creates a server running on port 8787. Now we can run a test on our login endpoint in Postman or VS Code Thunder Client.
Resources
GutHub Repo
CloudFlare Workers Getting Started Guide
CloudFlare D1 Getting Started Guide
Thank you for taking the time to read my article and I hope you found it useful (or at the very least, mildly entertaining). For more great information about web dev, systems administration and cloud computing, please read the Designly Blog. Also, please leave your comments! I love to hear thoughts from my readers.
If you want to support me, please follow me on Spotify!
Also, be sure to check out my new app called Snoozle! It’s an app that generates bedtime stories for kids using AI and it’s completely free to use!
Looking for a web developer? I’m available for hire! To inquire, please fill out a contact form.


