
In software development, continuous integration and continuous deployment (CI/CD) are crucial processes. To simplify this process, I developed Cargo Actions, a command-line tool based on the Rust language, which provides efficient workflow template management and creation functionality for GitHub Actions.
The main functions of Cargo Actions include:
User authentication and login: Securely integrate with GitHub via the OAuth 2.0 protocol, allowing users to log in to Cargo Actions using their GitHub accounts.
Workflow initialization: Support for initializing a workflow from a GitHub repository or template ID, providing a flexible way to integrate GitHub Actions workflows.
Template upload and sharing: Users can upload their own created workflow templates to the Cargo Actions platform and share them with other users.
Personalized template management: Allow users to manage their uploaded and favorite templates, facilitating the quick launch of familiar or commonly used workflow configurations.
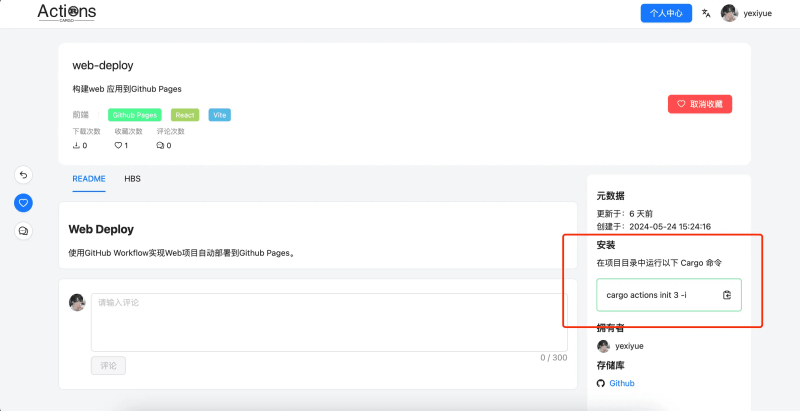
Installation
Run the following command in the terminal:
Usage
Initialization
Create a project using the GitHub repository URL, and you can omit the https://github.com/ prefix. By default, the workflow template in https://github.com/yexiyue/cargo-actions will be used.
Using the abbreviated form, the rule (User/Repo) is:
Using the URL form:
Using the SSH form:
You can also use the workflow on the Cargo Actions platform.
Copy the favorite workflow template to the terminal. For example:
Upload Template
If you want to upload your own workflow to the Cargo Actions platform, please log in first.
Then prepare a workflow template.
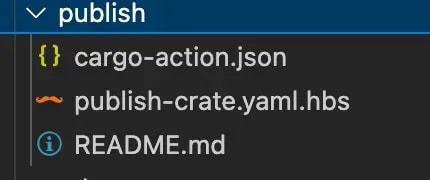
A standard workflow template should have the following files:
cargo-action.json: Configuration file used to prompt the user for input
Template name.yaml.hbs: Template file
README.md (optional)
cargo-action.json configuration field description
Field Name
Type
Description
name
string
Template name
description
string
Short description of the template
path
string
Template file path, default ${name}.yaml.hbs
prompts
Prompt[]
Defines the command-line interactive input items
success_message
string
Success message after template creation
Prompt configuration instructions
There are 4 types of prompts:
type: “input”
Field Name
Type
Description
field
string
Field name (corresponding to the variable name in the template)
prompt
string
Input prompt
default
string
Default value
type: “confirm”
Field Name
Type
Description
field
string
Field name (corresponding to the variable name in the template)
prompt
string
Input prompt
default
bool
Default value
type: “select”
Field Name
Type
Description
field
string
Field name (corresponding to the variable name in the template)
prompt
string
Input prompt
default
number
Index value of the default option
options
{value: any, label: string}[]
Option list, where label is the prompt value and value is the value used in the template at the end
type: “multiselect”
Field Name
Type
Description
field
string
Field name (corresponding to the variable name in the template)
prompt
string
Input prompt
default
number[]
Array of index values of default options
options
{value: any, label: string}[]
Option list, where label is the prompt value and value is the value used in the template at the end
Example:
“name”: “web-deploy”,
“description”: “Build a web application to Github Pages”,
“prompts”: [
{
“type”: “select”,
“field”: “toolchain”,
“prompt”: “Please select a package management tool”,
“default”: 0,
“options”: [
{
“label”: “npm”,
“value”: “npm”
},
{
“label”: “yarn”,
“value”: “yarn”
},
{
“label”: “pnpm”,
“value”: “pnpm”
}
]
},
{
“type”: “confirm”,
“field”: “enable_cache”,
“prompt”: “Enable caching”,
“default”: true
},
{
“type”: “input”,
“field”: “node_version”,
“prompt”: “Please enter the node version number”,
“default”: “node”
},
{
“type”: “input”,
“field”: “folder”,
“prompt”: “Web project path”,
“default”: “.”
},
{
“type”: “input”,
“prompt”: “Build artifact directory (relative to the web project path)”,
“field”: “target_dir”,
“default”: “dist”
},
{
“type”: “confirm”,
“prompt”: “Copy index.html to 404.html to support spa”,
“field”: “copy_index”,
“default”: false
}
]
}
The template file is rendered using handlebars, and the template syntax can be referred to Handlebars (handlebarsjs.com).
Template file example:
runs-on: ubuntu-latest permissions: contents: write concurrency: group:
{{#raw}}${{ github.workflow }}-${{ github.ref }}{{/raw}}
steps: – name: Checkout repository uses: actions/checkout@v4
{{#if (eq toolchain “pnpm”)}}
– name: Install pnpm run: npm install -g pnpm
{{/if}}
– name: Sync node version and setup cache uses: actions/setup-node@v4 with:
node-version: “{{node_version}}“
{{#if enable_cache}}
{{#if (eq toolchain “pnpm”)}}
cache: “{{folder}}/pnpm-lock.yaml”
{{/if}}
{{#if (eq toolchain “npm”)}}
cache: “{{folder}}/package-lock.json”
{{/if}}
{{#if (eq toolchain “yarn”)}}
cache: “{{folder}}/yarn.lock”
{{/if}}
{{/if}}
– name: Install dependencies run: | cd
{{folder}}
{{toolchain}}
install – name: Build run: | cd
{{folder}}
{{toolchain}}
build
{{#if copy_index}}
cp
{{target_dir}}/index.html
{{target_dir}}/404.html
{{/if}}
– name: Deploy uses: peaceiris/actions-gh-pages@v4 with:
{{#raw}}github_token: ${{ secrets.GITHUB_TOKEN }}{{/raw}}
publish_dir:
{{folder}}/{{target_dir}}
Note:
Expressions in {{{{raw}}}} {{{{/raw}}}} will not be escaped.
Before uploading, you can use the check command to verify if the workflow template is working properly.
Then use the upload command to upload the workflow template.
Using the created template
You can quickly use your own created workflow template with the following command, note that you need to log in.
You can also view the workflow template you created in the Cargo Actions platform Personal Center.
Using the favorite template
This command is similar to the mine command, and allows you to select a workflow from the templates you favorited on the Cargo Actions platform for initialization.
View more usage with the following command
Conclusion
If you are interested in Cargo Actions, welcome to visit my GitHub repository for more information.
At the same time, if you find this tool helpful, don’t forget to give it a like! Your support is the driving force for me to continuously update and improve.


