
Making apps that are accessible for everyone can be a challenge for many developers. If we don’t have any real issues using devices or seeing what’s on the display, it can be easy for us to overlook simple things that are really important for those of us who don’t have this luxury. So, we need to continually learn how we can be better at this and how we can leverage the tools we already have to help. In this example, I’ll show you how we can easily make an existing breadcrumb list component more accessible for everyone, with a few directives from the Angular Router Module. Alright, let’s get to it.
The Demo Application
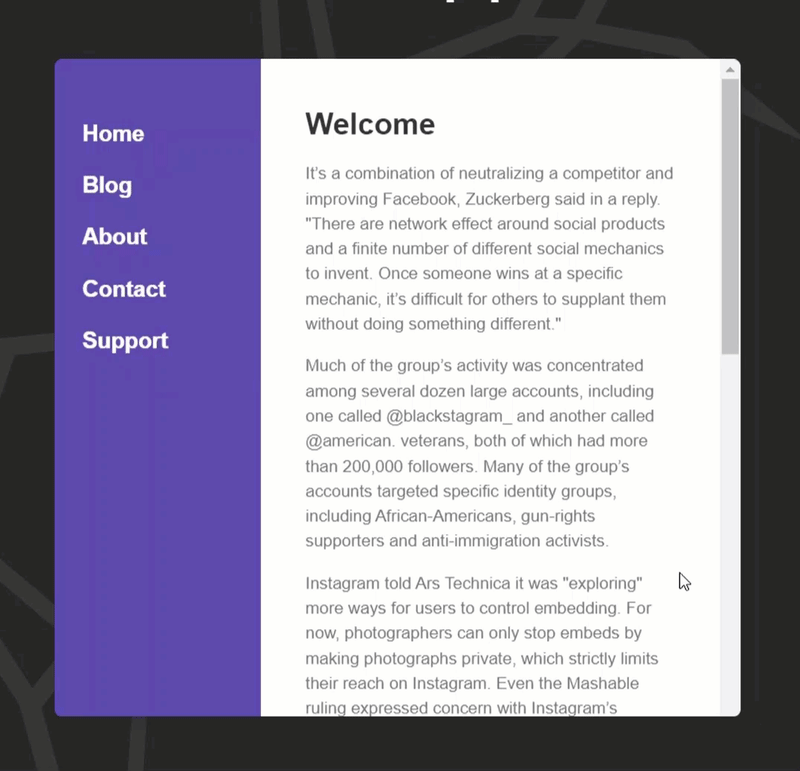
For the example in this tutorial we’ll be using this simple demo application. We have a few different pages that we can navigate to. This app has already been set up with routing so when we click the links in the main nav we properly navigate to the appropriate page.
We also have the breadcrumbs region here at the top of each page.
Well these links are missing some important accessibility features that will make them easier to read and understand for all users, not just those with disabilities.
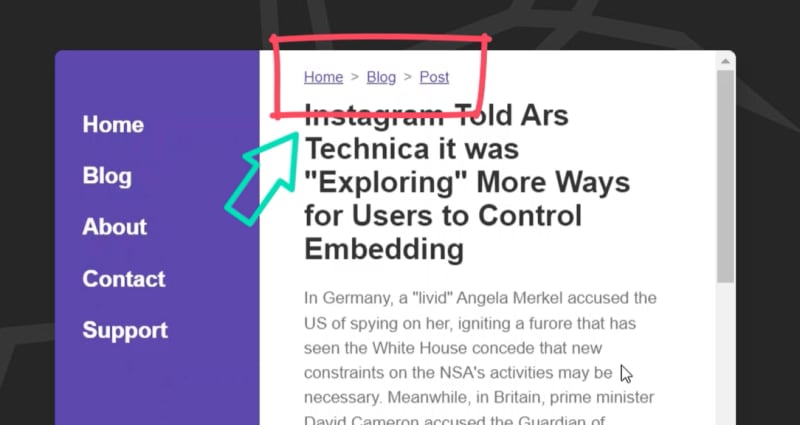
For one, we should probably have a visible style representation for the current page in the breadcrumb list. That way, sighted users will be able to easily understand where they are in the list at a glance.
But for those who won’t be able to see this style, they won’t be able to understand it either. So, we’ll need to add some additional ARIA information to the code.
The good news for us is that this is all pretty easy when using the RouterLink directive which is what we’ll be doing in this example. Ok, let’s look at some code.
The Existing Code
For this app we have several components for the different pages. Let’s take a look at the post component which is what’s used when navigating to an individual blog post.
At the top of the template, we have a breadcrumbs component.
post.component.html
<app-breadcrumbs [breadcrumbs]=“breadcrumbs”></app-breadcrumbs>
…
</app-page-layout>
This component has a “breadcrumbs” input(). Let’s look at how our breadcrumbs are being set.
Ok, here we are creating an array of “Link” objects, each with a label and a path. In this case we have two links for “blog” and “post”.
post.component.ts
{
label: ‘Blog‘,
path: ‘/blog‘
},
{
label: ‘Post‘,
path: ‘/blog/post‘
}
];
Now, we can see these links in our breadcrumbs, but there’s also a “home” link which we’re not including in this array.
Let’s look at the breadcrumbs component to see why. Here in the template, since the home page is the root route for the app, it will always be part of the breadcrumbs so it’s hardcoded in.
breadcrumbs.component.html
<li>
<a [routerLink]=“‘/'”>Home</a><span>></span>
</li>
…
</ul>
Then we have loop where we loop out the links provided from the input(). For these links we can see that they are already configured using the routerLink directive.
…
@for (breadcrumb of breadcrumbs(); track breadcrumb; let last = $last) {
<li>
<a [routerLink]=“breadcrumb.path”>{{ breadcrumb.label }}</a>@if (!last) {<span>></span>}
</li>
}
</ul>
The paths are set with a slash for the home page:
And with the path provided from the input() for dynamic breadcrumbs:
Ok, so that’s how everything is set up currently.
Adding an “active” Class with the routerLinkActive Directive
The first thing we’ll do is add the “active” visual styles to our links when they are active. Since we’re using the routerLink directive, we will be able to add a class for this state pretty easily with the routerLinkActive directive.
This directive will automatically add a class when the link becomes active and will then remove it when it’s no longer active.
Ok, here in the CSS for the breadcrumbs component, I’ve added some styles for the “active” state using an “active” class.
breadcrumbs.component.scss
color: #999;
font-style: italic;
}
This is the class that we’ll need to add dynamically with the routerLinkActive directive. All we need to do to pull this off is switch back to the template, and then add the routerLinkActive directive to our breadcrumb links. This directive takes in an input of one or more strings for the class or classes that it will bind when the link is active, so we’ll give it our “active” class name.
breadcrumbs.component.html
[routerLink]=“breadcrumb.path”
routerLinkActive=“active”>
…
</a>
That’s it.
Well that sort of worked, some styles were applied but they shouldn’t be applying to both the blog and the post link right? They should only apply to the post link since that’s the current page.
Well, this is happening because by default, if the URL is matched at all, even if it’s just a subset of the full URL, like it is in this case, it will be active.
In this case, the blog page path is:
And, the post page path is:
So, the post path contains the blog path too resulting with both links being “active”.
Adding “Active” State for Links Only When They are an “Exact Match” with the routerLinkActiveOptions input
Well this is an easy fix for us. The routerLinkActive directive has an input where we can pass options for the active link. One of the options we can provide will check if the path is an exact match before marking it active.
To add this, we just need to add the routerLinkActiveOptions input to our link. Then we’ll pass it an object with “exact” and we’ll set it to true.
[routerLink]=“breadcrumb.path”
routerLinkActive=“active”
[routerLinkActiveOptions]=“{ exact: true }”>
…
</a>
So now the URL will need to be an exact match for it to be active, it can no longer be a subset of the URL.
So, here’s how it looks now.
Not quite there are we? Now neither link is active.
Well, this is happening because we have a query string on the URL for our post. So we’re never going to get an exact match here.
So, what I’m going to do to fix this is, I’m going to modify the “Link” interface. I’m going to add an optional “exact” property.
link.ts
…
exact?: boolean;
}
Then, let’s go to our breadcrumbs array for the post page. On the post link, I’ll set exact to false.
post.component.ts
…,
{
label: ‘Post‘,
path: ‘/blog/post‘,
exact: false
}
];
Ok, now let’s switch back to the breadcrumbs component. Let’s switch the logic so that if exact is set in the link, it will use the value provided, if not it will be true.
breadcrumbs.component.html
[routerLink]=“breadcrumb.path”
routerLinkActive=“active”
[routerLinkActiveOptions]=“{ exact: breadcrumb.exact ?? true }”>
…
</a>
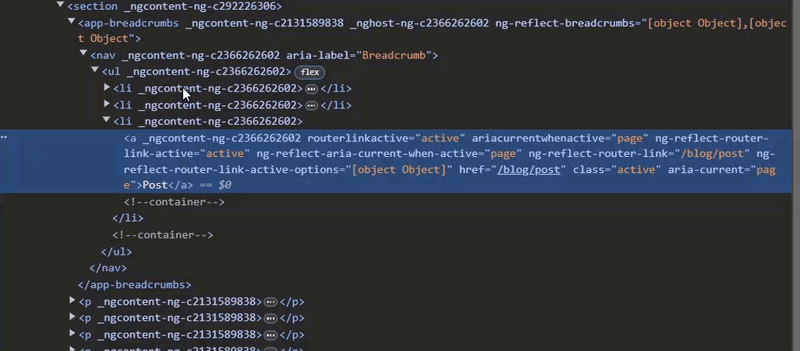
Now, after we save, the “active” class should only be applied to the post link.
And when we navigate around, the other pages should work correctly too.
Ok, so that provides us with a visual state for the active link, but for those who can’t see, the breadcrumbs may be confusing to them. So, in order to fix this, we need to add some additional ARIA information.
Adding ARIA for Enhanced Accessibility
The first thing we need to do really doesn’t have much to do with Angular. We just need to add an aria-label attribute with a value of “Breadcrumb” to the element containing the list of links. This just provides the user with more information around what type of navigation this is.
breadcrumbs.component.html
…
</nav>
Adding the aria-current Attribute with the ariaCurrentWhenActive Input
Ok, the next thing we need to do is add an aria-current attribute with a value of “page” to the current link in the breadcrumbs.
More good news for us, this is really easy with the ariaCurrentWhenActive input for the routerLinkActive directive.
All we need to do is add the input, and then give it a value of “page”. It’s that simple.
[routerLink]=“breadcrumb.path”
routerLinkActive=“active”
[routerLinkActiveOptions]=“{ exact: breadcrumb.exact ?? true }”
ariaCurrentWhenActive=“page”>
…
</a>
Now, after we save, nothing will change visually because all we did was add an aria attribute when the item is active. We’ll need to inspect the code to see this. We should see that the post link now correctly has an aria-current attribute. And, if we look at the other links, we should not see this attribute applied
Conclusion
So, sometimes we need to add both visual and non-visual feedback for our users to make it all make sense for everyone. The good news is that the Angular team is continually working on ways to make this easy for us by adding the things we need right into the framework. And that’s a really good thing for everyone, but it is our job to make sure that we are thinking about this and doing our part. And I hope this example helps you do exactly that!
Want to See It in Action?
Check out the demo code and examples of these techniques in the in the Stackblitz example below. If you have any questions or thoughts, don’t hesitate to leave a comment.
Found This Helpful?
If you found this article helpful and want to show some love, you can always buy me a coffee!


