

Introduction
By default, people don’t like to think too much about security while developing a software project or testing a infrastructure new cool tool.
That’s nothing wrong about it while you are developing that personal project you think will change your and humanity future, but when it’s time to put in to production and face the real world, it must be changed.
In my current job, our team tries to always focus in the “what could go wrong” approach, and add security as much as we can. One of the things we are using for a good while was access control using Service Principals (with the Client ID/Client Secret pair), and this could be considered good enough to the vast majority of the cases, right ?
In our case, it started to become a nightmare, since:
We manage everything as code (thanks Hashicorp for almighty terraform)
Our secrets are rotated every 90 days, and
Some applications relies on the client secret at runtime to authenticate to other managed services (e.g. DocumentDB’s, etc)
So, every time we need to rotate these credentials, we need to coordinate the action with the engineering teams, in order to ensure the applications receive a fresh secret and continue to work as intended.
How can we solve it you can ask me ? Well, some approaches we considered:
Instrument the applications with a /refresh endpoint, in order to when a secret got rotated this endpoint can be called:
Or configure a “cron” which calls this endpoint time to time in order to ensure we always have the current version of the secret available. The problem with this is it would introduce a overhead in the application and besides it, if we use a client secret to authenticate against the KeyVault, when it got rotated, this permissions vanishes too.
Use Workload Identities: This bring us two advantages in comparison with client_id/client_secrets:
First, we don’t need to have the current version of the current client secret anymore (yes, we still use client secrets in other parts of our infra, but this are not the topic here)
Second, we don’t need to store a sensitive value as a secret on the cluster anymore. When the application starts, it requests a token and using this token it tries to authenticates against all services it needs to work, if the user identity has permissions on the services, all good, access granted, application up and running.
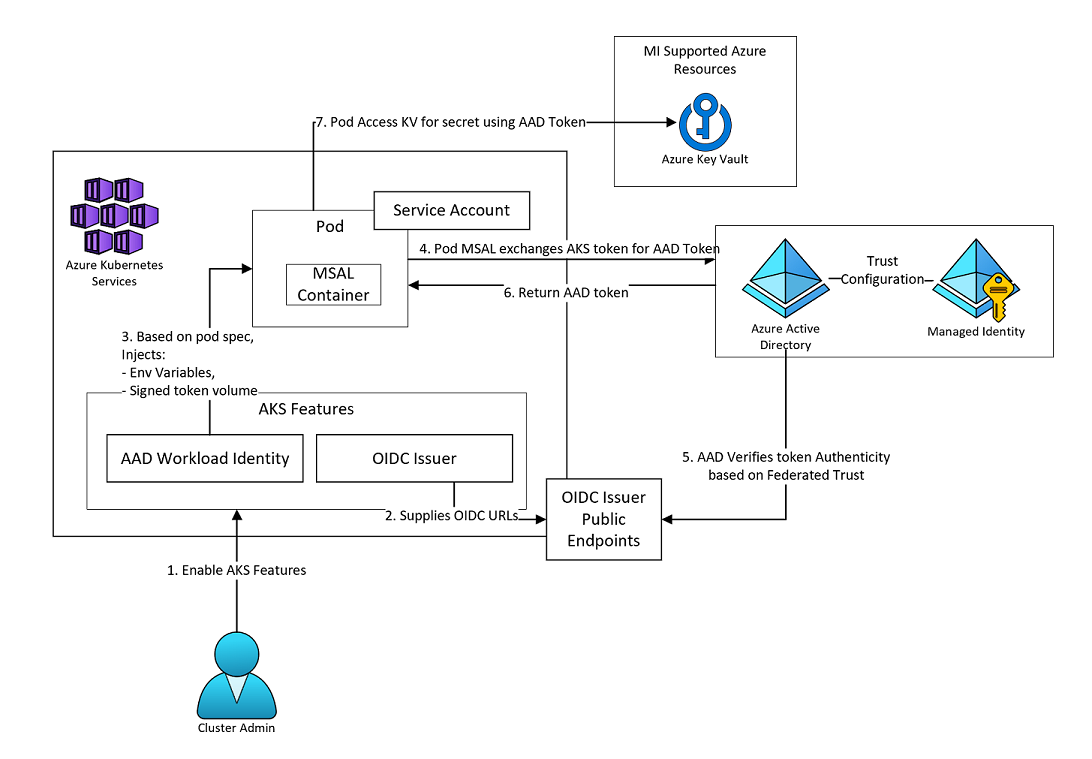
In a nutshell, it works like this:
Source of image: https://azure.github.io/AKS-DevSecOps-Workshop/assets/images/module1/diagram.png
Or in a different view, like this:
Source of image: https://learn.microsoft.com/en-us/azure/aks/media/workload-identity-overview/aks-workload-identity-model.png#lightbox
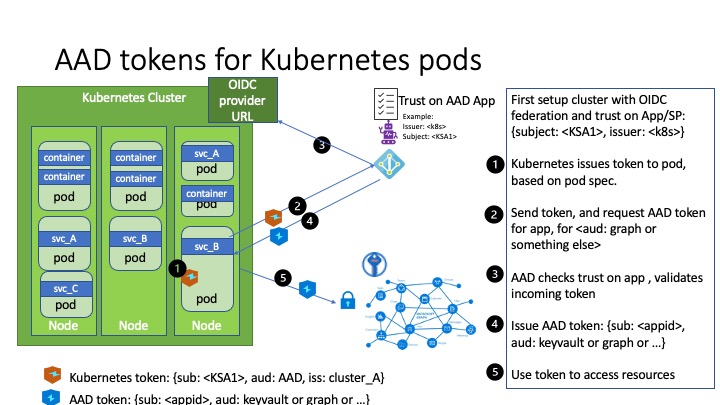
Or like this, in a more detailed view “inside” the cluster:
Source of image: https://azure.github.io/azure-workload-identity/docs/images/flow-diagram.png
While looking for documentation, I start to (naively) think “Wow, this will be a walk in the park” since I found a guide which looks very complete and also a lab guide, part of a AKS DevSecOps workshop, both provided by Microsoft.
I also found this post from an Azure MVP and started to think “how difficult it would be, since it’s so well documented?” and, oh boy, I couldn’t be more wrong. Buckle up and follow me!
What they don’t tell you
I had a hard time to make this work while ensuring I do not break my existing cluster in the process (yes, its a QA cluster, but I care about it anyway). So, I decided to compile a list of things the guides do not mention as prerequisites, to help you to not have the same issues I had while testing this thing. Here it goes:
Basic informations:
I’m using terraform to deploy everything I used in this article
The cluster is running Kubernetes v1.29.4
I’m using service principals
Other pre-requisites (those are mentioned on the guides linked before):
Your AKS cluster must have OIDC and Workload Identities enabled
If your cluster was created without those, it can be updated to have this capabilities, issue a az aks update –resource-group <YOUR RG NAME> –name <YOUR AKS CLUSTER NAME> –enable-oidc-issuer –enable-workload-identity and you should be good to go after it completes.
What are not mentioned and I discovered in the hard way during my implementation:
The user identities which will be federated to your service principal/app registration must be created at the same resource group of your AKS cluster (at least, this was the only way I managed to make this thing work, after days of research and tests).
The user identities will be the ones with the permissions from now one on the target resources (e.g. a Keyvault or a Database), instead of your Service Principal.
You MUST install this helm chart in order to use the Workload Identities.
And here I need to make a personal note: Remember I mentioned here we are trying to do the things in the most secure way possible ? Well, we are running Kyverno on our clusters, and one of the policies we are using, prevent a service account to be created if it don’t have the automountServiceAccountToken parameter set to false. After this policy in place, every time you need to use a service account on your workloads, and need to consume their credentials (token/certificates) mounted on the pods, you explicitly need to set this very same automountServiceAccountToken parameter to true inside your deployments.
The official helm chart linked above do not cover this scenario, so I pushed an PR to extend the helm chart to have it in place, lets see if the good folks from MS review and approve it 🙂
How we deployed it ?
In this part, I will only show the TF code I added on top of our existing code, so I’m assuming you already have your infrastructure up and running (at least on the basic level).
Here goes the TF code I used to deploy this thing on our infrastructure.
Workload Identity Webhook
resource “helm_release” “aad_workload_identity_webhook” {
name = “workload-identity-webhook”
chart = “./helm_charts/azure-workload-identity-webhook”
namespace = “azure-workload-identity-system”
create_namespace = true
set {
name = “azureTenantID”
value = var.tenant_id
}
}
Remember, in my case I had to do changes on the helm chart in order to be able to install it while complying with our admission control policies, if you want to use the default helm chart, your code would be something like this:
resource “helm_release” “aad_workload_identity_webhook” {
name = “workload-identity-webhook”
repository = “https://azure.github.io/azure-workload-identity/charts”
chart = “workload-identity-webhook”
namespace = “azure-workload-identity-system”
create_namespace = true
set {
name = “azureTenantID”
value = var.tenant_id
}
}
User assigned identity
location = data.azurerm_resource_group.myqacluster.location
name = “qa-cluster-aad-user-identity-for-applications”
resource_group_name = data.azurerm_resource_group.myqacluster.name
}
Service account
metadata {
name = “qa-cluster-app1-sa”
namespace = “test-namespace”
annotations = {
“azure.workload.identity/client-id” = azurerm_user_assigned_identity.user_identity_qa_cluster.client_id # Here we need to set the client ID of our User Assigned Identity created above
}
labels = {
“azure.workload.identity/use” = “true”
}
}
automount_service_account_token = false # Do not mount the token in the pods if not explicit set
depends_on = [
azurerm_user_assigned_identity.user_identity_qa_cluster
]
}
Federated identity credential
name = “qa-cluster-app1-federated-identity”
resource_group_name = data.azurerm_resource_group.myqacluster.name
audience = [“api://AzureADTokenExchange”]
issuer = data.azurerm_kubernetes_cluster.myqacluster.oidc_issuer_url
parent_id = azurerm_user_assigned_identity.user_identity_qa_cluster.id
subject = “system:serviceaccount:test-namespace:qa-cluster-app1-sa”
depends_on = [
azurerm_user_assigned_identity.user_identity_qa_cluster,
kubernetes_service_account.service_account_qa_cluster
]
}
This cover the basics, however, we still need to give permissions to the resources where the user identity will connect to, in this example lets give permissions to it be able to fetch secrets from a Azure Key Vault:
resource “azurerm_key_vault_access_policy” “aks_permissions_app1_qa_cluster” {
key_vault_id = data.azurerm_key_vault.mykeyvault.id
tenant_id = data.azurerm_subscription.mysubscription.tenant_id
object_id = azurerm_user_assigned_identity.user_identity_qa_cluster.principal_id
secret_permissions = [
“Get”,
“List”
]
depends_on = [
azurerm_user_assigned_identity.user_identity_qa_cluster
]
}
Testing it
To test it, you can deploy a example application, like showed on the Lab guide linked at the beginning of this article, something like:
apiVersion: v1
kind: Pod
metadata:
name: quick-start-test-workload-identities
namespace: test-namespace
labels:
azure.workload.identity/use: “true”
spec:
serviceAccountName: qa-cluster-app1-sa
automountServiceAccountToken: true
containers:
– image: ghcr.io/azure/azure-workload-identity/msal-net
name: oidc
env:
– name: KEYVAULT_URL
value: https://my-kevault-address.vault.azure.net/
– name: SECRET_NAME
value: testsecret
EOF
When the pod starts, you should see something like this in the logs:
Conclusion
Hopefully this aggregated steps will save you a day (or two) while deploying this thing!


