
Are you tired of always using ChatGPT and curious about how to build your own language model? Well, you’re in the right place! Today, we’re going to create GPT-2 , a powerful language model developed by OpenAI, from scratch that can generate human-like text by predicting the next word in a sequence.
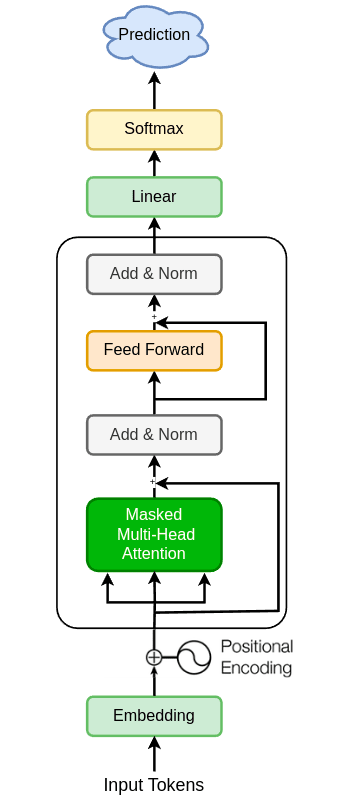
To dive deeper into the theory and architecture of GPT-2, I highly recommend reading The Illustrated GPT-2 by Jay Alammar. This article provides an excellent visual and intuitive explanation of GPT-2 and its inner workings. I’ll be referring to some of the visuals from the article to explain things better.
I have tried to make this as simpler as possible. Anyone with any level of Python or machine learning can follow along and build the model.
Resources
This project will take you through all the steps for building a simple GPT-2 model and train on bunch of Taylor Swift and Ed Sheeran songs. We’ll see what it will come up at the end :).
The dataset and source codes for this article will be available in Github.
I’ll also add a Jupyter Notebook which replicates this article so you can follow along with running code and understanding side-by-side.
Building GPT-2 Architecture
We will take this project step-by-step by continuously improving a bare-bone model and adding layers based on the original GPT-2 implementation.
Here are the steps we will follow:
Building a custom Tokenizer
Building a Data Loader
Train a simple language model
Implement GPT-2 architecture (part 2) 🔗
This project is divided into two parts, the first one goes through the basics of language modelling and Part 2 jumps straight into GPT-2 implementation. I suggest you to follow along with the article and build it yourself which makes learning GPT-2 more interesting and fun.
Note: This whole project will be done in a single python file so it will be easy for you to follow along block by block.
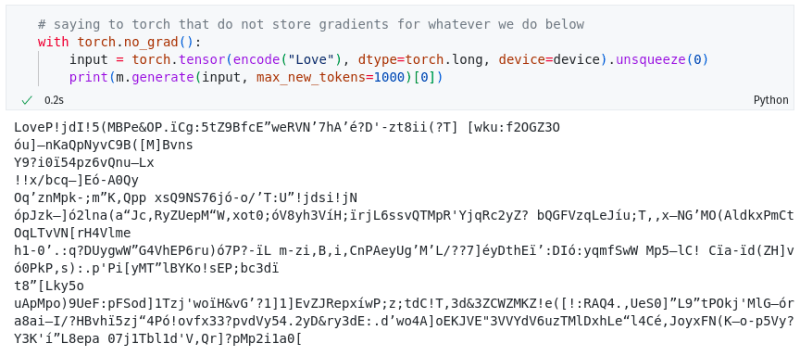
Final Model:
Final Model output:
I wish you would call
Oh-oh,
I’ll be a lot of everyone
I just walked
You’re sorry”Your standing in love out,
And something would wait forever bring ‘Don’t you think about the story
If you’re perfectly
I want your beautiful
You had sneak for you make me
This ain’t think that it wanted you this enough for lonely thing
It’s a duchess and I did nothin’ home was no head
Oh, but you left me
Was all the less pair of the applause
Honey, he owns me now
But’ve looks for us?”
If I see you’ll be alright
You understand, a out of the
Wait for me I can’t call
Everything
Oh, no words don’t read about me
You should’ve been so
You’re doing what you so tired,
If you, you got perfect fall
Like the song? Then let’s get building..
1. Building a custom Tokenizer
Language models don’t see text like us. Instead they recognize sequence of numbers as tokens of specific text. So, the first step is to import our data and build our own character level Tokenizer.
text = open(data_dir, ‘r’).read() # load all the data as simple string
# Get all unique characters in the text as vocabulary
chars = list(set(text))
vocab_size = len(chars)
Example:
If you see the output above, we have a list of all unique characters extracted from the text data in the initialization process. Character tokenization is basically using the index position of characters from the vocabulary and mapping it to corresponding character in the input text.
chr_to_idx = {c:i for i, c in enumerate(chars)}
idx_to_chr = {i:c for i, c in enumerate(chars)}
def encode(input_text: str) -> list[int]:
return [chr_to_idx[t] for t in input_text]
def decode(input_tokens: list[int]) -> str:
return “”.join([idx_to_chr[i] for i in input_tokens])
Example:
Convert our text data into tokens:
Installation:
import torch
# use cpu or gpu based on your system
device = “cpu”
if torch.cuda.is_available():
device = “cuda”
# convert our text data into tokenized tensor
data = torch.tensor(encode(text), dtyppe=torch.long, device=device)
Now, we have the tokenized tensor data where each characters in the text is converted to the respective tokens.
So far:
data_dir = “data.txt”
text = open(data_dir, ‘r’).read() # load all the data as simple string
# Get all unique characters in the text as vocabulary
chars = list(set(text))
vocab_size = len(chars)
# build the character level tokenizer
chr_to_idx = {c:i for i, c in enumerate(chars)}
idx_to_chr = {i:c for i, c in enumerate(chars)}
def encode(input_text: str) -> list[int]:
return [chr_to_idx[t] for t in input_text]
def decode(input_tokens: list[int]) -> str:
return “”.join([idx_to_chr[i] for i in input_tokens])
# convert our text data into tokenized tensor
data = torch.tensor(encode(text), dtyppe=torch.long, device=device)
2. Building a Data Loader
Now, before building our model, we have to define how we are going to feed the data into the model for training and what the data looks like in terms of dimensions and batch size.
Let’s define our data loader as below:
eval_batch_size = 8 # evaluation batch size
context_length = 256 # number of tokens processed in a single batch
train_split = 0.8 # percentage of data to use from total data for training
# split data into trian and eval
n_data = len(data)
train_data = data[:int(n_data * train_split)]
eval_data = data[int(n_data * train_split):]
class DataLoader:
def __init__(self, tokens, batch_size, context_length) -> None:
self.tokens = tokens
self.batch_size = batch_size
self.context_length = context_length
self.current_position = 0
def get_batch(self) -> torch.tensor:
b, c = self.batch_size, self.context_length
start_pos = self.current_position
end_pos = self.current_position + b * c + 1
# if the batch exceeds total length, get the data till last token
# and take remaining from starting token to avoid always excluding some data
add_data = -1 # n, if length exceeds and we need `n` additional tokens from start
if end_pos > len(self.tokens):
add_data = end_pos – len(self.tokens) – 1
end_pos = len(self.tokens) – 1
d = self.tokens[start_pos:end_pos]
if add_data != -1:
d = torch.cat([d, self.tokens[:add_data]])
x = (d[:-1]).view(b, c) # inputs
y = (d[1:]).view(b, c) # targets
self.current_position += b * c # set the next position
return x, y
train_loader = DataLoader(train_data, train_batch_size, context_length)
eval_loader = DataLoader(eval_data, eval_batch_size, context_length)
Example:
Now we have our own customized data loader for both training and evaluation. The loader has a get_batch function which returns batches of batch_size * context_length.
If you are wondering why x is from start to end and y is from start+1 to end+1, it’s because the main task for this model will be to predict next sequence given the previous. So there will be an extra token in y for it to predict the (n+1) token given last n tokens of x. If it sounds complicated look at the below visual:
3. Train a simple language model
Now we are ready to build and train a simple language model using the data we have just loaded.
For this section, we will keep it very simple and implement a simple Bi-Gram Model where given the last token predict the next token. As you can see below we will be using just the Embedding layer while ignoring the main decoder block.
An Embedding layer represents n = d_model unique properties of all the characters in our vocabulary and based on which the layer pops out the property using the token index or in our case the index of our character in the vocabulary.
You will be amazed how well the model will behave just by using the Embeddings. And we will be improving the model step by step by adding more layers, so sit tight and follow along.
Initialization:
d_model = vocab_size
The embedding dimension or d_model is vocab_size currently because the final output has to map to the logits for each character in vocab to calculate their probabilities. Later on we will introduce a Linear layer which will map d_model to vocab_size and then we can have a custom embedding_dimension.
Model:
import torch.nn.functional as F
class GPT(nn.Module):
def __init__(self, vocab_size, d_model):
super().__init__()
self.wte = nn.Embedding(vocab_size, d_model) # word token embeddings
def forward(self, inputs, targets = None):
logits = self.wte(inputs) # dim -> batch_size, sequence_length, d_model
loss = None
if targets != None:
batch_size, sequence_length, d_model = logits.shape
# to calculate loss for all token embeddings in a batch
# kind of a requirement for cross_entropy
logits = logits.view(batch_size * sequence_length, d_model)
targets = targets.view(batch_size * sequence_length)
loss = F.cross_entropy(logits, targets)
return logits, loss
def generate(self, inputs, max_new_tokens):
# this will store the model outputs along with the initial input sequence
# make a copy so that it doesn’t interfare with model
for _ in range(max_new_tokens):
# we only pass targets on training to calculate loss
logits, _ = self(inputs)
# for all the batches, get the embeds for last predicted sequence
logits = logits[:, -1, :]
probs = F.softmax(logits, dim=1)
# get the probable token based on the input probs
idx_next = torch.multinomial(probs, num_samples=1)
inputs = torch.cat([inputs, idx_next], dim=1)
# as the inputs has all model outputs + initial inputs, we can use it as final output
return inputs
m = GPT(vocab_size=vocab_size, d_model=d_model).to(device)
We have now successfully defined our model with just one Embedding layer and Softmax for token generation. Let’s see how our model behaves when given some input characters.
😄 Pretty interesting!! But we are not quite there yet.
Now the final step is to train our model and give it some knowledge about the characters. Let’s setup our optimizer. We will use a simple AdamW optimizer for now with 0.001 learning rate. We will go through improving the optimization in later sections.
optim = torch.optim.AdamW(m.parameters(), lr=lr)
Below is a very simple training loop.
eval_steps = 1000 # perform evaluation in every n steps
for ep in range(epochs):
xb, yb = train_loader.get_batch()
logits, loss = m(xb, yb)
optim.zero_grad(set_to_none=True)
loss.backward()
optim.step()
if ep % eval_steps == 0 or ep == epochs-1:
m.eval()
with torch.no_grad():
xvb, yvb = eval_loader.get_batch()
_, e_loss = m(xvb, yvb)
print(f”Epoch: {ep}tlr: {lr}ttrain_loss: {loss}teval_loss: {e_loss}”)
m.train() # back to training mode
Let’s run:
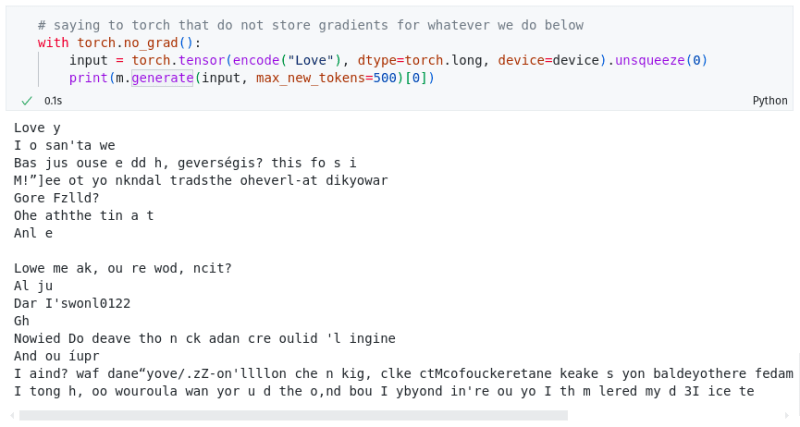
So we got a pretty good loss result. But we are not there yet. As you can see, the error decreased by a higher amount until epoch 2000 and not much improvements afterwards. It’s because the model doesn’t yet have much brain power (or layers/neural networks) and it’s just comparing embedding of one character with another.
The output now looks like below:
😮 OK!! Not very pleasing but definitely some improvements than the first generation which was without any training (Obviously). The model is starting to know how the songs are formatted and the lines and everything which is pretty impressive.
Now, as this article is getting too longer, I will add rest of the sections in the Part 2 below:
Build and Train GPT-2 (Part 2)
Thanks for reading the article. I hope you learned something new. If you have any questions/feedback, feel free to leave a comment.
References
Automatic Arabic Poem Generation with GPT-2 — Scientific Figure on ResearchGate. Available from: https://www.researchgate.net/figure/GPT-2-architecture-Heilbron-et-al-2019_fig1_358654229
*Alammar, J (2018). The Illustrated GPT-2 [Blog post]. Retrieved from *https://jalammar.github.io/illustrated-gpt2/


