
Introduction
Hashicorp Nomad is a workload orchestrator to deploy and manage applications across large clusters of servers. Nomad is a single binary application which can run in both server and client modes. The server manages the cluster state and applications are deployed in the client machine.
Nomad support running various type of deployments using docker, binary files, java jar files, and Linux VMs using QEMU driver.
This article demonstrates step-by-step process to build a Nomad cluster on Vultr. You can copy-paste the code and configurations present here to build an identical cluster in Vultr.
Prerequisites
Before you begin, you must have basic knowledge of Linux and Vultr services.
Vultr VPC 2.0
Vultr Startup Script
Vultr Load Balancer
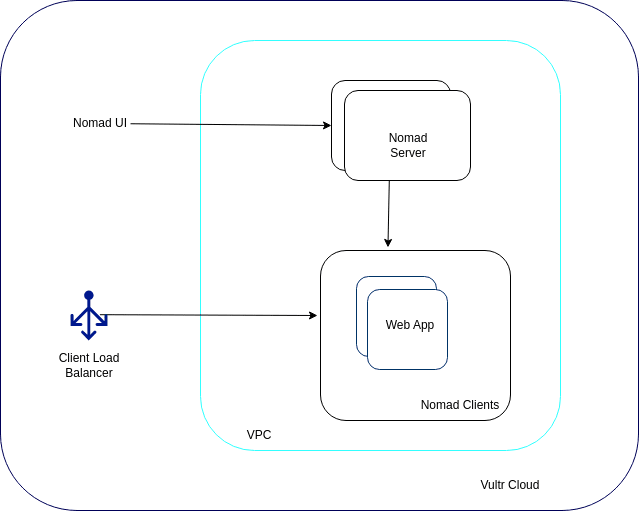
Example Nomad Cluster
The cluster consists of one Nomad server operating in a VM and three Nomad clients, each running on separate VMs, all forming a single compute plane. After deployment, the server will be accessible in the public IP on port 4646. To access client application, a load balancer will be attached to all clients on port 80. The entire cluster is located inside a VPC with a private IP range.
Set Up VPC 2.0
Open the Vultr Customer Portal
Navigate to Network and click VPC 2.0 on the main navigation menu.
Choose Add VPC 2.0 Network
Select a location.
Configure an IP range in the VPC, for example, 10.1.0.0/20.
Name the VPC 2.0 and click Add Network
This creates a vultr VPC 2.0 where the Nomad cluster will be deployed.
How to use Startup Script to Install Nomad and Docker
The bash script given below install Hashicorp Nomad and Docker in a Ubuntu VM.
A startup Script in Vultr allows the script to reuse by multiple VMs.
set -e
# Disable interactive apt prompts
export DEBIAN_FRONTEND=noninteractive
NOMAD_VERSION=“${NOMAD_VERSION:-1.7.3}“
# Update packages
sudo apt-get -y update
# Install software-properties-common
sudo apt-get install -y software-properties-common
# Add HashiCorp GPG key
curl -fsSL https://apt.releases.hashicorp.com/gpg | sudo apt-key add –
# Add HashiCorp repository
sudo apt-add-repository “deb [arch=amd64] https://apt.releases.hashicorp.com $(lsb_release -cs) main”
# Update packages again
sudo apt-get -y update
# Install Nomad
sudo apt-get install -y nomad=“${NOMAD_VERSION}“-1
# Disable the firewall
sudo ufw disable || echo “ufw not installed”
# Install Docker and associated dependencies
sudo apt-get -y update
sudo apt-get -y install
ca-certificates
curl
gnupg
# Add Docker’s official GPG key
sudo install -m 0755 -d /etc/apt/keyrings
curl -fsSL https://download.docker.com/linux/ubuntu/gpg | sudo gpg –dearmor -o /etc/apt/keyrings/docker.gpg
sudo chmod a+r /etc/apt/keyrings/docker.gpg
echo
“deb [arch=”$(dpkg –print-architecture)” signed-by=/etc/apt/keyrings/docker.gpg] https://download.docker.com/linux/ubuntu
“$(. /etc/os-release && echo “$VERSION_CODENAME“)” stable” |
sudo tee /etc/apt/sources.list.d/docker.list >/dev/null
sudo apt-get -y update
# Install Docker and required packages
sudo apt-get -y install docker-ce docker-ce-cli containerd.io docker-buildx-plugin docker-compose-plugin
# Create daemon.json if it doesn’t exist
if [ ! -f /etc/docker/daemon.json ]; then
sudo touch /etc/docker/daemon.json
fi
# Restart Docker
sudo systemctl restart docker
# Add the current user to the docker group
sudo usermod -aG docker ubuntu
Open the Vultr Customer Portal
Navigate to Orchestration and click Scripts on the main navigation menu.
Choose Add Startup Script
Give the script a name and choose Type as Boot
Copy the above given bash script and paste it in the Script location
Click Add Script
This creates a Vultr startup script that can be used to deploy multiple VMs.
Nomad server User Data
Nomad uses a config file to run the server with its required configuration. The default file location is /etc/nomad.d/nomad.hcl. The bash script shown below will add the Nomad server configuration to the config file and run the server as a systemd service.
set -Eeuo pipefail
# Add Nomad client configuration to /etc/nomad.d/ folder
cat <<EOF >/etc/nomad.d/nomad.hcl
datacenter = “dc1”
data_dir = “/opt/nomad/data”
bind_addr = “0.0.0.0”
log_level = “INFO”
advertise {
http = “{{ GetInterfaceIP “enp8s0“ }}”
rpc = “{{ GetInterfaceIP “enp8s0“ }}”
serf = “{{ GetInterfaceIP “enp8s0“ }}”
}
server {
enabled = true
bootstrap_expect = “1”
encrypt = “z8geXx7U+JPk6u/vlBRDhh81h5W12AXBN+7AUo5eXMI=”
server_join {
retry_join = [“127.0.0.1”]
}
}
acl {
enabled = false
}
EOF
sudo systemctl enable –now nomad
sudo systemctl restart nomad
The Vultr Cloud-Init User-Data is a script that can be used to launch the server when it is booted for the first time.
Add the script to the Cloud-Init User-Data during the server launch.
Deploying Nomad server
Open the Vultr Customer Portal
Navigate to Compute on the main navigation menu.
Choose Deploy Server
Select the Type of Server
Select Location same as VPC
Select Ubuntu 22.04 LTS as the Operating System
Select a Plan
In the Additional Features section select Virtual Private Cloud 2.0 and Cloud-Init User-Data
Copy the Nomad server User Data from the previous section and add it in the user data input section
Select the VPC name created in the previous section
In the Server Settings section, choose the nomad-startup-script created.
Add Server Hostname & Label
Click Deploy Now to launch the Nomad server
The Nomad server is now deployed in the VPC.
Fetching the Private IP of Nomad server
To connect Nomad client with server, the private IP of Nomad server is required.
Select VPC 2.0 in the navigation menu and click the VPC ID
Note down the private IP of the Nomad server from the Attached Nodes
Nomad client User Data
The given bash script run a Nomad client as a systemd service along with its configuration during a server boot. Update the private IP of the Nomad server in the server_join block as shown below to make the script connect with the server.
Add the modified script to the Cloud-Init User-Data during the server launch.
set -Eeuo pipefail
# Add Nomad server configuration to /etc/nomad.d/ folder
cat <<EOF >/etc/nomad.d/nomad.hcl
datacenter = “dc1”
data_dir = “/opt/nomad/data”
bind_addr = “0.0.0.0”
log_level = “INFO”
# add nomad advertise address
advertise {
http = “{{ GetInterfaceIP “enp8s0“ }}”
rpc = “{{ GetInterfaceIP “enp8s0“ }}”
serf = “{{ GetInterfaceIP “enp8s0“ }}”
}
# Enable the client
client {
enabled = true
options {
“driver.raw_exec.enable” = “1”
“docker.privileged.enabled” = “true”
}
# Configure the server_join option
server_join {
retry_join = [ “10.1.0.3” ]
}
# Configure the network interface
network_interface = “enp8s0”
}
# Enable the docker plugin
plugin “docker” {
config {
endpoint = “unix:///var/run/docker.sock”
volumes {
enabled = true
selinuxlabel = “z”
}
allow_privileged = true
}
}
EOF
# Enables nomad systemd service
sudo systemctl enable –now nomad
# Runs nomad service
sudo systemctl restart nomad
Deploying Nomad clients
Open the Vultr Customer Portal
Navigate to Compute on the main navigation menu.
Choose Deploy Server
Select the Type of Server
Select Location same as VPC
Select Ubuntu 22.04 LTS as the Operating System
Select a Plan
In the Additional Features section select Virtual Private Cloud 2.0 and Cloud-Init User-Data
Copy the Nomad client User Data from the previous section and add it in the user data input section
Select the VPC name created in the previous section
In the Server Settings section, choose the nomad-startup-script created.
Increase the Server Qty to 3
Add Server Hostname & Label for each server
Click Deploy Now to launch all 3 Nomad clients
After both the server and clients are deployed in the VPC, a cluster is formed between the server and clients with the help of the server_join configuration in Nomad.
Accessing Nomad UI
Fetch the public IP of Nomad server from Vultr UI and browse http://public-ip:4646. The Nomad UI is accessible on port 4646, as shown in the screenshot below.
Navigate to the Clients and Server page in sidebar to view connected clients and servers.
Nomad server
Nomad clients
Attach Vultr Load Balancer to Nomad Clients
Open the Vultr Customer Portal
Select Load Balancers on the main navigation menu and select Add Load Balancer option.
Select the same location as the VPC 2.0
Use the default Load Balancer Configuration and Forwarding Rules
Select the VPC Network created in the previous section
Choose Add Load Balancer
After the Load Balancer is created, add the nomad clients as targets.
You have attached a Load Balancer to the Nomad clients.
Deploying Sample Web Application
You can deploy web application in a Nomad cluster using Nomad Job files. A Job file must include a .nomad extension written in the HCL (Hashicorp configuration language).
A sample nomad job file is shown below, which deploys a web api on the Nomad cluster.
The api is deployed on port 80 and uses a docker image called traefik/whoami, which returns the client IP address and port number when invoked.
datacenters = [“dc1”]
type = “service”
group “webapp” {
count = 3
network {
mode = “host”
port “http” {
to = 80
static = 80
}
}
task “server” {
env {
WHOAMI_PORT_NUMBER = “${NOMAD_PORT_http}”
}
driver = “docker”
config {
image = “traefik/whoami”
ports = [“http”]
}
}
}
}
Open Nomad UI
Navigate to Jobs and select Run Job
Add the above job file in text input and click Plan
Click Run
After the job is in running state, Open the browser and navigate to load balancer IP on port 80, and you can see the response from the application container. Refresh the page to see the load balancer in action.
Conclusion
You have created a Nomad cluster in the VPC and deployed a web application with load balancer. You can now access the Nomad UI and deploy various applications on it.
More Information
For more information, please see:


