
To ensure that only authorized users can access specific features and data within an application, implementing Role-Based Access Control (RBAC) is essential.
In this article, I will show you how to implement RBAC into a Node.js and Express application using Permify.
Table Of Contents
Setting Up Node.js Express Project
Implementing RBAC in Node.js and Express App
Step 1: Designing the RBAC Model With Permify
Step 2: Setting Up a Permify Local Server with Docker
Step 3: Initialize Permify Node.js Client
Step 4: Configure Authorization Model
Step 5: Creating Access Control Middleware
Step 6: Securing Routes with RBAC
Testing RBAC Implementation
Conclusion
Setting Up Node.js Express Project
To quickly create an application skeleton for your Express.js project, you can use the express-generator tool.
Follow these steps to get started:
Step 1. Install express-generator:
If you’re using Node.js version 8.2.0 or later, you can run the application generator using the npx command:
For earlier Node versions, you can install the application generator as a global npm package:
Step 2. Generate Your Express Application:
Once you have express-generator installed, you can create your Express application. Display the command options with the -h option:
This will show you the available options for generating your Express application.
For example, to create an Express app named permify-rbac-app with the Pug view engine, you can run:
This command will create a folder named permify-rbac-app in the current working directory, along with the necessary files and folders for your Express application.
Step 3. Install Dependencies:
Navigate into your newly created Express application directory:
Then, install the project dependencies using npm:
Step 4. Start Your Express Application:
On MacOS or Linux, you can start the app with the following command:
Step 5. Access Your Application:
Once your Express application is running, you can access it in your browser at http://localhost:3000/.
Directory Structure:
The generated Express application will have the following directory structure:
├── app.js
├── bin/
│ └── www
├── package.json
├── public/
│ ├── images/
│ ├── javascripts/
│ └── stylesheets/
│ └── style.css
├── routes/
│ ├── index.js
│ └── users.js
└── views/
├── error.pug
├── index.pug
└── layout.pug
This structure includes the main application file (app.js), the server configuration (bin/www), routes, views, public assets, and the package.json file with project dependencies.
Now that you have set up our Express.js project, we’ll proceed to implement RBAC to our Express application.
Implementing RBAC in Node.js and Express
Implementing Role-Based Access Control (RBAC) in a Node.js and Express application involves several steps. Here’s a basic implementation:
Step 1: Designing the RBAC Model with Permify
Permify is an open source authorization service that allows developers to create authorization systems. With Permify you can model your authorization, create central authorization service in your environment and perform access checks from your applications and services.
It does this by providing client SDKs, which you can add into your middleware to send authorization requests, such as access check.
Permify offers a powerful domain-specific language (DSL) to define roles, permissions, and relationships. You can utilize the Permify Playground to experiment and visualize your RBAC model.
For this post, we will develop a simple file-based authorization system where users within your organization can access documents based on their roles.
Different roles such as Admin, Manager, and Employee may have different levels of access to view, edit, or delete files.
Defining Roles and Permissions with Permify DSL
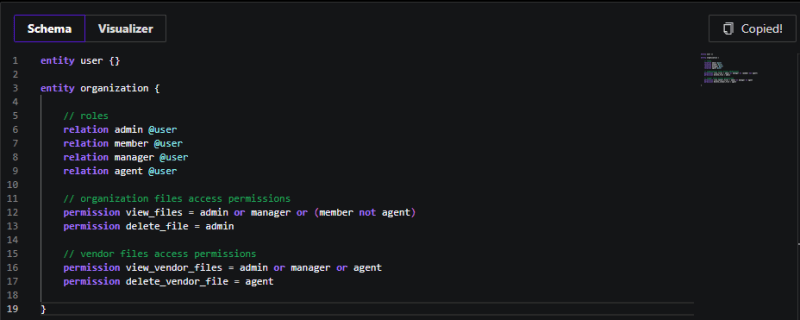
Below is an example Permify DSL schema for our RBAC model:
entity organization {
// roles
relation admin @user
relation member @user
relation manager @user
relation agent @user
// organization files access permissions
permission view_files = admin or manager or (member not agent)
permission delete_file = admin
// vendor files access permissions
permission view_vendor_files = admin or manager or agent
permission delete_vendor_file = agent
}
Roles and Permissions:
Roles: The schema defines roles for the organization entity, including admin, member, manager, and agent. These roles determine the level of access and permissions users have within the organization.
Permissions: Actions such as view_files, edit_files, delete_file, view_vendor_files, edit_vendor_files, and delete_vendor_file define the specific permissions associated with each role. For example, only admins can delete organization files, while managers and members have different levels of access.
Resource Types:
The schema distinguishes between organization files and vendor files, each with its own set of permissions. This allows for granular control over access to different types of resources within the application.
Now that we have our RBAC schema defined, we’ll proceed to setting up an Permify Local Server.
Step 2: Setting Up a Permify Local Server with Docker
Docker plays a crucial role in our setup by providing a containerized environment.
This environment is essential for the efficient operation of Permify, which functions as a microservice responsible for all authorization queries.
Now we will cover the steps needed to set up the Permify Server with using Docker Container below:
Run Permify Server with Docker Container
Open a terminal window and run the following command to pull the Permify Server Docker image and start the container:
This command will download the Permify Server image from the GitHub Container Registry and sets up Permify, our authorization service, with the following default settings:
The REST API running on port 3476.
The gRPC Service running on port 3478.
Authorization data is stored in the computer’s memory.
You should see a message similar to this:
│ Permify v0.8.5 │
│ Fine-grained Authorization Service │
│ │
│ docs: …………… https://docs.permify.co │
│ github: .. https://github.com/Permify/permify │
│ blog: …………… https://permify.co/blog │
│ │
└────────────────────────────────────────────────────────┘
time=2024-03-22T14:59:09.851Z level=INFO msg=“🚀 starting permify service…”
time=2024-03-22T14:59:09.851Z level=ERROR msg=“Account ID is not set. Please fill in the Account ID for better support. Get your Account ID from https://permify.co/account”
time=2024-03-22T14:59:09.859Z level=INFO msg=“🚀 grpc server successfully started: 3478”
time=2024-03-22T14:59:09.859Z level=INFO msg=“🚀 invoker grpc server successfully started: 5000”
time=2024-03-22T14:59:09.867Z level=INFO msg=“🚀 http server successfully started: 3476”
Verify Permify Server
Once the container is running, you can verify that Permify Server is running correctly by accessing the health check endpoint. Open Postman and send a GET request to http://localhost:3476/healthz. If Permify Server is running correctly, you should see a response indicating that the service is healthy.
The above image shows that Permify Server is up and running, you can now proceed with integrating it into your Node.js and Express application.
Step 3: Initialize Permify Node.js Client
In this tutorial, we’ll use Permify Node Client to control authorization in our application. You can find the list of available endpoints in our Permify Swagger Docs. We’ll be using Permify’s access control checks to safeguard our endpoints.
Let’s initialize our our client,
const permify = require(“@permify/permify-node“);
const client = new permify.grpc.newClient({
endpoint: “localhost:3478“,
})
Step 4: Configure Authorization Model
Now as our Permify Server running, we need to configure our authorization model to Permify service and then we can ready to perform test access checks.
To configure the authorization model, we’ll send the schema we created to Permify using the Permify schema.write method.
const permify = require(“@permify/permify-node“);
const client = new permify.grpc.newClient({
endpoint: “localhost:3478“,
})
client.schema.write({
tenantId: “t1“,
schema: “entity user {} nnentity organization {nn relation admin @user n relation member @user n relation manager @user n relation agent @user nn action view_files = admin or manager or (member not agent)n action edit_files = admin or managern action delete_file = adminn action view_vendor_files = admin or manager or agentn action edit_vendor_files = admin or agentn action delete_vendor_file = agentnn} “
}).then((response) => {
// handle response
console.log(response)
})
This code above creates a new schema using the Permify library.
It is built to connect to the Permify server running on localhost port 3478 and then calls the write method to define a schema for the specified tenant t1.
The schema defines entities such as user and organization along with their relationships and actions.
Now, let’s run this script
From the output in screenshot above, you can see that the new schema was successfully configured using Permify Node Js Client.
Hooray! 🥳 We’ve successfully finished setting up the Permify authorization service. Our API is now up and running with the authorization model configured and ready for use!
In the next step, we will be creating the middleware for access control.
Step 5: Creating Access Control Middleware
Here I will show an example of how we’ll develop Express middleware to enforce role-based access control on routes.
You will also learn how to implement Permify access check endpoint in the middleware to verify a user’s role and permissions before allowing access to protected resources.
// Import Permify client
const permify = require(‘@permify/permify-node‘);
const client = new permify.grpc.newClient({
endpoint: “localhost:3478“,
});
// Middleware function to check user’s permissions
const checkPermissions = (permissionType) => {
return async (req, res, next) => {
try {
// Ensure req.params.id exists
if (!req.params.id) {
throw new Error(‘User ID is missing in the request parameters‘);
}
// Convert permissionType to string if necessary
const permTypeString = String(permissionType);
// Prepare data for Permify check request
const checkRes = await client.permission.check({
tenantId: ‘t1‘,
metadata: {
schemaVersion: ”,
snapToken: ”,
depth: 20,
},
entity: {
type: ‘organization‘,
id: “1“,
},
permission: permTypeString, // Use the converted permissionType
subject: {
type: ‘user‘,
id: req.params.id,
},
});
if (checkRes.can === 1) {
// If user is authorized
req.authorized = ‘authorized‘;
next();
} else {
// If user is not authorized
req.authorized = ‘not authorized‘;
next();
}
} catch (err) {
console.error(‘Error checking permissions:‘, err.message); // Log the actual error message
res.status(500).send(err.message); // Send the actual error message to the client for debugging purposes
}
};
};
module.exports = checkPermissions;
The code above is built with the aim to implement a middleware function, checkPermission by utilizing the Permify library to verify user permissions based on the provided permission type.
When executed it extracts the user ID from the request parameters, converts the permission type to a string if needed, then sends a permission check request using Permify’s “permission.check” method to the Permify server. If authorized, it adds “authorized” to the request object; otherwise, it adds “not authorized”.
Errors are further logged and returned to the client for debugging purposes.
Next, we’ll integrate the middleware that was created above into our Node.js and Express application to enforce Role-Based Access Control (RBAC) and ensure that only authorized users with the appropriate roles and permissions can access specific routes.
Step 6: Securing Routes with RBAC
Now, let’s secure our routes using the middleware we’ve created. We’ll apply the checkPermissions middleware to protect various routes in our application.
// Import required modules
const express = require(‘express‘);
const permify = require(“@permify/permify-node“);
const authMiddleware = require(‘./auth‘); // Import the auth middleware
// Create Express app
const app = express();
// Define custom middleware to populate userInfo
app.use((req, res, next) => {
// Simulate user authentication and populate userInfo
req.userInfo = {
id: req.params.id // Extract the id from request params
// Add other user information if required
};
next();
});
// Define routes
// Route for ‘/users/:id’ where you want to enforce permission check
app.get(‘/users/viewFiles/:id‘, authMiddleware(‘view_files‘), (req, res) => {
// If middleware allows the request to pass through, handle the route logic here
if (req.authorized === ‘authorized‘) {
res.send(‘You have access to this user route‘);
} else {
res.status(403).send(‘You are not authorized to access this user resource‘);
}
});
// Route for ‘/admin/deleteVendorFiles/:id’ where you want to enforce permission check
app.get(‘/admin/deleteVendorFiles/:id‘, authMiddleware(‘delete_vendor_file‘), (req, res) => {
// If middleware allows the request to pass through, handle the route logic here
if (req.authorized === ‘authorized‘) {
res.send(‘You have access to this admin route‘);
} else {
res.status(403).send(‘You are not authorized to access this admin resource‘);
}
});
// Start the server
const PORT = process.env.PORT || 3000;
app.listen(PORT, () => {
console.log(`Server is running on port ${PORT}`);
});
This code sets up your Express application on port 3000 where specific routes are protected using a custom middleware called authMiddleware.
This middleware, imported from the auth.js file, integrates with Permify for permission checks. Below are routes being protected by the Middleware;
Routes protected by the authMiddleware:
Route for /users/viewFiles/:id: This route ensures that only users have permission to view files can access this route.
Route for /admin/viewFiles/:id: This route ensures that only admins who have permission to delete vendor files can access this route.
By applying the authMiddleware to these routes, access is restricted based on the permissions granted by Permify.
Let’s test our implementation!
Testing RBAC Implementation
Let’s say we have a user with userID alice, Let’s test to see if alice can access the /users/viewFiles/ API endpoint which is only accessible by admins, managers or members that are not agents as we defined in our schema earlier in this article.
As expected, the UserID alice doesn’t have access to this API endpoint, Let’s give alice the member role using Permify Nodejs client’s data.write method:
const permify = require(“@permify/permify-node“);
const client = new permify.grpc.newClient({
endpoint: “localhost:3478“,
})
client.data.write({
tenantId: “t1“,
metadata: {
schemaVersion: “”
},
tuples: [{
entity: {
type: “organization“,
id: “1“
},
relation: “member“,
subject: {
type: “user“,
id: “alice“
}
}]
}).then((response) => {
// handle response
console.log(response)
})
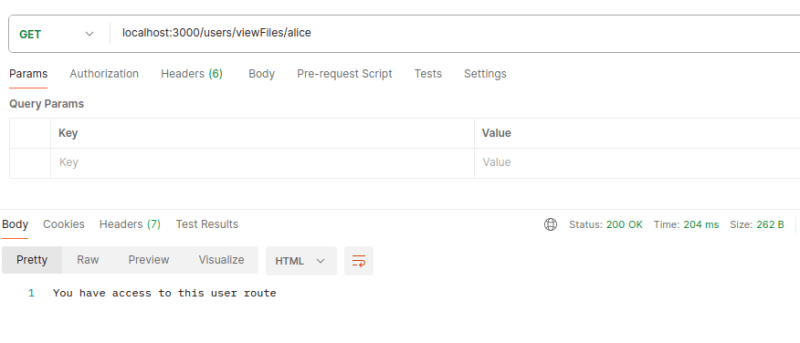
Let’s run this code and try visiting the /users/viewFiles/ API endpoint using Postman.
Now, after running the code, Alice can now successfully access the /users/viewFiles/ API endpoint.
Source Code: All the code snippets featured in this article can be found in the corresponding GitHub Repository.
Conclusion
It’s important to recognize that authorization isn’t a one-time setup; it’s an ongoing process.
Therefore, it’s imperative to regularly review your model, conduct thorough testing, and adapt it as your application evolves.
This guide serves as a solid foundation for implementing RBAC in your Node.js application.
However, don’t hesitate to delve deeper and tailor the RBAC model to precisely fit your unique requirements.
By harnessing the capabilities of Permify, you can streamline permission management and cultivate a resilient and secure application environment.


