
Introduction 👋
In this hands-on guide, we’ll walk through deploying Jenkins on a Kubernetes (k8s) cluster. You’ll learn how to set up the Jenkins controller, configure k8s clusters as Jenkins agents, create and run a sample pipeline on a k8s Pod, and monitor the Pod’s lifecycle during a pipeline run.
Environment ☁️
This hands-on is for a PoC or Pilot environment, to explore the Jenkins and Kubernetes features
Prerequisites 🔓
Before you start, ensure you have:
A running Kubernetes cluster (I used kind for my k8s local environment).
kubectl configured to interact with your cluster.
Basic knowledge of Kubernetes and Jenkins.
Documentation Reference 📖
Installing Jenkins on Kubernetes.
Deploy Jenkins on Kubernetes and run your pipeline 🔥
Let’s start deploying and using Jenkins on Kubernetes by following below steps:
1. Prepare K8s Manifest YAML files
Before start, we need to prepare the K8s YAML files.
NOTE: All the YAML files to deploy Jenkins controller on Kubernetes are available at: K8sHub/hands-on/jenkins-on-k8s/yamls. If you want to use the hands-on example and all-in-one script from my repo (desrible later in the next section), you do not need to create these files manually, just refer them as captured version of the ones in hands-on repository. Otherwise, create these files in your PC with following content and name:
volume.yaml: To create the persitent volumne for our Jenkins instance on k8s (Replace the demo-jenkins-cluster-control-plane by your node name)
kind: StorageClass
apiVersion: storage.k8s.io/v1
metadata:
name: local-storage
provisioner: kubernetes.io/no-provisioner
volumeBindingMode: WaitForFirstConsumer
—
apiVersion: v1
kind: PersistentVolume
metadata:
name: jenkins-pv-volume
labels:
type: local
spec:
storageClassName: local-storage
claimRef:
name: jenkins-pv-claim
namespace: devops-tools
capacity:
storage: 10Gi
accessModes:
– ReadWriteOnce
local:
## Replace by your desired path
path: /mnt/jenkins
nodeAffinity:
required:
nodeSelectorTerms:
– matchExpressions:
– key: kubernetes.io/hostname
operator: In
## Replace by your node name
values:
– demo-jenkins-cluster-control-plane
—
apiVersion: v1
kind: PersistentVolumeClaim
metadata:
name: jenkins-pv-claim
namespace: devops-tools
spec:
storageClassName: local-storage
accessModes:
– ReadWriteOnce
resources:
requests:
storage: 3Gi
service_account.yaml: To create jenkins-admin service account for the Deployment usage
—
apiVersion: rbac.authorization.k8s.io/v1
kind: ClusterRole
metadata:
name: jenkins-admin
rules:
– apiGroups: [‘‘]
resources: [‘*’]
verbs: [‘*’]
—
apiVersion: v1
kind: ServiceAccount
metadata:
name: jenkins-admin
namespace: devops-tools
—
apiVersion: rbac.authorization.k8s.io/v1
kind: ClusterRoleBinding
metadata:
name: jenkins-admin
roleRef:
apiGroup: rbac.authorization.k8s.io
kind: ClusterRole
name: jenkins-admin
subjects:
– kind: ServiceAccount
name: jenkins-admin
namespace: devops-tools
deployment.yaml: To deploy latest jenkins/jenkins:lts Jenkins version with jenkins-admin service account and us jenkins-pv-claim persistent volume
apiVersion: apps/v1
kind: Deployment
metadata:
name: jenkins
namespace: devops-tools
spec:
replicas: 1
selector:
matchLabels:
app: jenkins-server
template:
metadata:
labels:
app: jenkins-server
spec:
securityContext:
fsGroup: 1000
runAsUser: 1000
serviceAccountName: jenkins-admin
containers:
– name: jenkins
image: jenkins/jenkins:lts
resources:
limits:
memory: ‘2Gi’
cpu: ‘1000m’
requests:
memory: ‘500Mi’
cpu: ‘500m’
ports:
– name: httpport
containerPort: 8080
– name: jnlpport
containerPort: 50000
livenessProbe:
httpGet:
path: ‘/login’
port: 8080
initialDelaySeconds: 90
periodSeconds: 10
timeoutSeconds: 5
failureThreshold: 5
readinessProbe:
httpGet:
path: ‘/login’
port: 8080
initialDelaySeconds: 60
periodSeconds: 10
timeoutSeconds: 5
failureThreshold: 3
volumeMounts:
– name: jenkins-data
mountPath: /var/jenkins_home
volumes:
– name: jenkins-data
persistentVolumeClaim:
claimName: jenkins-pv-claim
services.yaml: To expose the jenkins-server as a k8s service
apiVersion: v1
kind: Service
metadata:
name: jenkins-service
namespace: devops-tools
annotations:
prometheus.io/scrape: ‘true’
prometheus.io/path: /
prometheus.io/port: ‘8080′
spec:
selector:
app: jenkins-server
ports:
– name: httpport
port: 8080
targetPort: 8080
– name: jnlpport
port: 50000
targetPort: 50000
2. Deploy Jenkins Controller
You can deploy it manually or using my all-in-one deploy script, choose one of the following options:
Option 1. Deploy Jenkins with prepare scipt
Clone the repo contains the hands-on example. Then, run the deployment script:
git clone https://github.com/tungbq/K8sHub.git
cd K8sHub/hands-on/jenkins-on-k8s
## NOTE: In `hands-on/jenkins-on-k8s/yamls/deployment.yaml` replace the `demo-jenkins-cluster-control-plane` value by your node name
## Create new `devops-tools` namespace
kubectl create namespace devops-tools
## Now run the deploy script
./deploy.sh
Option 2. Deploy Jenkins manually
kubectl create namespace devops-tools
kubectl apply -f sevice_account.yaml
kubectl apply -f volume.yaml
kubectl apply -f deployment.yaml
kubectl apply -f services.yaml
3. Access Jenkins Controller
3.1. Port-Forwarding
Open a new terminal and set up port forwarding to access Jenkins:
kubectl port-forward service/jenkins-service -n devops-tools 8087:8080
3.2. Get Initial Password
Jenkins requires an initial admin password for first-time access. Retrieve it with the following commands:
kubectl get pods –namespace=devops-tools
## Retrieve the initialAdminPassword
kubectl exec -it <pod_name> cat /var/jenkins_home/secrets/initialAdminPassword -n devops-tools
## Sample output: d72493ce44fb48bc8833da94b40cdd68
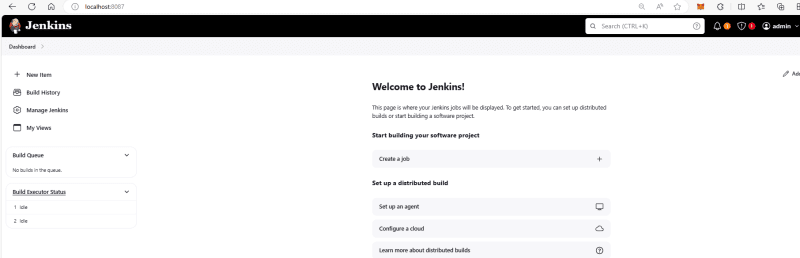
3.3. Access Jenkins
Open your browser and navigate to http://localhost:8087. Log in using the initial password obtained earlier, install the suggested plugins, and create an admin user.
4. Configure Jenkins Agents on Kubernetes
With Jenkins up and running, the next step is to configure Kubernetes as Jenkins agents.
4.1. Install Kubernetes Plugin
Navigate to Dashboard > Manage Jenkins > Plugins (http://localhost:8087/manage/pluginManager/available), search for the “Kubernetes” plugin, and install it. Restart Jenkins after installation.
4.2. Configure the Kubernetes Plugin
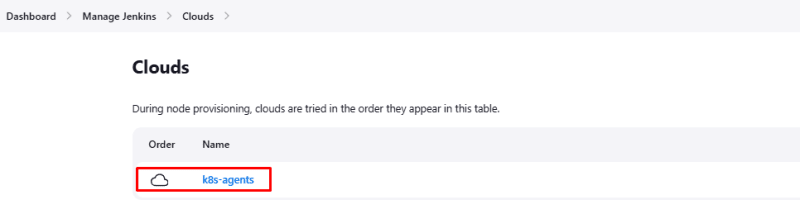
Navigate to Dashboard > Manage Jenkins > Clouds (http://localhost:8087/manage/cloud/). Select “New cloud” and input the cloud name (e.g., k8s-agents), then select “Create.”
Configure the following fields:
Kubernetes URL: Leave empty
Kubernetes server certificate key: Leave empty
Kubernetes Namespace: devops-tools
Credentials: Leave as None
Jenkins URL: http://jenkins-service.devops-tools.svc.cluster.local:8080
Select “Test connection” to verify the connection. If you see Connected to Kubernetes vX.Y.Z, the configuration is successful.
5. Run a Sample Job on a Kubernetes Pod
Now that the Jenkins controller and k8s agents are configured, let’s run a sample job on a Pod.
5.1. Create a New Pipeline
Go to the Jenkins homepage, select “New item,” choose “Pipeline,” input a name (e.g., Demo-Run-Shell-Inside-K8s-Pod), and create.
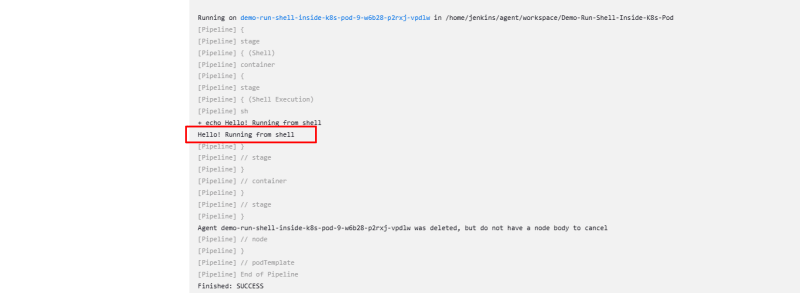
5.2. Define the Pipeline Script
In the pipeline configuration section, input the following script:
containerTemplate(
name: ‘jnlp’,
image: ‘jenkins/inbound-agent:latest’
)
]) {
node(POD_LABEL) {
stage(‘Shell’) {
container(‘jnlp’) {
stage(‘Shell Execution’) {
sh ”’
echo “Hello! Running from shell”
”’
}
}
}
}
}
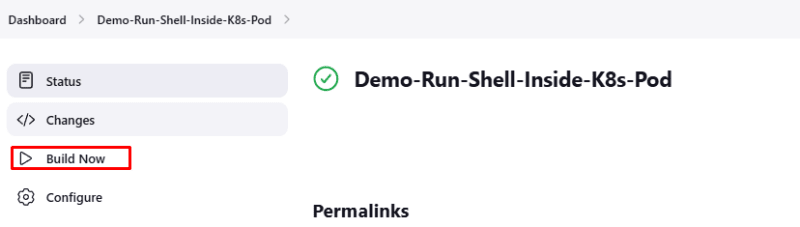
5.3. Build the Pipeline
Select “Build Now” to trigger the pipeline.
Jenkins will create a new Pod based on your template and run the pipeline inside the Pod.
5.4. Monitor Pod Lifecycle
To see the Pods created and terminated with each build, use the following command:
kubectl get pods -n devops-tools -w
Cleanup
To clean up your environment, delete the namespace along with its resources:
kubectl delete namespace devops-tools
Alternatively, run the cleanup script:
./cleanup.sh
Troubleshooting 🔨
Common Issues and Solutions:
Persistent volume binding issues: Delete the PV with kubectl delete pv jenkins-pv-volume and redeploy.
Connection issues to the Jenkins service: Verify the service port and check the agent pod logs using kubectl logs -f <your_pod_name> -n devops-tools.
Losing connection to Jenkins page: Re-run kubectl port-forward service/jenkins-service -n devops-tools 8087:8080 and ensure the Jenkins pod is running.
Conclusion ✒️
By following this guide, you should have a functional Jenkins setup on Kubernetes, allowing you to run pipelines within k8s Pods. Experiment with custom pipelines and explore more advanced Jenkins features on Kubernetes. Happy DevOps-ing!


