

Identity is an important aspect of the digital space. Making sure that users are who they claim to be helps prevent fraud and enhances trust within any platform.
That’s where the DOCSCAN API developed by PixLab comes in. It provides advanced ID scanning and data extraction for over 11,000 ID types from 197+ countries.
In this tutorial, we will create a project called Rivety Travels using Next.js and integrating the DOCSCAN API to scan Passports and ID Cards. This web app will allow users to book their travel plans securely by verifying their identities through a seamless process.
Prerequisites
Understanding of Javascript and Next.js
NPM installed on your machine
A PixLab account. Sign up here https://pixlab.io/
Cloudinary cloud account – for uploading the images
A Code editor – VS Code, NeoVim, or your favorite!
Here is a demo that shows the ID verification process with DOCSCAN API in the Next.js app
Let’s get started!
What is PixLab?
PixLab is a Machine Learning SaaS platform that offers Computer Vision and Media Processing APIs either via a straightforward HTTP RESTful API or offline SDK via the SOD Embedded CV library.
Features of the DOCSCAN API
Comprehensive Document Support: The DOCSCAN API supports over 11,000 types of ID documents from 197+ countries, including documents with or without MRZ (Machine Readable Zone) codes. This extensive coverage ensures that the API can handle a wide variety of ID documents, making it a versatile tool for global applications.
Advanced OCR Technology: The API uses highly accurate OCR (Optical Character Recognition) to extract text from ID documents. This ensures that the extracted information is reliable and ready for further processing.
Automatic Face Detection and Cropping: It automatically includes advanced features for detecting and cropping faces from ID documents. This enhances the efficiency of the ID verification process.
Developer-Friendly Integration: With a single REST API endpoint, the DOCSCAN API is straightforward to integrate into any application. The DOCSCAN API documentation provides guides and code samples to facilitate the integration process.
Now, let’s integrate the DOCSCAN API into the Rivefy Travels Next.js application to scan IDs when users want to book a journey.
Step 1: Create a Next.js app
Open your terminal and run these commands to create a new directory and a Next.js app.
cd rivefy-travels
npx create-next-app@latest .
Install Axios, which we will use to make HTTP requests to the DOSCAN API.
Run this command:
Also install Tailwind CSS and its dependencies
Step 2: Setting Up the App Router
We’ll set up the app router to handle client-side and server-side requests. In the server-side folder, create a route to handle the POST request to the DOCSCAN API.
To setup the route, navigate to your server-side folder, and create a file named route.jsx inside the /api/docscan/route.jsx directory like so:
Then enter the code below:
import axios from “axios“;
export async function POST(req) {
const { img, key } = await req.json();
const url = `https://api.pixlab.io/docscan?img=${encodeURIComponent(
img
)}&type=passport&key=${key}`;
try {
const response = await axios.get(url);
return NextResponse.json(response.data);
} catch (error) {
return NextResponse.json(
{
message: error.response?.data?.message || error.message,
},
{ status: error.response?.status || 500 }
);
}
}
It carries out a POST request and also an Axios GET request to the DOCSAN API. This helps to prevent CORS error.
The handler function extracts the img and key parameters from the request. It constructs the URL for the DOCSCAN API and performs an axios GET request. The response from the API is then sent back to the client.
Step 3: The Request Parameters
Here is a breakdown of the parameters, types, and their descriptions:
Parameter
Type
Description
img
string
Required. User’s inputted image
key
string
Required. Key from DOCSCAN’s API
Response:
Status: 200 OK
Body:
“data”: {
“status”: “DOCSCAN_status”,
“score”: “DOCSCAN_score”
}
}
Example Request
Content-Type: application/json
{
“img”: “user’s_image”,
“key”: “pix_lab_key”
}
Step 4: Developing the Client-Side
Next, we’ll develop the client-side components and logic for uploading and verifying ID documents.
In the app/(Home)/_components directory, create these components:
Hero.jsx, BookingDetails.jsx, IDVerification.jsx, and Travel.jsx.
The main logic will reside in the IDVerification.jsx component like so:
import React, { useCallback, useState } from “react“;
import Badge from “@/assets/svg/badge“;
import Image from “next/image“;
import { CiImageOn } from “react-icons/ci“;
import { CldUploadWidget } from “next-cloudinary“;
import {
Select,
SelectContent,
SelectGroup,
SelectItem,
SelectTrigger,
SelectValue,
} from “@/components/ui/select“;
import axios from “axios“;
// import { toast } from “react-toastify”;
const IDVerification = ({
setIDType,
image,
handleUpload,
handleUploadDocscanDocuments,
loading,
idtype,
newTravelData,
setImage,
}) => {
const handleIDTypeSelection = (value) => {
setIDType(value);
};
const handleSetData = () => {
localStorage.setItem(“traveldata“, JSON.stringify(newTravelData));
};
const packagelist = [“Passport“, “Driver License“, “National ID card“];
return (
<div className=“w-full py-16”>
<div className=“w-[90%] mx-auto max-w-custom_1 grid md:grid-cols-2 gap-24 md:gap-12”>
<div className=“flex flex-col gap-8”>
<h3 className=“text-3xl font-extrabold”>
Verify Your Identity
<span className=“block text-sm md:text-base pt-2 text-grey font-normal”>
Follow the steps to securely upload and verify your ID document.
</span>
</h3>
<div className=“w-full flex flex-col gap-4”>
<label
htmlFor=“”
className=“text-sm w-full text-dark font-semibold flex flex-col gap-2”
>
ID Type
<Select onValueChange={(e) => handleIDTypeSelection(e)}>
<SelectTrigger className=“w-full”>
<SelectValue placeholder=“Select ID Type” />
</SelectTrigger>
<SelectContent>
{packagelist?.map((packagedata, index) => (
<SelectGroup key={index}>
<SelectItem key={index} value={packagedata}>
{packagedata}
</SelectItem>
</SelectGroup>
))}
</SelectContent>
</Select>
</label>
<div className=“text-sm w-full text-dark font-semibold flex flex-col gap-2”>
Upload ID Document
<div className=“w-full”>
{image ? (
<Image
alt=“Cotion”
width={0}
sizes=“100vw”
height={0}
loading=“lazy”
src={image}
className=“h-[150px] w-full md:mx-auto object-cover”
/>
) : (
<div
className=“w-full”
id=“uploadDiv”
// onClick={handleUploadWidgetClick}
>
<CldUploadWidget
onSuccess={handleUpload}
uploadPreset=“dl93zl9fn”
folder=“uploads”
sources={[“local“, “url“, “camera“]}
>
{({ open }) => (
<div
className=“w-full cursor-pointer border px-4 md:px-8 border-[rgba(0,0,0,.2)] h-[150px] flex flex-col gap-4 items-center justify-center”
onClick={() => open()}
>
<CiImageOn fontSize={“38px“} />
<span className=“text-sm text-center”>
Upload a file or drag and drop PNG, JPG, GIF up to
10MB
</span>
</div>
)}
</CldUploadWidget>
</div>
)}
</div>
<input
value={image}
name=“image”
onChange={(e) => setImage(e.target.value)}
type=“text”
placeholder=“Enter your image URL”
className=“input h-[50px] text-sm rounded-xl”
/>
</div>
<button
onClick={() => {
handleSetData();
handleUploadDocscanDocuments();
}}
disabled={image === “” || idtype === “” || loading === true}
className=“btn h-[55px] w-full py-3 rounded-[10px] px-6 text-base font-semibold border”
>
Proceed to ID Verification
</button>
</div>
</div>
<div className=“w-full”>
<div className=“flex flex-col gap-4”>
{!loading ? (
<div className=“w-full p-6 px-8 border rounded-xl flex items-center justify-center gap-4”>
<div className=“w-full flex items-center justify-center flex-col gap-4”>
<Badge />
<h3 className=“text-2xl text-center font-extrabold”>
Verify Your Identity
<span className=“block text-sm md:text-base pt-2 text-grey font-normal”>
Upload a photo of your government-issued ID to complete
the booking process.
</span>
</h3>
<button
onClick={() => {
handleSetData();
handleUploadDocscanDocuments();
}}
className=“btn h-[55px] w-full py-3 rounded-[10px] px-6 text-base font-semibold border”
>
Verify ID
</button>
</div>
</div>
) : (
<div className=“w-full p-6 px-8 border rounded-xl flex items-center justify-center gap-4”>
<div className=“w-full flex items-center justify-center flex-col gap-4”>
<Badge />
<h3 className=“text-2xl text-center font-extrabold”>
ID Verification in Progress
<span className=“block text-sm md:text-base pt-2 text-grey font-normal”>
We`‘`re reviewing your ID document. You`‘`ll receive a
notification once the verification is complete.
</span>
</h3>
<span className=” h-[55px] w-full text-center px-6 text-base font-semibold”>
Verifying…
</span>
</div>
</div>
)}
<h5 className=“text-sm text-grey”>
Your personal information is securely stored and will not be
shared with third parties.
</h5>
</div>
</div>
</div>
</div>
);
};
export default IDVerification;
Step 5: – Initializing States
We’ll then initialize states to manage the application’s state and handle user inputs.
Here are the states:
const [idtype, setIDType] = useState(0);
const [userDocumentData, setUserDocumentData] = useState(null);
const [image, setImage] = useState(“”);
traveltab: Tracks which tab or section the user is currently on in the travel booking process. We use it to control which part of the UI is displayed.
idtype: Stores the type of ID document the user is trying to verify (e.g., passport, driving license). It helps in handling different verification logic based on the document type.
userDocumentData: Holds the results from the document verification process, such as the status and score from the DOCSCAN API. It is used to display verification results to the user.
image: Manages the URL or path of the image that the user has uploaded for verification. It is used to preview the image and send it to the DOCSCAN API for processing.
Step 6: Setting up the Logic
We make use of ternary operators in checking for conditions in the rendering of the images.
If the state (image) is empty and the result from the server is undefined, the div should be rendered.
This condition is also subject to the evaluation of the score response from the server. In the event that the score response is equal to 1, the image should be displayed without any blurring.
Also, if the score response is not equal to 1, the image should be displayed with blurring. In any case, where the image has not been transmitted to the server, it should be returned.
<div className=“w-full”>
{result?.score === 1 ? (
<Image
alt=“Cotion”
width={0}
sizes=“100vw”
height={0}
loading=“lazy”
src={image}
// blurDataURL={image | “”}
className=“h-[250px] w-full md:mx-auto object-cover”
/>
) : (
<Image
alt=“Cotion”
width={0}
sizes=“100vw”
height={0}
loading=“lazy”
style={{ filter: “blur(10px“ }}
src={image}
className=“h-[250px] w-full md:mx-auto object-cover”
/>
)}
</div>
) : (
<>
{image ? (
<Image
alt=“Cotion”
width={0}
sizes=“100vw”
height={0}
loading=“lazy”
src={image}
// blurDataURL={image | “”}
className=“h-[250px] w-full md:mx-auto object-cover”
/>
) : (
<CldUploadWidget
multiple
onSuccess={handleUpload}
uploadPreset=“dl93zl9fn”
folder=“uploads”
sources={[“local“, “url“, “camera“]}
>
{({ open }) => {
return (
<div
className=“w-full cursor-pointer border-dotted px-4 md:px-8 border-4 border-[rgba(0,0,0,.2)] h-[250px] flex flex-col gap-4 items-center justify-center
“
onClick={() => open()}
>
<CiImageOn fontSize={“38px“} />
<span className=“text-sm text-center”>
Upload a fileNo file chosen or drag and drop PNG, JPG,
GIF up to 10MB
</span>
</div>
);
}}
</CldUploadWidget>
)}
</>
)}
Also, we handle the logic for uploading documents and interacting with the DOCSCAN API.
setLoading(true);
try {
const { data } = await axios.post(“/api/docscan“, {
img: image,
key: tempKey,
});
setUserDocumentData(data);
setTravelTab(2);
toast.success(“Image test successfull!!“);
setLoading(false);
} catch (error) {
setLoading(false);
toast.error(
error.response && error.response.data.message
? error.response.data.message
: error.message
);
}
};
Uploading images using Next-Cloudinary
Next-Cloudinary, powered by Cloudinary, is used to upload images of ID documents to the Next.js web app.
Upload ID Document
<div className=“w-full”>
{image ? (
<Image
alt=“Cotion”
width={0}
sizes=“100vw”
height={0}
loading=“lazy”
src={image}
className=“h-[150px] w-full md:mx-auto object-cover”
/>
) : (
<div
className=“w-full”
id=“uploadDiv”
// onClick={handleUploadWidgetClick}
>
<CldUploadWidget
onSuccess={handleUpload}
uploadPreset=“dl93zl9fn”
folder=“uploads”
sources={[“local“, “url“, “camera“]}
>
{({ open }) => (
<div
className=“w-full cursor-pointer border px-4 md:px-8 border-[rgba(0,0,0,.2)] h-[150px] flex flex-col gap-4 items-center justify-center”
onClick={() => open()}
>
<CiImageOn fontSize={“38px“} />
<span className=“text-sm text-center”>
Upload a file or drag and drop PNG, JPG, GIF up to
10MB
</span>
</div>
)}
</CldUploadWidget>
</div>
)}
</div>
<input
value={image}
name=“image”
onChange={(e) => setImage(e.target.value)}
type=“text”
placeholder=“Enter your image URL”
className=“input h-[50px] text-sm rounded-xl”
/>
</div>
Step 7: Setting up your PixLab account
Go to the PixLab website and enter your username and email to create an account.
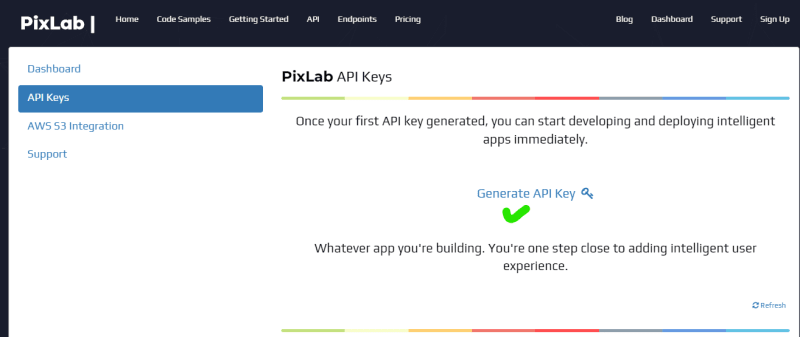
In your dashboard, click on API Keys like so:
Then click on Generate API Key to get the key we will use for the Next.js application.
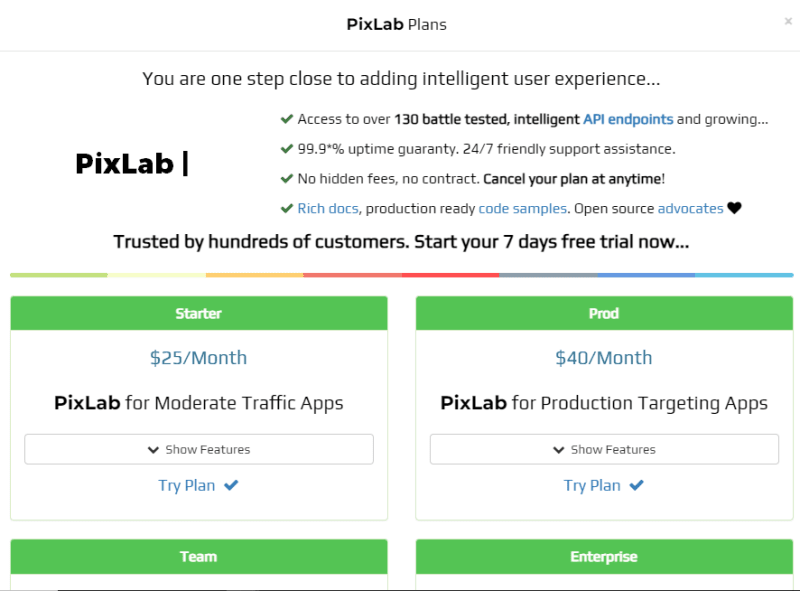
You will then need to select the subscription plan from the options below:
Configure environment variables
In the root directory of your Next.js project, create a new file named .env.local and enter this to define the environment variable:
NEXT_PUBLIC_CLOUDINARY_CLOUD_NAME=your_cloudinary_name_here
Replace “your_pixlab_api_key_here” with your actual PixLab API key, and add .env.local to your .gitignore file.
How to Run the Application
Start the development server by running:
Then open your browser and enter http://localhost:3000
The web app will then load like so:
Select your destination city, travel dates (check-in & check-out), and package needed.
Then click on Proceed to ID Verification, choose your ID document type, and either upload an image to the document or enter a link to the image.
For this example, a link to an ID document is added, which then displays the ID to be verified:
Note: This is a dummy ID
Then click on Proceed to ID Verification or Verify ID after uploading the ID image or image link.
As shown in the image below, the ID is verified, and travel booking details have been confirmed.
To clone the project and run it locally, open your terminal and run this command:
Then run npm install to install all the project dependencies and npm run dev to run the web app.
Get the full source code on GitHub.
And that’s it! We have successfully integrated the DOCSCAN API into the Next.js travel app.
This is just one implementation of the DOCSCAN API; you can integrate it for many use cases, adding a means of secure ID verification to your product.
Create an account on PixLab and check out the documentation to get started.


