

In a previous post I shared my desire to create an interactive display for my pin collection. In it, I decided to use Meta AI’s Segment Anything Model to extract cutouts from my crowded canvas:
But as I discovered, with such a crowded and detailed image, the automatic segmentator struggles with identifying all the pins individually.
Luckily for me, segment anything, has other ways of extracting masks from an image, via the use of prompts; there are two kinds of prompts: boxes and points.
In this post, I will show you these two features.
Load the model and image
First thing, we load the model:
from segment_anything import sam_model_registry
sam = sam_model_registry[‘vit_b‘](checkpoint=‘sam_vit_b_01ec64.pth‘).to(device=torch.device(‘cpu‘))
Next, we load the image that contains the pins. We use OpenCV for reading the image and convert it to RGB color space, as the model expects the input in this format:
image = cv2.imread(‘pins@high.jpg‘)
image_rgb = cv2.cvtColor(image, cv2.COLOR_BGR2RGB)
Create a Segment Anything Model Predictor
Segment Anything offers a predictor that requires a model to be instantiated. Then we need to set an image using set_image, which will process the image to produce an image embedding; The predictor will store this embedding and will use it for subsequent mask prediction.
mask_predictor = SamPredictor(sam)
mask_predictor.set_image(image_rgb)
Prompting with a box
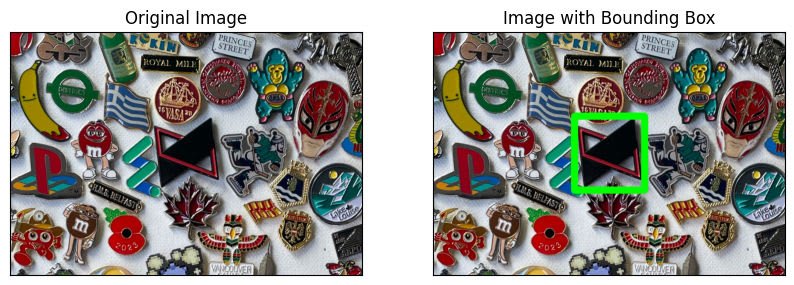
To prompt SAM with a bounding box it is necessary to define a NumPy array, where the order of the values is x1,y1,x2,y2, for example:
The image is just an illustration, the model operates on the image alone with the box as a NumPy array
To prompt the model, one has to call the predict method on the mask_predictor:
box=box,
multimask_output=True,
)
The result will be a triplet, with the following values:
masks: The output masks in CxHxW format, where C is the number of masks, and (H, W) is the original image size.
scores: An array of length C containing the model’s predictions for the quality of each mask.
logits: An array of shape CxHxW, where C is the number of masks and H=W=256. These low resolution logits can be passed to a subsequent iteration as mask input.
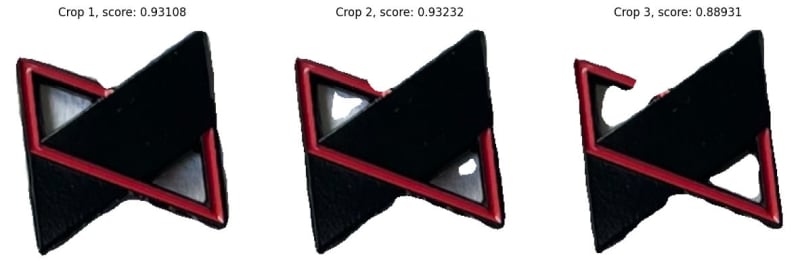
By the way, if you specify multimask_output = True you will get three masks for each prediction, I find this ability truly useful, as some of the generated masks are not usable, so I rather keep my options with multiple masks.
Ultimately, the result will be masks that when applied to the image, yield the following resit:
Prompting with points
The input to the model is comprised of two arrays:
point_coords: A Nx2 array of point prompts to the model. Each point is in (X,Y) in pixels
point_labels: A length N array of labels for the point prompts. 1 indicates a foreground point and 0 indicates a background point.
(box[0]+40, box[1]+50),
(box[0]+150, box[1]+160),
(box[0]+200, box[1]+80),
])
point_labels = np.array([1, 1, 1])
If we visualise the points, they look like this:
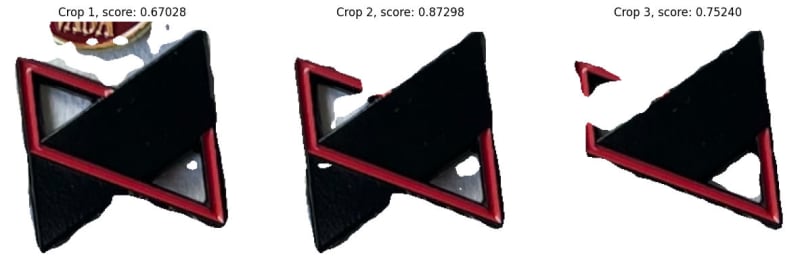
The call to predict looks like this:
point_coords=point_coords,
point_labels=point_labels,
multimask_output=True,
)
And the results… well, they’re not great:
Speed
When prompted the model takes significantly less time (<1 second) when compared to my previous attempt using the automatic segmentator.
Conclusion
For my pin collection, manual prompting with bounding boxes proved more effective than using point prompts.
In my next entry, I will demonstrate how I integrated this model into a custom web-based application, enhancing the interactive display of my collection.


