

In the realm of software development and network engineering, understanding the fundamentals of sockets and networking is invaluable, regardless of your specific focus within the industry. This article aims to provide a comprehensive overview of these essential concepts, facilitating a clearer understanding of their importance and functionality for engineers. Let’s delve into the basics and uncover the foundational principles that drive modern networking.
To keep things simple, we will start with basic examples and gradually introduce more complexity. This approach allows us to build a strong foundation without getting overwhelmed. In future articles, we will explore more advanced topics.
Understanding the OSI and TCP/IP Models: Foundations of Networking
OSI model
We can’t start discussing basic networking concepts without mentioning our old friend, the OSI model. For two computers to communicate effectively, they need to speak the same language, structured by the OSI model. This foundational framework has been a cornerstone in understanding and implementing network communications. By breaking down the complex process of data transmission into seven manageable layers, the OSI model provides a clear and organized approach to networking that has stood the test of time.
The OSI model simplifies the complex process of data transmission by providing a universal language for networking. Each layer of the OSI model has specific responsibilities and capabilities, ensuring that technologies can interact seamlessly. Higher layers benefit from this abstraction, utilizing lower-layer functions without needing to understand their inner workings.
OSI model layers
Physical Layer: This is the lowest layer, dealing with the physical connection between devices. It is responsible for transmitting raw bit streams over a physical medium, such as cables or wireless signals.
Data-Link Layer: This layer manages the transfer of data between two directly connected nodes. It handles error detection and correction, as well as flow control, ensuring reliable communication over the physical medium.
Network Layer: This layer is responsible for routing data from the source to the destination across multiple networks. It uses logical addressing (such as IP addresses) to determine the best path for data transmission.
Transport Layer: This layer ensures reliable data transfer between systems. It provides error detection and recovery, flow control, and ensures complete data transfer through protocols like TCP (Transmission Control Protocol).
Session Layer: This layer manages sessions between applications. It establishes, maintains, and terminates connections, ensuring data is synchronized and properly sequenced.
Presentation Layer: This layer translates data between the application layer and the network. It handles data encryption, compression, and translation, ensuring that data is presented in a readable format.
Application Layer: This is the topmost layer, which interacts directly with user applications. It provides network services to end-user applications, such as web browsers and email clients.
Have you ever heard the joke about Layer 8? If not, for those who enjoy a bit of networking humor, there’s often mention of “Layer 8” — the user layer. It’s a playful reminder that no matter how perfect the technical setup, the human element can introduce its own unique challenges!
When data is communicated through protocol layers, it’s sent in small segments called packets. Each packet includes implementations from these protocol layers. Starting at the application layer, the data is encapsulated by the presentation layer, which is then encapsulated by the session layer, followed by the transport layer, and so on. This process is known as encapsulation.
Each layer adds a header and a body to the packet. The header contains protocol-specific information necessary for that layer, while the body contains the encapsulated data, including headers from the previous layers. This encapsulation technique can be visualized like the layers of an onion.
The illustration below demonstrates the encapsulation process as data moves from the application layer of one computer, across the Internet, to the application layer of the other computer.
| ▲
▼ |
+———————+ +———————+
| 7. Application | | 1. Physical |
+———————+ +———————+
| |
+———————+ +———————+
| 6. Presentation | | 2. Data-Link |
+———————+ +———————+
| |
+———————+ +———————+
| 5. Session | | 3. Network |
+———————+ +———————+
| |
+———————+ +———————+
| 4. Transport | | 4. Transport |
+———————+ +———————+
| |
+———————+ +———————+
| 3. Network | | 5. Session |
+———————+ +———————+
| |
+———————+ +———————+
| 2. Data-Link | | 6. Presentation |
+———————+ +———————+
| |
+———————+ +———————+
| 1. Physical | | 7. Application |
+———————+ +———————+
| |
+————————————–+
| Internet |
+————————————–+
TCP/IP as an Alternative to the OSI Model
While the OSI model provides a detailed framework for understanding network communications, TCP/IP is the more practical and widely-used model in real-world networking. TCP/IP simplifies the structure into four layers and serves as the foundation for the Internet, emphasizing robust, scalable communication across diverse networks.
Imagine you want to visit a website by entering a URL into your browser. Here’s how TCP/IP handles this request:
Application Layer: Your web browser (application) generates an HTTP request for the webpage. In the TCP/IP model, the Application layer combines the functions of the Application, Presentation, and Session layers of the OSI model. This means it handles not only the user interface and communication protocols (Application layer in OSI), but also data translation, encryption, and compression (Presentation layer in OSI), as well as managing sessions and dialogues between the devices (Session layer in OSI). This consolidation simplifies the model and aligns it more closely with real-world protocols and applications.
Transport Layer: The HTTP request is handed to the TCP protocol, which breaks it into smaller packets, adds a header with port information, and ensures reliable transmission. This layer matches the Transport layer in the OSI model.
Internet Layer: Each packet is then passed to the IP protocol, which adds another header containing the IP addresses of both the source (your computer) and the destination (the web server). This layer corresponds to the Network layer in the OSI model.
Network Access Layer: The packets are then sent over the physical network (like Ethernet or Wi-Fi), where they travel through various routers and switches to reach the web server. This layer combines the Data Link and Physical layers of the OSI model.
Both the OSI and TCP/IP models are open standards. They’re designed so that anyone can use them, or further build them out to meet specific requirements.
Programs that use networking, such as web browsers and email clients, rely on the operating system to manage network communications. The operating system handles the intricate details of network encapsulation, making it easier for developers to write network programs. They simply need to use the network interface provided by the OS, without worrying about the underlying complexities.
Using Sockets for communication
To interface with the network or enable inter-process communication (IPC), developers often use sockets. Sockets serve as standardized endpoints for sending and receiving data, whether across a network or between processes on the same machine. They provide a way for programs to communicate, abstracting the complexities of the underlying protocol layers. By using socket APIs provided by the operating system, developers can focus on building their application logic while the OS manages the detailed network and IPC operations. This makes tasks like creating a web server, a chat application, or facilitating communication between processes more straightforward and accessible. The most common types of sockets are stream sockets, which provide a reliable connection-oriented service, and datagram sockets, which offer a connectionless service.
For IPC communication offered by the Unix domain socket using the AF_UNIX family, we already explore this in the article below. We may explore it again from another perspective in future parts of this article.
https://www.kungfudev.com/blog/2022/12/05/understanding-unix-domain-sockets-in-golang
Stream sockets and datagram sockets are the two most common types of sockets. Stream sockets, which use the TCP protocol, provide a reliable, connection-oriented service. This means that data is transmitted in a continuous stream, ensuring that it arrives in the correct order and without errors. Examples of stream sockets in action include web servers, where the integrity and order of the data (such as HTML pages) are crucial for proper rendering, and email clients, which require reliable data transmission to ensure messages are received intact. In contrast, datagram sockets use the UDP protocol and offer a connectionless service. This allows for faster data transmission but without the guarantees of order and reliability. An example of datagram sockets is in online gaming or live video streaming, where speed is more critical than perfect data accuracy, and occasional data loss is acceptable.
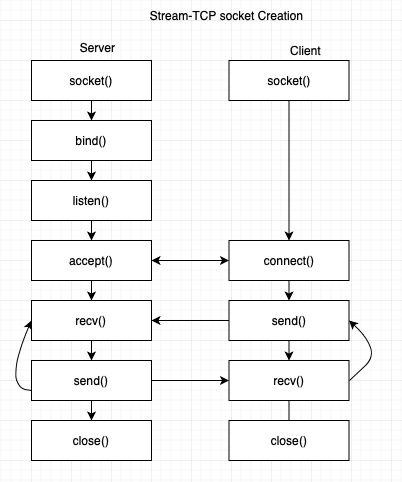
I would bet that at least once you have seen the image below while learning about networking, sockets, or reading some network articles. This diagram illustrates the basic flow of socket communication between a server and a client, highlighting the key function calls and interactions involved in establishing a connection and exchanging data.
Sockets behave similarly to files because of the Unix philosophy of treating everything as a file. This design choice provides a consistent interface for performing input and output operations across different types of data streams, simplifying the programming model.
Sockets and files both provide a stream of bytes that can be read from or written to. This stream abstraction fits well with many types of I/O operations, whether they involve local files, remote network communication, or inter-process communication.
When a socket is created with the socket() function, it requires parameters such as the domain (e.g., AF_INET for IPv4), the type (e.g., SOCK_STREAM for TCP), and the protocol (usually 0 to select the default protocol for the given type). The socket is then assigned a file descriptor, an integer that uniquely identifies the socket within the operating system.
A file descriptor is a unique integer assigned by the operating system to an open file or socket, serving as an abstract indicator for accessing various I/O resources, such as files, sockets, and pipes. In simple terms, when you open a file, the operating system creates an entry to represent that file and stores information about it. If there are N files open, there will be N corresponding entries in the operating system, each represented by an integer like 20, 21, etc. This integer is the file descriptor. It uniquely identifies an open file within a process, allowing the process to perform operations like reading, writing, and closing files using standardized functions. By managing resources this way, the operating system ensures efficient communication between processes and I/O resources.
The bind() function associates the socket with a specific local address and port, which are provided as arguments. The listen() function marks the socket as a passive socket that will be used to accept incoming connection requests, taking an argument that specifies the maximum number of pending connections. The accept() function extracts the first connection request on the queue of pending connections, creating a new socket file descriptor for the connection.
On the client side, the connect() function is used to establish a connection to the server, requiring the server’s address and port as arguments. Both the client and server can then use send() and recv(), or the analogous write() and read(), to transmit and receive data. The close() function is used to close the socket, releasing the file descriptor.
This design simplifies the API and makes it easier for developers to handle network communication using familiar file operations, streamlining the development process and making the code more intuitive and maintainable. By treating sockets as files, the operating system can efficiently manage various types of I/O operations using a unified interface, leveraging existing mechanisms for buffering, blocking, and error handling that are well-established for file systems.
As we mentioned, there are a couple of socket types and families, but for now, for socket families we are going to focus on AF_INET for IPv4, AF_INET6 for IPv6, and as we mentioned the AF_UNIX for local communication within the same host. And regarding type, we will discuss the two primary types of sockets: stream sockets and datagram sockets.
Socket in Actions
To illustrate what we have learned so far, we will write a couple of programs in Rust. We will use the nix crate, which provides friendly unix platform APIs (Linux, Darwin) for working with the socket API. While the Rust standard library offers standard socket functionality in the std, the nix crate provides more comprehensive and idiomatic access to lower-level unix system calls, making it easier to work with advanced socket features and perfect for explaining what we have seen until now.
Server
So as we saw previously, to create a server the sequence of functions are: socket(), bind(), listen(), and accept(). The first step is to create the socket.
nix::sys::socket::AddressFamily::Inet, // Socket family
nix::sys::socket::SockType::Stream, // Socket type
nix::sys::socket::SockFlag::empty(),
None,
)
.expect(“Failed to create socket”);
This code snippet creates a new socket using the nix crate in Rust. The socket() function call includes several parameters:
nix::sys::socket::AddressFamily::Inet: Specifies the socket family, in this case, AF_INET, which is used for IPv4 addresses.
nix::sys::socket::SockType::Stream: Specifies the socket type, SOCK_STREAM, which indicates a stream socket using the TCP protocol.
nix::sys::socket::SockFlag::empty(): Indicates that no special flags are set for the socket.
None: Indicates that the default protocol should be used.
After creating the socket, the next step is to bind the socket to a specific address and port. This associates the socket with a particular local endpoint.
let sock_addr =
SockaddrIn::from_str(“127.0.0.1:6797”).expect(“Failed to create socket address”);
// Bind the socket to the address
bind(socket_fd.as_raw_fd(), &sock_addr).expect(“Failed to bind socket”);
This code snippet binds the previously created socket to the local address 127.0.0.1 (localhost) and port 6797:
SockaddrIn::from_str(“127.0.0.1:6797”): Creates a new socket address (SockaddrIn) from the string representation of the IPv4 address and port.
bind(socket_fd.as_raw_fd(), &sock_addr): Binds the socket file descriptor to the specified address. This makes the socket listen for incoming connections on 127.0.0.1:6797.
Something to notice here is that we are using IP addresses and ports in a specific format because we are using AddressFamily::Inet. Different protocol families have their own ways of defining endpoint addresses. This means the address format can vary depending on the address family, allowing sockets to handle different networking protocols and address formats properly. For this article, we are focusing on the INET family, but in future articles, we will explore other address families in more detail.
After binding the socket to a specific address and port, the next step is to listen for incoming connections. This prepares the socket to accept connection requests from clients.
// The backlog parameter specifies the maximum length of the queue of pending connections
let backlog = Backlog::new(1).expect(“Failed to create backlog”);
listen(&socket_fd, backlog).expect(“Failed to listen for connections”);
This code snippet sets up the socket to listen for incoming connections:
let backlog = Backlog::new(1).expect(“Failed to create backlog”);: This line creates a backlog object that specifies the maximum length of the queue of pending connections. In this case, the backlog is set to 1, meaning the socket can queue up to one pending connection.
listen(&socket_fd, backlog).expect(“Failed to listen for connections”);: This line calls the listen() function, which puts the socket into listening mode.
We use a backlog of 1 because we are keeping the example simple and synchronous for now. In the future, we will introduce an asynchronous runtime to handle multiple connections more efficiently.
The listen operation involves the kernel creating two queues for this socket: the syn queue and the accept queue. To keep this article concise, we will explore these queues in detail in the next article.
At this point, the server socket is ready and waiting for incoming connection requests from clients. The listen() function allows the server to queue incoming connections, which can be accepted and processed one by one.
Once the server socket is set to listen for incoming connections, the next step is to accept these connections and handle the data communication with the client.
let conn_fd = accept(socket_fd.as_raw_fd()).expect(“Failed to accept connection”);
// Read data
let mut buf = [0u8; 1024];
let bytes_read = read(conn_fd, &mut buf).expect(“Failed to read from connection”);
let received_data =
std::str::from_utf8(&buf[..bytes_read]).expect(“Failed to convert received data to string”);
println!(
“Received {} bytes: {:?} repr: {}”,
bytes_read,
&buf[..bytes_read],
received_data
);
This code snippet demonstrates how to accept an incoming connection and read data from it:
let conn_fd = accept(socket_fd.as_raw_fd()).expect(“Failed to accept connection”);: This line calls the accept() function to accept an incoming connection. It creates a new socket file descriptor for the connection, conn_fd.
let mut buf = [0u8; 1024];: This line initializes a buffer to store the incoming data.
let bytes_read = recv(conn_fd, &mut buf, MsgFlags::empty()).expect(“Failed to read from connection”);: This line reads data from the accepted connection into the buffer. The recv() function is used for this purpose, with MsgFlags::empty() indicating no special flags. The number of bytes read is stored in bytes_read.
let received_data = std::str::from_utf8(&buf[..bytes_read]).expect(“Failed to convert received data to string”);: This line converts the received byte data into a UTF-8 string. It slices the buffer up to the number of bytes read and converts it.
At this point, the server has accepted an incoming connection and read the data sent by the client. The server can then process this data, echo it back, or perform other actions based on the application logic.
.expect(“Failed to write to connection”);
This code snippet demonstrates how to send data back to the client:
let bytes_written = send(conn_fd, &buf[..bytes_read], MsgFlags::empty()).expect(“Failed to write to connection”);: This line sends data from the buffer back to the client using the send() function. The buffer is sliced to the number of bytes read from the client, ensuring only the received data is sent back. MsgFlags::empty() indicates no special flags are used.
For simplicity, we are using MsgFlags::empty(), which indicates no special options are set, allowing the send() and recv() functions to operate in their default mode. To read more about these flags .
With this step, the server echoes the received data back to the client, completing a simple round-trip communication. This demonstrates the basic flow of data from client to server and back to client, showcasing the core operations of socket communication.
So putting it all together, we have the complete example for this simple TCP echo. We’ve explained each step, as discussed previously:
let socket_fd = socket(
nix::sys::socket::AddressFamily::Inet, // Socket family
nix::sys::socket::SockType::Stream, // Socket type
nix::sys::socket::SockFlag::empty(),
None,
)
.expect(“Failed to create socket”);
// Create a socket address
let sock_addr =
SockaddrIn::from_str(“127.0.0.1:6797”).expect(“Failed to create socket address”);
// Bind the socket to the address
bind(socket_fd.as_raw_fd(), &sock_addr).expect(“Failed to bind socket”);
// Listen for incoming connections
let backlog = Backlog::new(1).expect(“Failed to create backlog”);
listen(&socket_fd, backlog).expect(“Failed to listen for connections”);
// Accept incoming connections
let conn_fd = accept(socket_fd.as_raw_fd()).expect(“Failed to accept connection”);
// echo back the received data
let mut buf = [0u8; 1024];
let bytes_read =
recv(conn_fd, &mut buf, MsgFlags::empty()).expect(“Failed … connection”);
let received_data =
std::str::from_utf8(&buf[..bytes_read]).expect(“Failed to …”);
// Echo back the received data
let bytes_written = send(conn_fd, &buf[..bytes_read], MsgFlags::empty())
.expect(“Failed to write to connection”);
}
In Rust, we do not explicitly use the close method to close sockets because Rust’s ownership and borrowing system automatically handles resource management. When a socket goes out of scope, Rust’s memory safety guarantees ensure that the socket is properly closed and resources are freed. This eliminates the need for explicit close calls, reducing the risk of resource leaks and making the code cleaner and safer.
Most programming languages provide higher-level abstractions to simplify socket programming, making it more accessible and easier to use. These abstractions often wrap the underlying system calls, handling details, and resource management for you. For example, in Rust, the std::net module offers a convenient API for TCP networking:
fn main() {
let listener = TcpListener::bind(“127.0.0.1:7878”).unwrap();
for stream in listener.incoming() {
let stream = stream.unwrap();
println!(“Connection established!”);
}
}
In this example, TcpListener::bind abstracts the complexity of creating and binding a socket, ensuring that the address is correctly formatted “”and byte-ordered.”” The incoming method returns an iterator over incoming connections, managing the accept loop. This abstraction makes the code more readable and easier to maintain, allowing us to focus on the application logic rather than the intricacies of socket communication.
Running the server
Now, if we run the server and use telnet from another terminal, we will see this in action:
Socket file descriptor: 3
Socket bound to address: 127.0.0.1:6797
Listening for incoming connections…
received 22 bytes
bytes: [72, 101, 108, 108, 111, 32, 102, 114, 111, 109, 32, 75, 117, 110, 103, 102, 117, 68, 101, 118, 13, 10]
hex repr: [“0x48”, “0x65”, “0x6c”, “0x6c”, “0x6f”, “0x20”, “0x66”, “0x72”, “0x6f”, “0x6d”, “0x20”, “0x4b”, “0x75”, “0x6e”, “0x67”, “0x66”, “0x75”, “0x44”, “0x65”, “0x76”, “0x0d”, “0x0a”]
str repr: “Hello from KungfuDevrn“
Sent 22 bytes back to client
This output indicates that the server is running, bound to the address 127.0.0.1:6797, and successfully received and echoed back data from a client.
And in our telnet(client) we can see the data is replied back.
Trying 127.0.0.1…
Connected to localhost.
Escape character is ‘^]’.
Hello from KungfuDev
Hello from KungfuDev
Connection closed by foreign host.
You can find the code in this repository.
What about the client?
As you saw in the diagram that illustrates the flow of socket communication, the client, instead of calling listen, uses connect to initiate a connection to a server socket.
.expect(“Failed to send data to server”);
The client uses the connect function to establish a connection with the server. After successfully connecting, the client can send data to the server using the send function and receive data from the server using the recv function.
You can find the code for this example and future ones in this repo.
To conclude
In this article, we explored the fundamentals of socket programming using Rust and the nix crate. We began by understanding the OSI model and its practical application through the TCP/IP model, laying the groundwork for network communication. We then delved into the sequence of functions necessary to create a server: socket(), bind(), listen(), and accept(). By walking through a complete example, we demonstrated how to set up a simple server that listens for incoming connections, receives data, and echoes it back to the client.
Running the provided Rust program and testing it with telnet illustrated these concepts in action, showing how data is transmitted and received over a network. Although we kept the example synchronous and used a small backlog for simplicity, this foundation paves the way for more advanced topics such as asynchronous programming and handling multiple connections efficiently.
Stay tuned for future articles where we will introduce asynchronous runtimes and explore additional and advanced socket programming techniques to enhance our networking skills.


