
Why Host Your Own Large Language Model (LLM)?
While there are many excellent LLMs available for VSCode, hosting your own LLM offers several advantages that can significantly enhance your coding experience. Below you can find some reasons to host your own LLM.
Customization and Fine-Tuning
Data Control and Security
Domain Expertise
Easy Switching Between Models
Prerequisites
To host your own Large Language Model (LLM) for use in VSCode, you’ll need a few pieces of hardware and software in place.
Hardware Requirements
For this example, we’ll be using a Radeon 6700 XT graphics card and a Ryzen 5 7600X processor on Linux. However, you can also host an LLM on Windows or macOS machines with compatible hardware.
A modern CPU (at least quad-core) with high-performance capabilities
A suitable graphics card with OpenCL or HIP support (Radeon or NVIDIA)
At least 16 GB of RAM for smooth performance
### Software Prerequisite
To get started, you’ll need to install the packages you need on your Linux machine are:
Docker
GPU drivers.
Nvidia Container Toolkit (if you use Nvidia GPU)
[!tip]
If you don’t have docker installed already, please check the Docker Installation document.
It doesn’t matter if you are using Arch, Debian, Ubuntu, Mint etc. Since we will use containers, the environment will be the same.
Note that we won’t be training our own LLM models; instead, we’ll focus on hosting and running pre-trained models. This means you won’t need a high-performance GPU or specialized hardware for model training.
With these prerequisites in place, you’re ready to start setting up your LLM hosting environment!
Deploying the AI
We will deploy two containers. One for the Ollama server which runs the LLMs and one for the Open WebUI which we integrate with the Ollama server from a browser.
To deploy Ollama, you have three options:
Running Ollama on CPU Only (not recommended)
If you run the ollama image with the command below, you will start the Ollama on your computer memory and CPU.
[!warning]
This is not recommended if you have a dedicated GPU since running LLMs on with this way will consume your computer memory and CPU.
Also running LLMs on the CPU are much slower than GPUs.
Running Ollama on AMD GPU
If you have a AMD GPU that supports ROCm, you can simple run the rocm version of the Ollama image.
If your AMD GPU doesn’t support ROCm but if it is strong enough, you can still use your GPU to run Ollama server. I use that command to run on a Radeon 6700 XT GPU.
[!info]
If you run LLMs that are bigger than your GPUs memory, then they will be loaded partially on the GPU memory and RAM memory. This will cause a slow response time in your prompts.
Running Ollama on Nvidia GPU
After you have successfully installed the Nvidia Container Toolkit, you can run the commands below configure Docker to run with your GPU.
sudo systemctl restart docker
Now it’s time to run the LLM container:
[!info]
If you run LLMs that are bigger than your GPUs memory, then they will be loaded partially on the GPU memory and RAM memory. This will cause a slow response time in your prompts.
Verifying Installation
After you have deployed the Ollama container, you can manually check if the Ollama server is running successfully.
You won’t see any LLM in the list because we haven’t downloaded any.
Deploying Web UI
We will deploy the Open WebUI and then start using the Ollama from our web browser.
Since our Ollama container listens on the host TCP 11434 port, we will run our Open WebUI like this:
After the container is up, you can head to your browser and hit the http://localhost:8080 if Open WebUI is running on your own computer. If it’s on another computer, you can use http://ip-address-or-domain:8080 to access Open WebUI from browser.
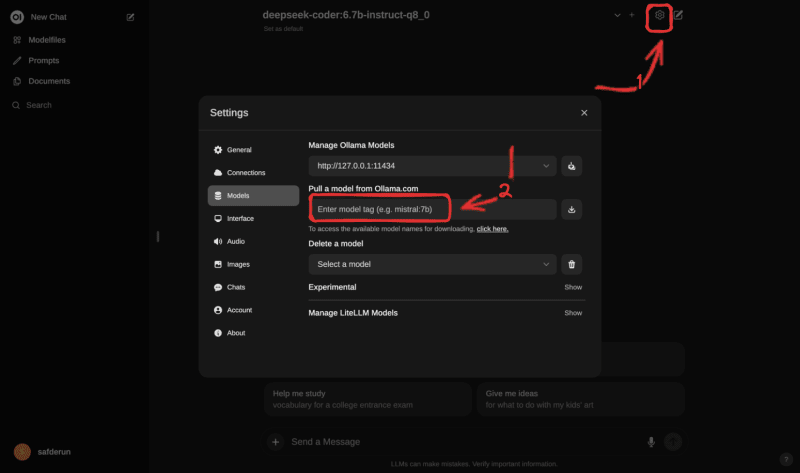
Pulling LLM AI Models
Ollama provides LLMs ready to use with Ollama server. To view all the models, you can head to Ollama Library.
Since my GPU has 12GB memory, I run these models:
Name: deepseek-coder:6.7b-instruct-q8_0 , Size: 7.2GB: I use that LLM most of the time for my coding requirements.
Name: llama3:8b-instruct-q8_0 , Size: 8.5 GB: I use that LLM to chat if I am writing emails or etc.
Name: deepseek-coder:33b-instruct-q4_0 , Size: 18 GB: I use that LLM for challenging coding requirements.
You can paste the LLM name into the red box to pull the LLM image.
Performance
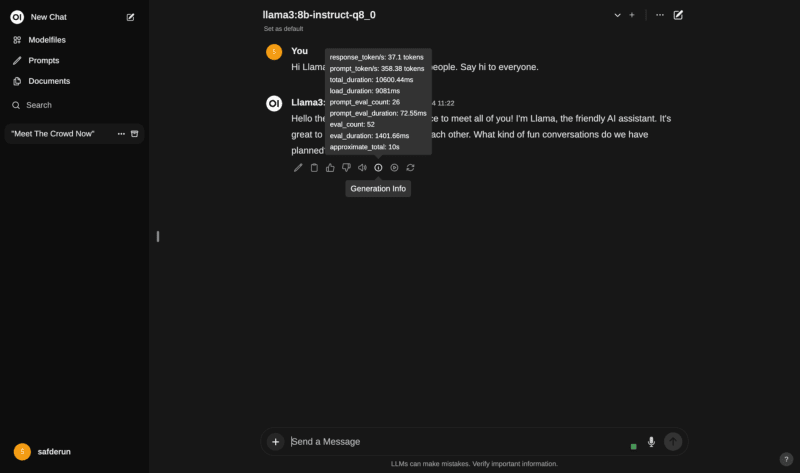
If you want to see how the AI is performing, you can check the i button of response messages from AI.
At the first message to an LLM, it will take a couple of seconds to load your selected model.
As you can see below, the LLM took 9 seconds to get loaded. Then answered in 1 second.
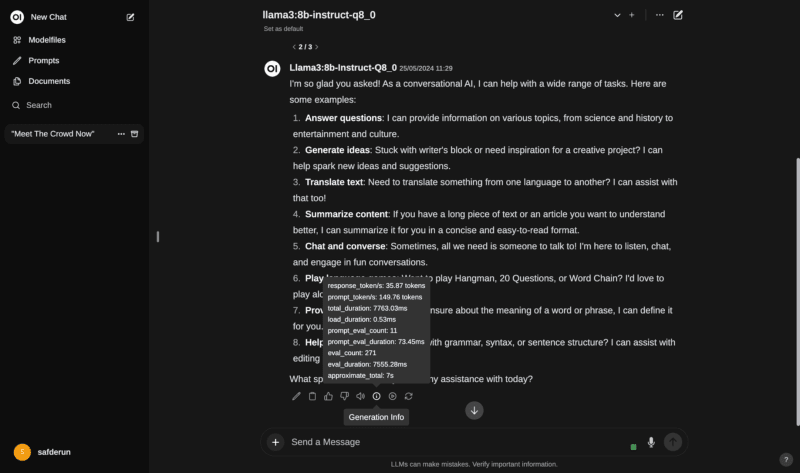
The messages after the first one doesn’t took that load time.
As you can see below, it started to response after 0.5 seconds and all the answer took 7.7 seconds.
Also you can check your GPU statics if you want to be sure about where the LLM is running.
For the AMD GPUs, you can use radeontop
For Nvidia GPUs, you can use nvidia-smi.
This is my radeontop command outputs while a prompt is running:
For More
If you like the post, you can head to my personal blog site and read more about DevOps, Linux, system engineering, and self-hosted applications for homelab!

