
Hello There!!!
Called Sarvar, I am an Enterprise Architect, Currently working at Deloitte. With years of experience working on cutting-edge technologies, I have honed my expertise in Cloud Operations (Azure and AWS), Data Operations, Data Analytics, and DevOps. Throughout my career, I’ve worked with clients from all around the world, delivering excellent results, and going above and beyond expectations. I am passionate about learning the latest and treading technologies.
Folks, today we are looking into, Git sync is an exciting new feature from CloudFormation that enables customers to easily connect Git, a popular version control system, with their cloud resource management. We are going to see the implementation of a real-time connection with an actual example. We’ll make the changes that are needed, establish a few AWS resources, and investigate our options for leveraging CloudFormation to enable Git Sync in the future.
So let’s begin……!!!
What is Amazon CloudFormation Git Sync?
The Amazon CloudFormation Git Sync is a solution that integrates the popular version control system Git with AWS CloudFormation. Thanks to this integration, developers may store CloudFormation templates directly in a Git repository, where they can define and configure cloud resources. Git Sync makes sure that cloud infrastructure is always up to date with the most recent code changes by automatically updating the related CloudFormation stack with each commit to the repository. This feature streamlines processes, permits automatic updates, and lets you provide dynamic values using a YAML deployment file, making cloud resource management easier.
The ability for Git sync to automatically update is one of its main advantages. Once set up, AWS will make sure that your cloud stack always reflects the most recent modifications by automatically syncing the deployment file and CloudFormation template with each Git commit. This increases development speed and creates an environment that is more responsive and flexible. Moreover, testing CloudFormation modifications prior to deploying them to production is made possible by this functionality. Teams can guarantee the dependability and durability of their cloud settings by setting up various stacks to sync from Git branches, such as a production branch for live deployment and a staging branch for testing.
Let’s See How We Can Leverage the New Feature of Amazon CloudFormation:
We will view the entire tutorial in a step-by-step manner. Before we begin this tutorial, there are a few items that are necessary.
Prerequisites:
Need GitHub account.
Need CloudFormation templates. (You will get this in my GitHub URL)
IAM Role and Policy Link
GitHub Repository URL – Link
Step 1: Create IAM Policy and Role
Here we are just creating a IAM policy & Role required for this demo. If you want detailed information please follow link in above prerequisites section.
Use below JSON to create a Policy required for this demo.
“Version”: “2012-10-17”,
“Statement”: [
{
“Sid”: “SyncToCloudFormation”,
“Effect”: “Allow”,
“Action”: [
“cloudformation:CreateChangeSet”,
“cloudformation:DeleteChangeSet”,
“cloudformation:DescribeChangeSet”,
“cloudformation:DescribeStackEvents”,
“cloudformation:DescribeStacks”,
“cloudformation:ExecuteChangeSet”,
“cloudformation:GetTemplate”,
“cloudformation:ListChangeSets”,
“cloudformation:ListStacks”,
“cloudformation:ValidateTemplate”
],
“Resource”: “*”
},
{
“Sid”: “PolicyForManagedRules”,
“Effect”: “Allow”,
“Action”: [
“events:PutRule”,
“events:PutTargets”
],
“Resource”: “*”,
“Condition”: {
“StringEquals”: {
“events:ManagedBy”: [“cloudformation.sync.codeconnections.amazonaws.com”]
}
}
},
{
“Sid”: “PolicyForDescribingRule”,
“Effect”: “Allow”,
“Action”: “events:DescribeRule”,
“Resource”: “*”
}
]
}
Create IAM Role with Trust Policy.
“Version”: “2012-10-17”,
“Statement”: [
{
“Sid”: “CfnGitSyncTrustPolicy”,
“Effect”: “Allow”,
“Principal”: {
“Service”: “cloudformation.sync.codeconnections.amazonaws.com”
},
“Action”: “sts:AssumeRole”
}
]
}
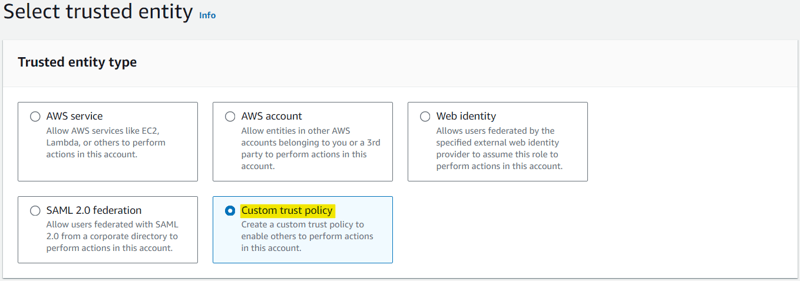
Create Role with this Highlighted Option and Attached above created policy to it.
Step 2: Setup a Connection with GitHub Account.
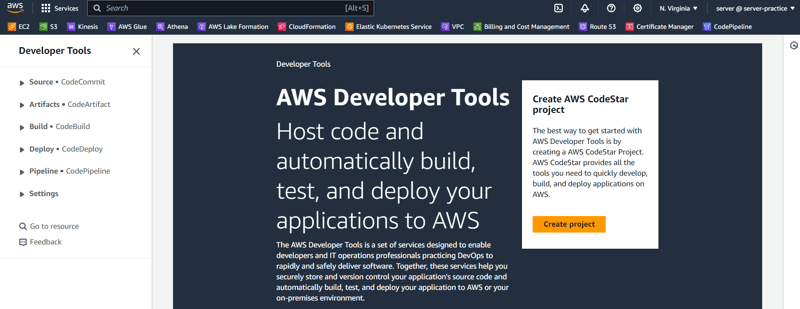
There are two methods we can use to create this connection: using the Developer tool service which know as CodePipeline Service or the CloudFormation console. Since you will ultimately be using the developer tool service only let me demonstrate how to establish a connection using the development tool.
Login to AWS Console
Search Any of this Service – CodePipeline, CodeBuild, CodeCommit, CodeDeploy or CodeArtifacts.
You will see the console of Developers Tool.
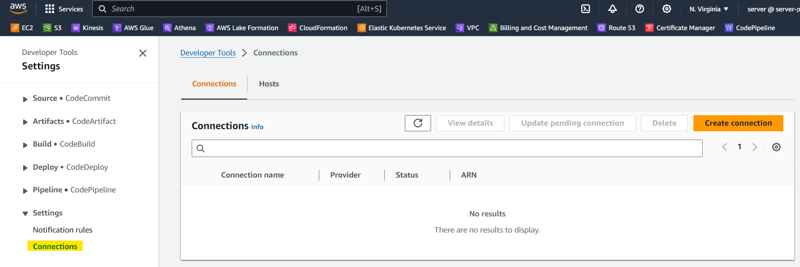
Now click on Settings which is located at the left sidebar.
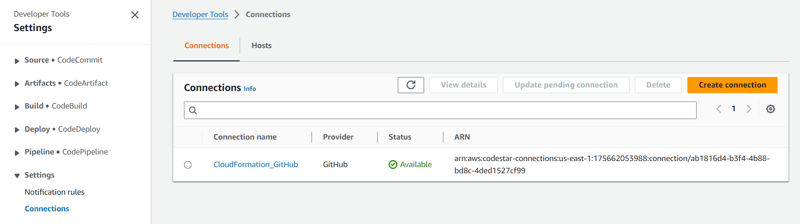
Here you can see the connections. Here we are established the new GitHub connection.
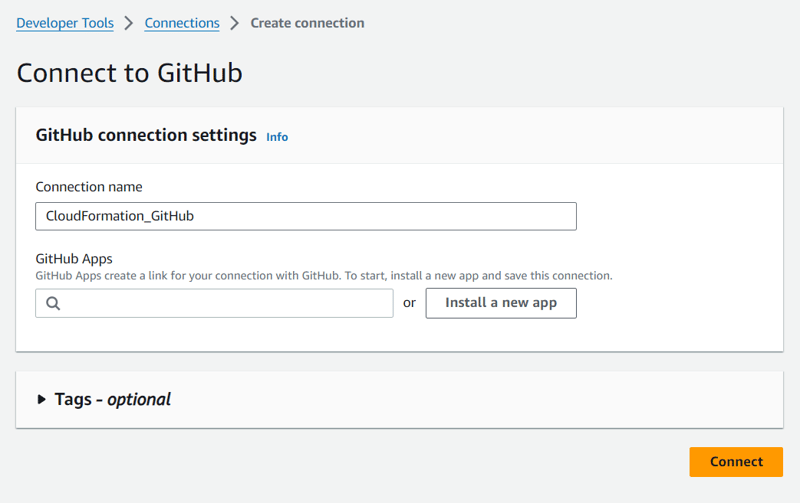
Create New connection by click on Create Connections.
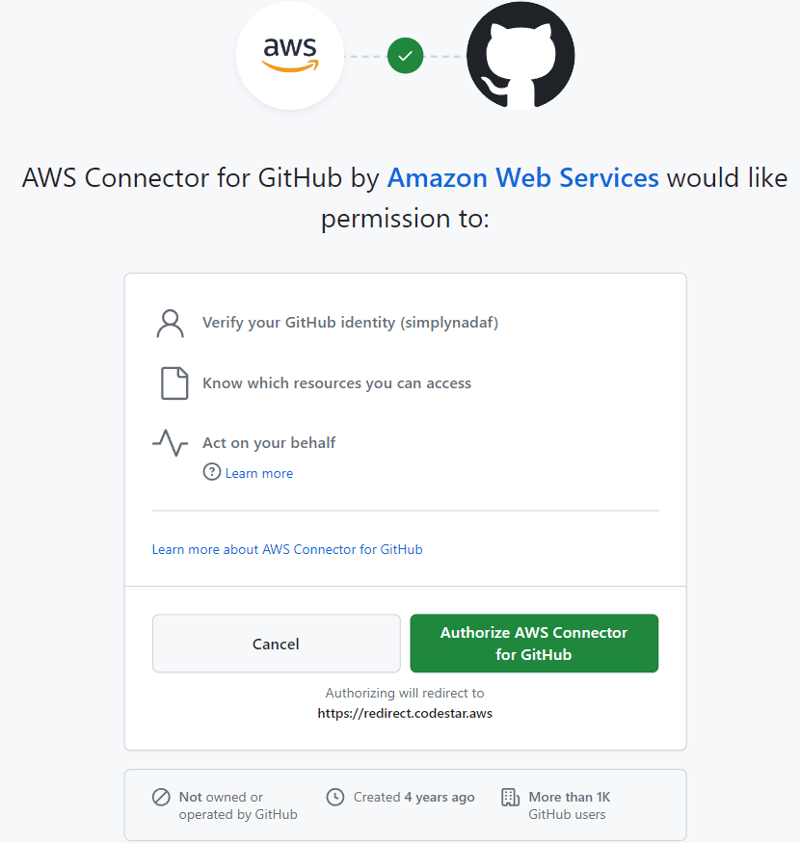
Once you select GitHub as your provider just click on connect GitHub and it will reroute you to authorization page and it will look like below. You should pre login to you GitHub account.
Once you click on Authorize option it will direct you to GitHub Connection Setting were you need to click on install new app option. At last just click on Connect.
If Everything goes well you will able to see the connection string like below and you are done with Connection.
Step 3: Let’s Perform GitSync feature in CloudFormation
I want to share an important note with you before we get started. Here, a VPC will be created, and an EC2 instance with the auto scaling option is being created inside of that VPC. in order for us to scale up and down the EC2 instances. The deployment file is the second crucial point. A deployment file contains a configuration file needed to manage a CloudFormation stack. These files are usually in YAML or JSON format. It has values and options that specify how the resources in the stack should be set up. This file allows you to customize the stack’s parameters and tags and provides the path to the CloudFormation template. Automatic updates are performed to the corresponding CloudFormation stack when modifications are made to the deployment file and committed to the repository.
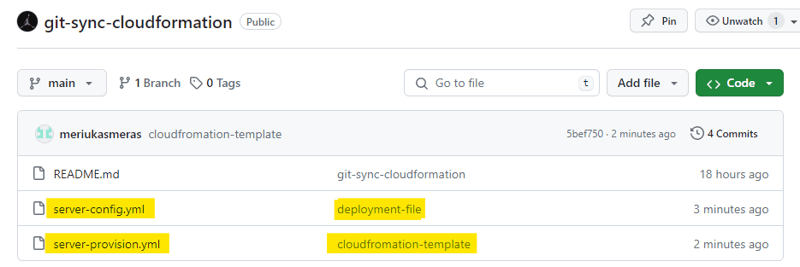
GitHub Repo Files:
Here we are having only 2 files one is deployment file which we will use in this demo to run our cloudformation template and second one is cloudformation template as shown below.
Deployment File Format:
This file will use to deploy the Cloudformation Stack. I Highly recommend you to go through my GitHub repo to see the deployment file and actual cloudformation template.
parameters:
image: public.ecr.aws/lts/nginx:latest
task_size: size
max_capacity: 11
port: 80
env: prod
tags:
cost-center: ‘123456’
org: ‘AWS’
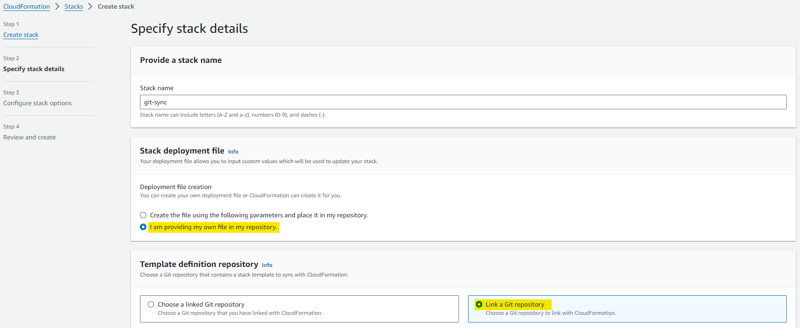
Let’s Create CloudFormation Stack: Login to the AWS Console and Go to Cloudformation Service and Click on Create New Stack you will able to the interface as below and just go ahead and select GitSync option has highlighted below.
Give Suitable name to Stack and Select Link a Git Repository.
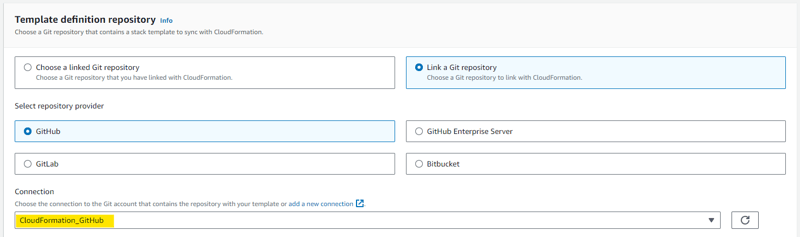
Once you select the Link a Git Repository Select Git Repository Provider and Connection which we have created at very 1st stage.
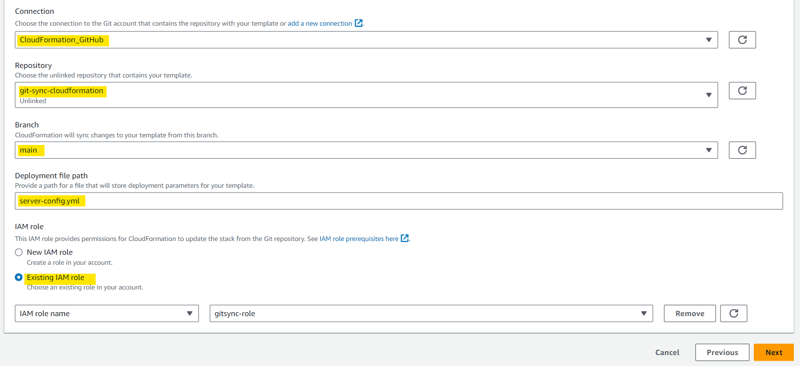
Once you select the Connection then it will able to fetch all the repositories and you can choose the repo, branches and deployment file. Lastly select the role we have prepared for this demo in above section.
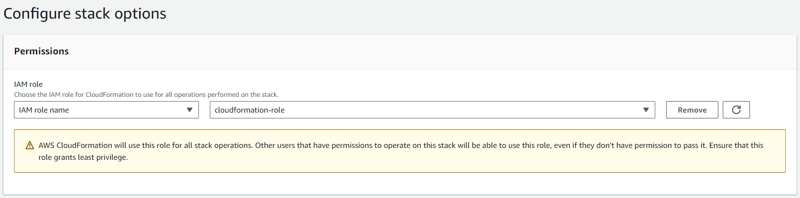
If all of your selections are correct, let’s proceed to the next phase, where you will choose the role that will assist Cloudformation in creating the necessary resources. This role is different from the one we have previously created, hence it is a straightforward role with full resource creation access. Rest keep everything default hit click on create option and here you go….
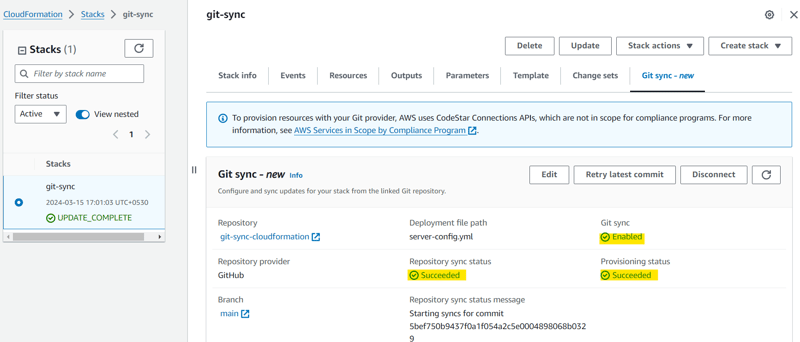
As you can see below the stack has been created successfully and you can able to the progress here. GitSync is Enable and Git Repository Sync is Successful. Only provision will take sometime because its actual stage were all the deployment will happens.
Finally all the Resource provision has been completed successfully. Now you can validate the resources.
Navigate to VPC Service and click on VPC and you will able to see the new VPC Namely gitsync-cft-vpc as shown below.
Now Navigate to EC2 Service and See you have one EC2 Instance running nemaly gitsync-cft-auto-scaling-group as shown below.
Step 4: Let’s Perform Some Chaos Testing to See How Well the Cloudformation GitSync Feature Works.
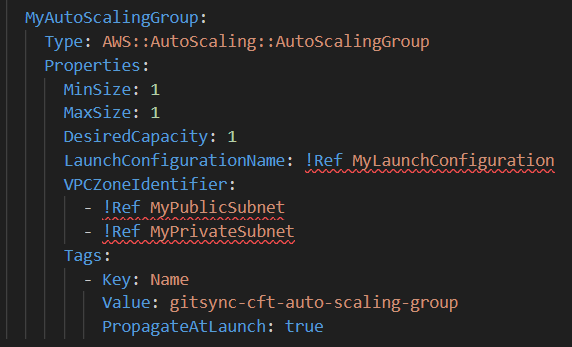
Here, we modify the Cloudformation template, and we’ll see how Gitsync detects and applies the modifications to our Cloudformation stack in terms of resource creation automatically. As you can see, we set the autoscaling group for our EC2 instance to 1, as you can see below. We are now changing it to 2, and we’ll see how the modifications take effect. For your reference, kindly refer to the images below.
The cloudformation will automatically detect the changes as you make them and commit them to Git as you can see below, we have two EC2 instances ready. This feature’s attractiveness lies in it.
Step 5: CleanUp
All you have to do is delete the stack that you prepared for this demo the stack will be automatically removed all resource we have created using cloudformation, and there won’t be additional costs.
Conclusion: With the release of Amazon CloudFormation Git Sync, version control for cloud resources has advanced significantly as Git’s powerful features are smoothly integrated with AWS CloudFormation. By enabling developers to instantly synchronize CloudFormation templates with their Git repositories, this ground-breaking tool streamlines the development process and promotes a more effective workflow. Git Sync shortens development timelines and promotes a more responsive and agile development environment by enabling automatic updates with every Git contribution, guaranteeing that cloud stacks are always up to date.
— — — — — — — —
Here is the End!
Thank you for taking the time to read my article. I hope you found this article informative and helpful. As I continue to explore the latest developments in technology, I look forward to sharing my insights with you. Stay tuned for more articles like this one that break down complex concepts and make them easier to understand.
Remember, learning is a lifelong journey, and it’s important to keep up with the latest trends and developments to stay ahead of the curve. Thank you again for reading, and I hope to see you in the next article!
Happy Learning!

