
INTRODUCTION
In this guide I will be taking you on a ride on how to leverage the power of GitHub actions, to efficiently build and push Docker image to two essential container registries, Amazon ECR and Docker Hub, Plus, we’ll tag them based on the GitHub run number and “Latest”, all in one go, optimizing your workflow for maximum efficiency and reliability.
Prerequisite
Git and GitHub
Docker
DockerHub account
AWS account
A GitHub repository, a Dockerfile, and the project you aim to build and push to the registry.
Wondering why we are pushing to dual container registries
and tagging the images twice using the GitHub run number and “Latest”?
Here you go:
1.Dual Image Distribution
By pushing the Docker image to both AWS ECR and Docker Hub simultaneously, you gain redundancy and flexibility. Here’s why it’s advantageous:
High Availability: If one container registry experiences downtime or issues, your application remains accessible through the other.
Geo-Distribution: AWS ECR and Docker Hub have different global distributions. Pushing to both ensures that your application is available to users worldwide with lower latency.
Vendor Independence: Diversifying the storage locations mitigates the risk of vendor-specific limitations or changes affecting your deployments.
2.Tagging with “latest” and GitHub Run Number
Tagging Docker images with “latest” and the GitHub run number offers several advantages:
Versioning: The “latest” tag simplifies the process of deploying the most recent version of your application.
Traceability: Each image is tagged with the GitHub run number, making it easy to trace back to the specific commit and build that produced the image. This is invaluable for debugging and auditing purposes.
Rollback: In case of issues with a new release, you can easily revert to a previous image tagged with a specific run number.
What is GitHub actions?
GitHub Actions is a continuous integration and continuous delivery (CI/CD) platform that allows you to automate your build, test, and deployment pipeline.
What is DockerHub?
Docker Hub is a container registry built for developers and open source contributors to find, use, and share their container images.
What is Amazon ecr?
Amazon Elastic Container Registry (Amazon ECR) is a fully AWS managed container registry offering high-performance hosting, so you can reliably deploy application images and artifacts anywhere
Shall we begin? Okay, Let’s get it done in 7 steps
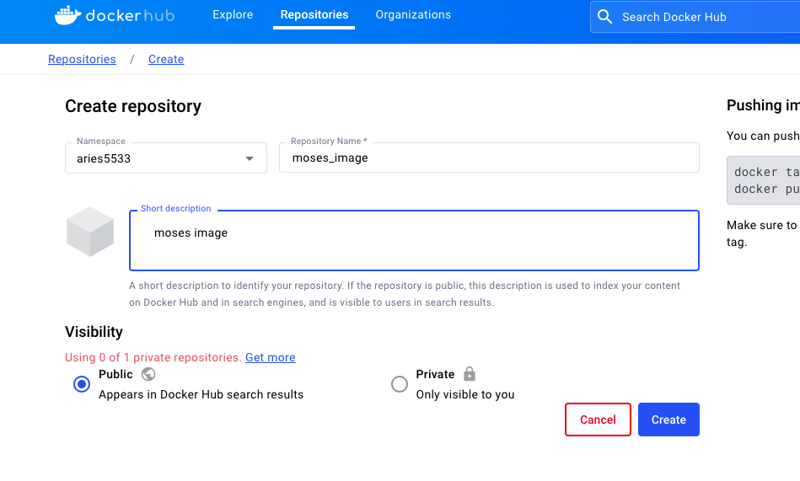
Create Dockerhub repository
Create a repository on Docker Hub where your docker images will stored:
Sign into your docker hub account, navigate to repositories, click on “create repository”
Enter your preferred repository name, then click on create.
There! your repository is ready.
Create Amazon ecr repository
On your AWS account, search for ecr and create a repository for your docker images to be stored:
In the navigation pane, choose Repositories under “Private registry”.
On the Repositories page click on Create repository.
Enter the preferred repository name and click on “Create”.
Configure your repository secrets on GitHub
Click on the “settings” in your repository
In the “Security” section of the sidebar, select Secrets and – variables, then click Actions.
Click the Secrets tab.
Click New repository secret.
secrets to add: AWS_ACCESS_KEY_ID, AWS_SECRET_ACCESS_KEY, AWS_ACCOUNT_ID, DOCKERHUB_PASSWORD, DOCKERHUB_USERNAME.
AWS_ACCESS_KEY_ID and AWS_SECRET_ACCESS_KEY: These are credentials used to authenticate and authorize access to Amazon Web Services (AWS) resources.
AWS_ACCOUNT_ID: This is the unique identifier for your AWS account.
DOCKERHUB_USERNAME and DOCKERHUB_PASSWORD: These are credentials used to authenticate and authorize access to Docker Hub, a cloud-based repository for storing and sharing containerized applications.
Create a workflow file
In the project directory where your source code and dockerfile resides you need to add the workflow file:
Think of GitHub Actions workflows as sets of instructions written in YAML files. To get started, make a new file called main.yml inside the .github/workflows directory of your repository. This file will outline the steps needed to build and push your Docker image.
The workflow will be triggered whenever we push to the main branch.
Copy the below code and paste in the main.yml file.
Note: In the workflow below, make sure to replace every [Repository name] with the actually name of your image repository
push:
branches:
– main
jobs:
deploy_to_ecr:
name: Deploy to ECR
runs-on: ubuntu-latest
steps:
– name: Check out code now
uses: actions/checkout@v2
– name: Check out code
uses: actions/checkout@v2
– name: Configure AWS credentials
uses: aws-actions/configure-aws-credentials@v1
with:
aws-access-key-id: ${{ secrets.AWS_ACCESS_KEY_ID }}
aws-secret-access-key: ${{ secrets.AWS_SECRET_ACCESS_KEY }}
aws-region: us-east-1
– name: Login to Amazon ECR
id: login-ecr
uses: aws-actions/amazon-ecr-login@v1
– name: Build, tag, and push image to Amazon ECR
env:
ECR_REGISTRY: ${{ steps.login-ecr.outputs.registry }}
ECR_REPOSITORY: [Repository name]
IMAGE_TAG: latest
run: |
docker build -t $ECR_REGISTRY/$ECR_REPOSITORY:$IMAGE_TAG .
docker tag $ECR_REGISTRY/$ECR_REPOSITORY:$IMAGE_TAG $ECR_REGISTRY/$ECR_REPOSITORY:${{ github.run_number }}
docker push $ECR_REGISTRY/$ECR_REPOSITORY:$IMAGE_TAG
docker push $ECR_REGISTRY/$ECR_REPOSITORY:${{ github.run_number }}
deploy_to_dockerhub:
name: Deploy to Docker Hub
runs-on: ubuntu-latest
steps:
– name: Check out code
uses: actions/checkout@v2
– name: Login to Docker Hub
uses: docker/login-action@v2
with:
username: ${{ secrets.DOCKERHUB_USERNAME }}
password: ${{ secrets.DOCKERHUB_PASSWORD }}
– name: Build and tag Docker images
run: |
docker build . –file Dockerfile –tag ${{ secrets.DOCKERHUB_USERNAME }}/[Repository name]:latest
docker tag ${{ secrets.DOCKERHUB_USERNAME }}/[Repository name]:latest ${{ secrets.DOCKERHUB_USERNAME }}/[Repository name]:${{ github.run_number }}
– name: Push images to Docker Hub
run: |
docker push ${{ secrets.DOCKERHUB_USERNAME }}/[Repository name]:latest
docker push ${{ secrets.DOCKERHUB_USERNAME }}/[Repository name]:${{ github.run_number }}
Push your project To GitHub
Now that you’ve added the GitHub Actions workflow to your project, it’s time to take the next steps.
Initialize a Git repository: If you haven’t already, initialize a Git repository in your project folder by running git init**. This will set up a new Git repository locally.
Add your files: Use git add . to add all files in your project to the staging area. If you want to add specific files, replace . with the file names.
Commit your changes: Commit the added files to the local repository with a descriptive message using git commit -m “Your commit message”.
Link to your GitHub repository: If you haven’t already, link your local repository to your GitHub repository by adding it as a remote. You can do this with the command git remote add origin . Replace with the URL of your GitHub repository.
Push to GitHub: Finally, push your committed changes to GitHub with git push -u origin main. This command pushes your changes to the main branch on GitHub.
Finally! you can watch your workflow run:
On your Github repository, Click on Actions
Verify that the Docker image is pushed to the container registries(Docker, Ecr)
For Amazon Ecr:
For DockerHub:
Github Repository for this Tutorial
You can also clone here and use the sample code: https://github.com/ARIES5533/Image-push-to-Ecr-and-DockerHub
