01- Harbor Installation Prerequisites
Hardware
The following table lists the minimum and recommended hardware configurations for deploying Harbor.
Resource
Minimum
Recommended
CPU
2 CPU
4 CPU
Mem
4 GB
8 GB
Disk
40 GB
160 GB
Software
The following table lists the software versions that must be installed on the target host.
Software
Version
Description
Docker Engine
Version 20.10.10-ce+ or higher
For installation instructions, see https://docs.docker.com/engine/installation/
Docker Compose
docker-compose (v1.18.0+) or docker compose v2 (docker-compose-plugin)
For installation instructions, see https://docs.docker.com/compose/install/
OpenSSL
Latest is preferred
Used to generate certificate and keys for Harbor
Network ports
Harbor requires that the following ports be open on the target host.
Port
Protocol
Description
443
HTTPS
Harbor portal and core API accept HTTPS requests on this port. You can change this port in the configuration file.
4443
HTTPS
Connections to the Docker Content Trust service for Harbor. You can change this port in the configuration file.
80
HTTP
Harbor portal and core API accept HTTP requests on this port. You can change this port in the configuration file.
For Opening Network ports , we use ufw :
sudo ufw allow 80/tcp # Open HTTP port
sudo ufw allow 443/tcp # Open HTTPS port
sudo ufw allow 4443/tcp # Open Harbor’s default port
sudo ufw allow 8080/tcp # Open port 8080
Then we enable the ufw :
sudo ufw status # Staus of ufw
we should an output like following output :
To Action From
—
22/tcp ALLOW Anywhere
80/tcp ALLOW Anywhere
443/tcp ALLOW Anywhere
4443/tcp ALLOW Anywhere
8080/tcp ALLOW Anywhere
02- Configure DNS Records
Part 1 : DNS Records
We should config and set DNS Records for our domain.
My main domain is : developerhub.blog
I need a subdomain for Harbor : harbor.developerhub.blog
Also I have IPV4 and IPV6 on my VPS . So we have
⚠️ Change IPV4 and IPV6 in following tutorial to your VPS IP .
A Records (IPv4):
@ (or developerhub.blog): This record maps the root domain to your server’s IPv4 address. TTL: 3600 (1 hour)
www.developerhub.blog: This record maps the www subdomain to your server’s IPv4 address. TTL: 3600 (1 hour)
harbor.developerhub.blog: This record maps the harbor subdomain to your server’s IPv4 address. TTL: 3600 (1 hour)
AAAA Records (IPv6):
@ (or developerhub.blog): This record maps the root domain to your server’s IPv6 address. TTL: 3600 (1 hour)
www.developerhub.blog: This record maps the www subdomain to your server’s IPv6 address. TTL: 3600 (1 hour)
harbor.developerhub.blog: This record maps the harbor subdomain to your server’s IPv6 address. TTL: 3600 (1 hour)
CNAME Record:
harbor.developerhub.blog: This record is an alias or a canonical name record that points the harbor subdomain to another domain name. TTL: 3600 (1 hour)
MX Record:
@ (or developerhub.blog): This record specifies the mail server(s) responsible for handling email for your domain. TTL: 86400 (24 hours)
TXT Records:
@ (or developerhub.blog): TXT records are used for various purposes, such as verifying domain ownership, configuring email security (SPF, DKIM), or providing additional information about your domain. TTL: 3600 (1 hour)
Here’s an example of how your DNS records might look like with TTL values:
@ IN A 192.0.2.1 3600
www IN A 192.0.2.1 3600
harbor IN A 192.0.2.1 3600
; AAAA Records (IPv6)
@ IN AAAA 2001:db8::1 3600
www IN AAAA 2001:db8::1 3600
harbor IN AAAA 2001:db8::1 3600
; CNAME Record (Only if harbor is hosted on a different server)
harbor IN CNAME example.com 3600
; MX Record
@ IN MX 10 mail.example.com 86400
; TXT Records (Examples)
@ IN TXT “v=spf1 include:example.com ~all” 3600
@ IN TXT “google-site-verification=…” 3600
The TTL (Time to Live) value specifies the amount of time (in seconds) that a DNS record can be cached by other DNS servers and clients before it needs to be refreshed. A lower TTL value means that changes to your DNS records will propagate faster, but it also increases the load on your DNS server. A higher TTL value reduces the load on your DNS server but may cause delays in propagating changes.
The recommended TTL values can vary based on your specific use case and requirements. For example, MX records generally have a higher TTL value (e.g., 24 hours) since they don’t change frequently, while A and AAAA records may have a lower TTL value (e.g., 1 hour) to facilitate faster updates in case of IP address changes.
⚠️ We need to configure SSL Certificate for this domain and subdomain .
Also We should set DNS Records for SSL.
Part 2 : Let’s Encrypt SSL Certificate
Installing certbot
Debian
sudo apt-get install certbot python3-certbot-nginx
Red-Hat
sudo yum install certbot python3-certbot-nginx
Obtain SSL Certificate using Certbot
Create a TXT Record for Domain Ownership Verification
For developerhub.blog
For harbor.developerhub.blog
⚠️ Warning : The acme-challenge-value for domain and subdomain is different !
You can check DNS Records and acme-challenge-value in the following website :
Part 3 – Convert SSL Certificates
If you want to upload you SSL certificate into your domain Provider , it is better to do following steps :
Go to SSL directory
cd /etc/letsencrypt/live/developerhub.blog
Convert privkey.pem to privkey.key
Convert cert.pem to cert.crt
Copy cert.crt to docker directory
cd /etc/docker/certs.d/
# mkdir YOURDOMAIN/
mkdir developerhub.blog
Then copy cert.crt to docker directory :
cp /etc/letsencrypt/live/developerhub.blog/cert.crt
/etc/docker/certs.d/developerhub.blog/
chmod 644 /etc/docker/certs.d/developerhub.blog/cert.crt
Restart docker
sudo systemctl status docker
03- Harbor Installation Process
The process of installing Harbor involves several steps, which are all essential to ensure a smooth and successful installation.
Step 1 – Download the Harbor Installer
The first step is to download the Harbor installer from the official GitHub repository. It’s important to select the appropriate installer that corresponds to your operating system. This is to ensure compatibility and prevent potential installation issues.
Harbor Release URL : https://github.com/goharbor/harbor/releases
In this tutorial , I’ve used offline installer
wget
https://github.com/goharbor/harbor/releases/download/v2.9.4/
harbor-offline-installer-v2.9.4.tgz
EOF
Step 2 – Unzip the Installer
Once the download process is complete, the next step is to unzip the installer. This can be done using any standard unzipping tool. When unzipped, the installer files should be readily accessible.
tar xzvf harbor-offline-installer–v2.9.4.tgz
Step 3 – Configure the harbor.yml File
Next, it’s time to configure the harbor.yml file. This configuration file is crucial as it contains various settings and parameters that Harbor will use during and after the installation. It’s important to carefully review and update this file according to your specific requirements.
cp harbor.yml.tmpl harbor.yml
Then we should edit the harbor.yml :
We just edit hostname , http port , https certificate and private_key .
The remain config is default .
# The IP address or hostname to access admin UI and registry service.
# DO NOT use localhost or 127.0.0.1, because Harbor needs to be accessed by external clients.
hostname: harbor.developerhub.blog
# http related config
http:
# port for http, default is 80. If https enabled, this port will redirect to https port
port: 8080
# https related config
https:
# https port for harbor, default is 443
port: 443
# The path of cert and key files for nginx
certificate: /etc/letsencrypt/live/developerhub.blog/fullchain.pem
private_key: /etc/letsencrypt/live/developerhub.blog/privkey.pem
Step 4 – Run install.sh Script
Finally, once the harbor.yml file has been configured to your liking, the last step is to run the install.sh script. This script will initiate the installation process of Harbor. You’ll need to wait for some time as the script installs all necessary components and sets up Harbor on your system.
⚠️ After Installation , you can check docker-compose ps in the harbor directory to ensure harbor images are running and up !
04- Harbor UI login
We can login to Harbor UI using the hostname url in harbor.yml
harbor.developerhub.blog
Credentials for login (Default ) :
Password : Harbor12345
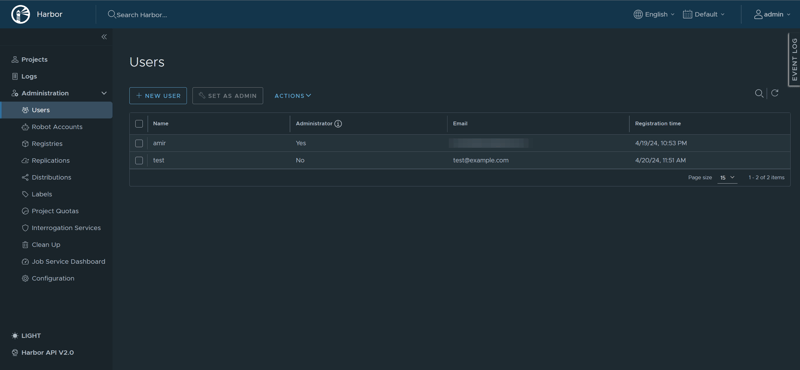
05- Managing Users
From Users Tab , we can add new users to Harbor
06- Working with Projects
For creating docker private registry , we need to create new projects to able to push new docker images to Harbor .
So we create a new project name : reg
In the client ( Where we want to push images from ) , first we should login to our docker private registry using following command
docker login harbor.developerhub.blog
Then docker asks username and password
Password : Harbor12345
If the credentials is true , you should see this message :
WARNING! Your password will be stored unencrypted in /home/amir/.docker/config.json.
Configure a credential helper to remove this warning. See
https://docs.docker.com/engine/reference/commandline/login/#credentials-store
Login Succeeded
Then you are able to push new images to your docker registry !
For pushing images , you should do following steps :
list docker images to see the IMAGE ID
Select the image you want to push and copy the IMAGE ID. Then change the image tag like the following structure
docker tag bb6d28039b8c harbor.developerhub.blog/reg/node:12-alpine
Then push this docker image