
By end of this article, you will have idea about following:
Creating REST APIs in Angular SSR using Express
Running the Angular SSR app locally with server
Fetching data from APIs
Prefetching
Creating production build (with sitemap)
How to run app on server
Let’s start by creating new Angular project with SSR:
Creating REST APIs using Express
Now, we will create API using expressjs. When we created application using –ssr flag, the Angular CLI already took care of installing expressjs for us.
Creating /api endpoint
Go to server.ts file, find the line with // server.get(‘/api/**’, (req, res) => { });, un-comment it and replace it with below:
res.send({ message: ‘Hello World‘, success: true });
});
Now, at first we would think to run the application as usual and expect the API to work. Go ahead, run the application using ng serve command and try to hit localhost:4200/api. You will receive below error:
The reason why it’s not working, it’s because ng serve command is designed to serve only client-side code. Let’s see how we can run both, client and server-side code together locally for development.
Running the Angular SSR app locally with server
Please note that this setup is only to run the full-stack application locally for development purposes. For production, I will explain a different setup.
Let’s install nodemon first as dev-dependency:
Next, go to your package.json. Verify the watch script is present as below and update the serve:ssr:angular-ssr-prefetch script to use nodemon:
“watch”: “ng build –watch –configuration development”,
“serve:ssr:angular-ssr-prefetch”: “nodemon dist/angular-ssr-prefetch/server/server.mjs”
}
Now, run watch in one terminal followed by serve:ssr:angular-ssr-prefetch in another:
1st terminal
2nd terminal
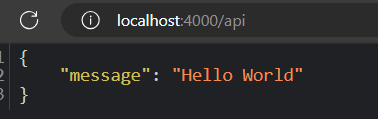
Now go to localhost:4000/api, and see that it works as expected:
To better manage all APIs, we should create an express router. And we will also create interfaces to properly manage data-types between client and server.
Let’s create new type file at src/types.ts:
message: string;
success: boolean;
datTime: number;
}
Create new express router at src/api/index.ts:
import { APIData } from ‘../types‘;
export const router = express.Router();
router.use(‘/‘, (req, res) => {
const datTime = Date.now();
const data: APIData = {
message: ‘Hello World from API Router‘,
success: true,
datTime
};
res.send(data);
});
And use that router in server.ts:
import { router as apiRouter } from ‘./src/api‘;
server.use(‘/api‘, apiRouter);
Fetching data from APIs
Now, if we want to fetch data from newly created API, we can simply do that by using HttpClient.
Let’s first configure HttpClient service to be available for injection through src/app/app.config.ts:
import { provideHttpClient, withFetch } from ‘@angular/common/http‘;
export const appConfig: ApplicationConfig = {
providers: [
// reset remains same
provideHttpClient(withFetch()),
],
};
Now, simply inject HttpClient in your component and pass /api for url:
message = ”;
getData(): void {
this.http.get<APIData>(‘/api‘).subscribe((d) => this.message = d.message);
}
Now you can simply see the message by using template interpolation:
<hr />
<div>
Data from sever:
<p><b>Message</b>: {{ message }}</p>
<p><b>Time</b>: {{ serverDateTime | date:”MMM dd, yyyy ‘at’ hh:mm:ss:SSS a” }}</p>
</div>
Prefetching
Now, sometimes we want data to be pre-loaded when user visits the page. Let’s see how we can do that!
For this example, we will use pokeapi. We will show total number of pokemons when user hits our app.
Let’s create a function to get the count:
getPokemonCount() {
this.http.get<{count: number}>(‘https://pokeapi.co/api/v2/pokemon‘).subscribe(d=>{
this.pokemonCount = d.count;
})
}
And let’s also add it in template:
<div>
Total number of pokemon: <b>{{ pokemonCount }}</b>
</div>
Now, to make it a prefetched request, we will call getPokemonCount in ngOnInit life-cycle hook:
this.getPokemonCount();
}
And that’s it! Now, if you visit localhost:4000, you will see pokemonCount is already generated with correct value!
Note that even if you refresh, it’s not calling the API again, it’s due to default configurations of provideClientHydration setup in src/app/app.config.ts .
You can also check the output by simply going into dist/angular-ssr-prefetch/browser/index.html and see the generated HTML. You will the count is present in the template in similar to below format:
This technique is helpful in many cases, for example generating HTML content from some markdown files. In case of dynamic routes, like /blog/:id , you can resolve the data using ResolveFn and access the data using activatedRoute.data .
Let me know in comments if you want an article explaining how to convert markdown to HTML and keep the content pre-loaded for dynamic routes.
Creating production build (with sitemap)
To create production build, you can simply run the build command:
And to generate sitemap, you can use ngx-sitemap. Simply add it as dev dependency:
And add the postbuild script in package.json :
“scripts”: {
“postbuild”:“ngx-sitemap ./dist/angular-ssr-prefetch/browser https://www.angular-ss-prefetch.com”
}
}
Update the script as per your need. postbuild script will run after every time build script has run successfully.
How to run app on server
Once you have generated production build, you can simply push the dist folder on your server and run the server.mjs using a process manager for nodejs, like pm2.
For example, for pm2, you could configure below ecosystem.config.js on your server:
apps: [
{
name: ‘angular-ssr-prefetch‘,
script: ‘./dist/angular-ssr-prefetch/server/server.mjs‘,
watch: false,
env: {
PORT: 3000
},
},
],
};
Conclusion
In this article we started with a new SSR enabled project. Then we added a /api endpoint using expressjs.
Next, we learned how to run the project so that API endpoints also work fine. Then we fetched data from the endpoint.
Then we moved to prefetching. Where we saw an example to keep the total counts of pokemons pre-loaded using ngOnInit hook.
And lastly, we saw how to build the production app with sitemap and how to run the application on server using pm2.
Code is available on GitHub.
Wait…
Have you heard of angular-material.dev?
I launched it in August 2023 to write tutorials and articles about Angular Material. Do check it out today and level up your game with Material Design and Angular!
Lastly, Support Free Content Creation
Contributions & Support
Even though the courses and articles are available at no cost, your support in my endeavour to deliver top-notch educational content would be highly valued. Your decision to contribute aids me in persistently improving the course, creating additional resources, and maintaining the accessibility of these materials for all. I’m grateful for your consideration to contribute and make a meaningful difference!
Follow me on X (Twitter), Medium, Dev.to, LinkedIn, and Peerlist!

