So, lately, I have been working on a form component. It was a registration form that had quite a few fields in it. The state management for this was not complex, but it was repetitive. Creating a state for each input field and updating it whenever the user interacts with them, I was writing the same code with minor differences.
let [lname,setLname] = useState(“”);
let [email,setEmail] = useState(“”);
…
Also, I felt that all these pieces must be related to one another rather than being separate entities. So, I switched to using a single state with an object storing all input fields.
fname: “”,
lname: “”,
email: “”,
…
});
Even though the state was centralized, the event handlers still managed the state update logic.
const regex = /^[a-zA-Z0-9.!#$%&’*+/=?^_`{|}~-]+@[a-zA-Z0-9-]+(?:.[a-zA-Z0-9-]+)*$/;
if(e.target.value.match(regex))
setFormData({…state, email: e.target.value});
};
I was looking for some way to centralize this as well. That’s when I came across the useReducer() hook, a utility for complex state management.
Want to know about this? Just follow along with me.
What is this useReducer() hook, and how does it work?
The useReducer() hook is an alternative to the useState() hook that helps to manage complex states in a React application. In fact, the useState() hook uses the useReducer() hook behind the scenes itself.
The useReducer() hook takes a reducer function and the initial state as its parameter and returns an array. The first element of this array is the state object, and the second element is the dispatch function. At first, it might look very similar to useState(). But the working is very different here.
The state and the initialState is obvious. But, what is dispatch and reducer? Let’s try to understand how all this works.
Reducer, Actions and Dispatch
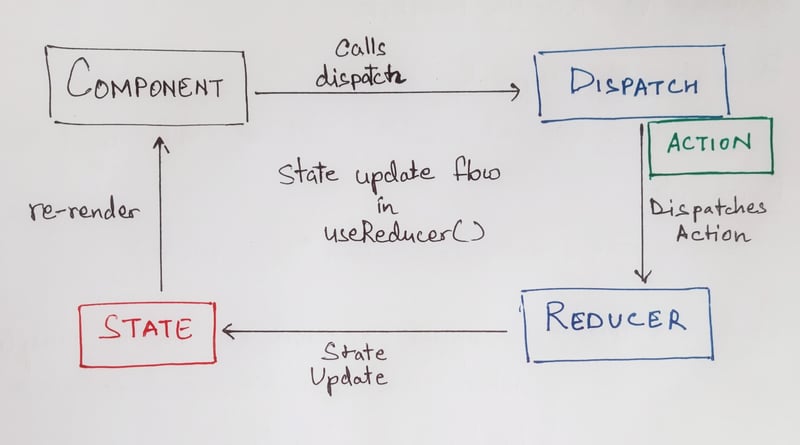
The dispatch is analogous to the update function returned by the useState() hook. Both are used to update the state. The difference lies in how they work. Unlike the update function, where we pass the next state directly, we pass an Action here.
Now, you may ask, “What is this Action?”. Well, An Action is an object that specifies how we want to update our state. You may structure your Action object as you wish. But conventionally, we have two fields in this object – type and payload. The type specifies the kind of update that we want to perform. The payload takes any external values that might be needed for the update.
What does the dispatch do with this Action object? It passes it to its associated reducer. The reducer is a function that maintains the logic for state updates for every action type. It takes the current state and an Action object as arguments and returns the updated state per the requested action. After this, the component is rendered according to the update state.
Let’s try this out
Let us build a simple Counter App to see this working (cliche, I know). The application will have four functions –
We can increment the count by 1.
We can decrease the count by 1.
We can add some value to the count.
We can subtract some value from the count.
Let’s begin with our initial state. It will only contain a field for the count.
Now, we implement our reducer function.
const {type,payload} = action;
const {count} = state;
switch(type) {
case “INCREMENT“: return {…state, count: count + 1};
case “DECREMENT“: return {…state, count: count – 1};
case “ADD“: return {…state, count: count + payload.value};
case “SUBTRACT“: return {…state, count: count – payload.value};
default: return state;
}
}
It’s time to implement our Counter component.
const [state, dispatch] = useReducer(reducer, initState);
const [value, setValue] = useState(0);
return (
<div>
<h1>{state.count}</h1>
<button onClick={() => dispatch({ type: “INCREMENT“ })}>Increment</button>
<button onClick={() => dispatch({ type: “DECREMENT“ })}>Decrement</button>
<div>
<input
type=“number”
value={value}
onChange={(e) => setValue(parseInt(e.target.value))}
/>
<button onClick={() => dispatch({ type: “ADD“, payload: { value } })}>
Add
</button>
<button
onClick={() => dispatch({ type: “SUBTRACT“, payload: { value } })}
>
Subtract
</button>
</div>
</div>
);
}
export default Counter;
And with this, our component is complete. Copy this code and play around with it to understand things better.
Things to consider
Here are some points to remember when working with the useReducer() hook.
Do not use them anywhere and everywhere. Use it only where the structure of the state is somewhat complex. Otherwise, you’ll be writing unnecessarily lengthy codes. For simple states, stick to the useState() hook.
Storing action types as constants is better than using literals. It helps in avoiding bugs due to typos.
Always return a new object from the reducer when updating the state. React makes a shallow comparison when comparing new and old states. Updating a particular field will not trigger re-renders.
That’s all Folks
That’s a wrap for now, folks! I hope this article was insightful to you. I look forward to your insights and feedback. Let’s keep this conversation going in the comments below!
And hey, if you want to connect beyond these pages, these are the places where you can find me!
Until next time, stay curious and keep exploring!🌟 Thank You for reading this far. 😊