
An Integration platform as a service (iPaaS), like Boomi, is known for integrating platforms and data from different services. However, another interesting feature of the iPaaS solution is its ability to ensure efficient communication with your business clients.
Automating email sending directly from your MySQL databases using Boomi allows you to establish personalized and timely communication without manual intervention. This eliminates the time-consuming task of manually sending emails and ensures that your customers receive relevant information promptly.
This guide discusses automating sending out emails, empowering you to leverage your MySQL data to trigger custom email notifications.
TL;DR
To automate email sending from your MySQL database with Boomi, follow these steps:
Create a new Boomi integration process
Collect the data from the database
Transform the data type from database to CSV
Split the CSV files by line
Set Properties
Create the Message
Send the email
Prerequisites
To get the most out of this article, you must have the following:
A Boomi platform account: if you do not have one, create a 30-day free trial account
A Boomi Atom is installed locally and connected to a MySQL account. To learn how to do this, check out How to connect your Boomi Atom runtime and MySQL on Docker.
A Boomi Mail connection; to learn how to create one, check out this Creating the Mail connection and Operation Boomi documentation
Inserting data in your MySQL database
MySQL is an open-source relational database management system (RDBMS) that stores, organizes, and accesses data in a structured format. The prerequisites section discussed Connecting your Boomi Atom runtime and MySQL on Docker, and this section will build on that knowledge.
The MySQL database will hold the user information, including their names and the email addresses to which you will send your desired message. To do this, you must change your folder structure and the docker-compose.yml file you created when you connected your Boomi Atom runtime to your MySQL database.
In your project’s root directory, create a folder named ‘mysql-data’. This folder will store your MySQL data and ensure it persists even when the Docker container stops running.
Next, in your docker-compose.yml file, add a volume mapping for the MySQL service. This line will link your host machine’s ‘mysql-data’ folder to the container’s internal data directory.
image: mysql:latest
container_name: mysql
# add this line
volumes:
– mysql-data:/var/lib/mysql:Z
environment:
– MYSQL_ROOT_PASSWORD=<root user password>
– MYSQL_USER=<username>
– MYSQL_PASSWORD=<password>
– MYSQL_DATABASE=<name of your MySQL database>
ports:
– “3306:3306″
After updating your docker-compose.yml file, run this command to build and run your images.
Creating a table in your MySQL Database
Run this command in your terminal to start an interactive shell in your running MySQL Docker container.
docker exec -it mysql bash
Next, log into this shell using this command.
mysql -u <mysql_user> -p<mysql_password> <mysql_database>
The next step is to create a table named ‘customers‘ to store your customer data. This table will include ‘id’, ‘first_name’, ‘last_name’, and ‘email’ fields.
CREATE TABLE users (
id integer,
first_name varchar(255),
last_name varchar(255),
email varchar(255)
);
To check if your tables have been successfully created, run this command.
SHOW TABLES;
Inserting data in your MySQL database
After you create your tables, use the following command to insert data into this table, replacing the placeholders with their actual values.
VALUES (1, ‘user1 first name’, ‘user1 last name’, ‘user1 email’),
(2, ‘user2 first name’, ‘user2 last name’, ‘user2 email’);
Run this command to see your data.
Automate email sending with Boomi
This section explains how to set up a Boomi process to automatically collect data from your MySQL database and send a customized email.
To create this process, follow these steps:
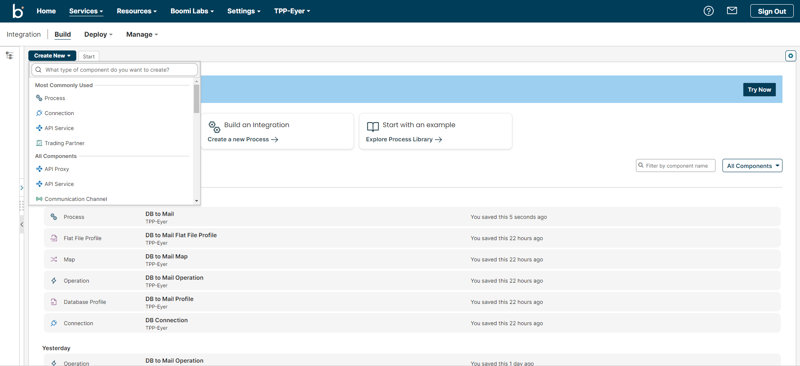
1.Create a new Boomi integration process
Go to the Integration page, click the Create New button, and choose Process from the dropdown menu.
This action will open the Start Shape sidebar. Choose the No Data radio button, indicating that the process will not receive external data, and then confirm by clicking the OK button.
2.Collect the data from the database
After initiating your new Boomi process, add your MySQL database connector, which holds the user information.
To add a shape to a Boomi process, click on the small box at the end of the dotted lines, leaving the previous shape (in this case, the Start Shape). Then, search for the shape you want to add to the process (the Database shape).
Next, click on the Database connector to configure the shape. This action opens up the Connector Shape sidebar.
In this sidebar, click the Connection input field and select the MySQL connection you created in the prerequisites section.
If you have not created the MySQL database connection, check out How to connect your Boomi Atom runtime and MySQL on Docker to do so.
Next, click on + sign in the Connector Operation input field to create a new operation. In Boomi, a database operation defines how you interact with the database specified in the connection.
This action opens up the Database Options page.
In the Database Options page, click on the + symbol to create a new Database profile for the operation.
On the Database Profile page, click the Statement menu, followed by the Import button on the top right-hand corner to import your database connection.
The Import button opens up a Database Import Wizard menu. Here, fill out the following fields with your credentials:
The Boomi Atom you want to run this Boomi process on
The Database connection you created
A schema filter of users
Once you are done, your Database Import Wizard modal should look like the image below:
After clicking Next, you’ll be prompted to choose a table for synchronization. Select the desired table and click Next again.
Next, select the columns you want to move to collect your data. You can choose all columns or exclude any as needed. Once you’ve selected, click Next, followed by the Finish button.
Finally, expand the Fields menu to verify that your Database profile has been imported correctly into the Connector.
After saving and closing the Profile page, you’ll be returned to the Database Options page. Here, set up the link between your data points:
Click on the Link Element field.
From the Fields menu, choose id. This tells Boomi to group records that share the same id into a single document.
Set the Batch Count to 1 for data retrieval to process data one record at a time. Leave Max Rows at 0 to retrieve all rows from the database.
Finally, click the Save and Close button to return to the connector sidebar.
In the sidebar, click the OK button to return to the canvas.
3.Transform the data type from database to CSV
Next, transform the files from the database to a CSV format, which will make it easier for you to parse and retrieve information from the database.
Add a Map Shape to the Boomi process to change the data format. Click on the Shape to configure it, which opens up a Map sidebar.
Click the + sign in the Map input field in this sidebar to open the dedicated Map page.
On the Map page, go to the Map Source section and select the Choose link.
This action opens the Choose a Source Profile. In this modal, select the Profile Type of Database, and in the Profile field, select the database profile you created for your Database Options page.
Click the OK button to see your data fields populated in the Elements menu.
On the right side of the page, the Map Destination, find the Choose button and click on it.
This action will open the Choose a Destination Profile modal.
Select Flat file from the modal’s Profile Type dropdown menu. Then, click the + button in the Profile input field to create a new profile for the CSV file.
This action opens up a New Flat File Profile page. Right-click the downwards-facing arrow next to Elements, and select Add Multiple Elements from the menu.
This opens up a modal that asks you to choose how many elements you’d like to add. This tutorial decides to create 4 new elements. Click on the OK button to close the modal.
Next, click on each of the newly created elements and change them to correspond with the fields in your database. This tutorial creates fields for id, first_name, last_name, and email.
Next, navigate to the Options tab, check the Use Column Headers checkbox, and select the Comma Delimited option from the File Delimiter dropdown. This indicates that you want to use the column headers present in the data and separate the data fields by a comma.
Click on Save and Close and the OK buttons to save this profile.
To see all your newly created fields, click the downward-facing arrow next to the Elements menu in the Map Destination section and select Expand.
Next, map the corresponding fields between your database and CSV profiles.
Simply drag your cursor from a field on the left side and connect it to its matching field on the right. Once you’ve mapped all the fields, your page should resemble the example provided.
Click the Save and Close button to save this Map and return to the Map sidebar.
Click the OK to save the Map configuration and return to the Boomi canvas.
4.Split the CSV files by line
Next, you want to split each piece of information in the file by users. To do this, you need to add the Data Process Shape to the Boomi process.
This Data Process shape allows you to split your document line by line, which in your case means user by user.
Next, click on the Data Process shape to open up its dedicated sidebar. In this dedicated sidebar, click on the + sign to specify a processing step for your data.
This action opens up a form; in this form, select:
Split Documents from the Processing Step dropdown
A Profile Type of Flat File to match the CSV file format
Split Options of Split By Line
A Headers Option of Retain first line as Column Headers
Click the OK button to save this Data Process Shape configuration.
5.Set Properties
Next, you will use the Set Properties shape to create and set two properties dynamically:
The user’s first name property is set as the first_name in the data
The receiver’s email address property is set as the email address stated in the data file.
You will need these dynamic properties to create and send out these emails. To create the first name property, click the + button in the Properties to Set section.
This action opens up a Choose Property modal. In this modal, select the Property Type of Dynamic Document Property and select the Property Name as first_name.
Click on the OK button to save this property.
You should see the Dynamic Document Property parameter. Select this parameter, and click the + sign in the Property Value section to create the parameter’s value.
This action opens up the Parameter Value modal. Fill out the Parameter Value modal with the following information:
Type -> Profile Element
Profile Type -> Flat File
Profile -> The CSV profile you created during the Map process.
Element -> Expand the menu and select the first_name field
Your Parameter Value modal should look like this when you are done. Click the OK button to save the parameter value information.
Next, create another parameter for the receiver’s email address. To create this parameter, click the + sign in the Properties to Set section. This action opens up the Choose Property modal. Fill out this modal with the following information:
Property Type -> Document Property
Source Type -> Connectors
Connector -> Mail
Property -> To Address
This creates a dynamic property that holds the receiver’s email address.
Click the OK button to save this property and return to the sidebar. In this sidebar, you should see a Mail – To Address property.
Select this parameter, and click the + sign in the Property Value section. This action opens up the Parameter Value modal. Fill out the Parameter Value modal with the following information:
Type -> Profile Element
Profile Type -> Flat File
Profile -> Mail Flat File Profile
Element -> Expand the Elements menu and select the email field
When you are done, your Parameter Value modal should look like this. Click the OK button to save this parameter value and return to the sidebar.
Click the OK button in this sidebar to save your Set Properties configuration shape and return to the Boomi canvas.
6.Create the Message
Next, you need to create the message in the email you want to send out. Add the Message shape to your Boomi process to create this custom message.
Click this process shape to open its dedicated sidebar.
In this sidebar, write the message you want to send out in the Message input field. This tutorial writes out this message.
I hope everything is going great for you.
The {1} is a variable you will set to the first_name property you created in the Set Properties Shape.
Click the + button to set this variable value in the Variables section. This action opens a Parameter Value modal.
In this modal, fill in a Type of Document Property. Next, click the search icon next to the Document Property input field to open up the Choose Property modal.
In this modal, fill out the following credentials:
Property Type -> Dynamic Document Property
Property Name -> first_name
Click the OK button to save and close this modal.
You should see your Document Property loaded in the Parameter Value modal.
Click the OK button to save your parameter value and return to the sidebar. Your sidebar should look like this.
After creating your message and setting your dynamic variable, you instruct Boomi to replace the{1} with the user’s first_name from the file when it sends the email. Finally, click the OK button to save your message configuration and return to the Boomi canvas.
7.Send the email
Now, the best part is actually sending the email. The Mail Connector Shape allows you to add this shape to your Boomi process.
Click this Mail connector to configure this shape. This opens up the Mail connector sidebar.
In this sidebar, go to the Connection input field and select the Mail Connection you created in the prerequisites section. If you have not created the Mail Connection yet, check out Creating the Mail connection and Operation.
Next, select an Action of Send, as you will be sending emails.
In the Operation input field, you can either select a previously created Mail operation or create a new one. This tutorial shows you how to create a new operation.
Click the + sign in the Operation input field to create a new operation. This action opens up a new Mail operation page.
Fill out the input fields on this page with the following information:
From: This is the email you used when creating your connection. It is the email address that shows up as the sender in your Mail app
To: Leave To as blank as you want to dynamically set that property depending on the email address in the data file from your database
Disposition: Select Inline because the document data is sent in the body of the email message instead of as an attachment.
Content-Type: text/plain, as you will be sending texts
When you are done, your sidebar should look like this: click the OK button to save this sidebar and return to the Boomi canvas.
8.Test the process
To verify if the process is working, click the Arrange button, then click the Test button to test the process.
This action asks you to select the Atom you want to run this Boomi process on; select the Atom you created in the prerequisites section. After running the process, you should see the custom email in the provided email address.
That’s a Wrap!
This guide has shown you how to dynamically send custom emails to different email addresses in your MySQL database using Boomi. You can also build on this tutorial to create personalized messages based on user information and trigger automated emails based on specific actions.
However, as interesting as this exercise is, this is only just a starting point for exploring the full capabilities of Boomi. Refer to the official documentation for more information on what Boomi can do.


