
I recently had to deploy an API backend from a monorepo on fly.io and this is a documentation of the steps.
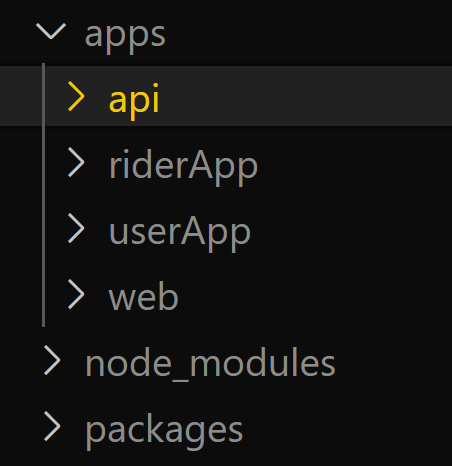
The project uses turborepo with npm managed workspace. The monorepo had the below structure
Fly.io has a generous free tier that is perfect for small projects like MVPs. New users get a $5 credit which gives up to 3 shared-cpu-1x 256mb VMs and 3GB persistent volume storage. This served my purposes especially during development. Let’s dive in.
Step 1: Create an Account on fly.io & Install Fly CLI
To begin visit fly.io to create an account. Next install flyctl a command line tool for creating and deploying fly apps.
macOS
Windows
You may have to run the command on windows with powershell instead of pwsh if you run into errors. Full instructions can be found here. After installation authenticate the CLI using:
Step 2: Create A Dockerfile
Flyctl automatically detects a Dockerfile in the app root directory, It builds an image from it and deploys it.
Create a Dockerfile in the nestjs app’s root directory and paste in the following content.
FROM node:20-alpine as builder
# Line 2
ENV NODE_ENV build
# Line 3
WORKDIR /api
# Line 4
COPY package*.json ./
# Line 5
RUN npm install
# Line 6
COPY . .
# Line 7
RUN npm run build
&& npm prune –production
# Line 8
FROM node:20-alpine
# Line 9
ENV NODE_ENV production
# Line 10
WORKDIR /api
# Line 11
COPY –from=builder /api/package*.json ./
COPY –from=builder /api/node_modules/ ./node_modules/
COPY –from=builder /api/dist/ ./dist/
# Line 12
CMD [“node”, “dist/src/main.js”]
This dockerfile uses a multi stage build, which is a docker build process that lets you build an image in different steps. Each build stage has output(files) from which one can copy only what is needed in the next stage, this removes unnecessary files like development dependencies from the final output which helps to reduce the overall size of the resulting image.
In the builder stage(Line 1), from Lines 4-7, we copy package.json file to the image, run the install script, copy over the generated files and build the nest app.
In the next stage of the build beginning in line 8, On Line 11 we copy over the only files we need(package.json and lock files, node modules folder and the dist folder) and on line 12 we finally specify the start command.
Step 3: Create & Configure a fly app
In this step we create and configure a fly app from our nestjs application. Run the command below from inside your project source directory to create, configure, and (for most apps) deploy a new fly application. In my case the root was monorepo_root/apps/api.
This command generates a fly.toml file with default configuration that can be edited using a web interface.
Note: Fly expects the app to listen on port 8080 by default, so tweak the default configuration when prompted to do so and set the listening port to 8080.
Note: Also change the nest app to listen on the same port(8080) from main.ts/js as shown below
Step 4: Deploying the app
To deploy the app run the command below (from the root of your nest app).
This command detects our dockerfile, builds an image and deploys a container from it. If the build is successful, a url will be generated for you to access the app.
Step 5: Setting environment variables
To set runtime environment variables, use fly secrets set KEY=VALUE syntax to set sensitive variables that should not be included in the built docker image.
Example:
You can also import bulk values from your .env file by doing:
fly secrets import < .env
This then updates each Machine belonging to that Fly App with the new environment variables. This involves a restart of the Machine(s).
Congratulations🎊
