
Integrated platforms as a service (iPaaS) are the guardians of the very distributed present and future of the modern software development landscape. They empower your team to enjoy all the benefits of a modular, distributed system without experiencing a lot of its cons, such as siloed data and complexities in unifying this data throughout the application.
iPaaS systems like Boomi shine even brighter thanks to their intuitive and user-friendly interfaces. These solutions simplify integration with third-party applications, like Salesforce for customer management and Eyer for complete visibility. No matter how complex the integrations become, iPaaS platforms like Boomi empower us to achieve our goals without compromise. In other words, we can leverage the power of various applications while maintaining a streamlined system.
At the end of this article, you will understand how Boomi ensures data unification by leveraging Boomi to sync data between your MySQL database and your Salesforce application within a Docker containerized environment.
Prerequisites
To get the most out of this article, you must have the following:
A Boomi platform account: if you do not have one, create a 30-day free trial account
A Salesforce account: if you do not have one, create a free account
A Boomi Atom is installed locally and connected to a MySQL account. To learn how to do this, check out How to connect your Boomi Atom runtime and MySQL on Docker.
Inserting data in your MySQL database
MySQL is an open-source relational database management system (RDBMS) that stores, organizes, and accesses data in a structured format. The prerequisites section discussed Connecting your Boomi Atom runtime and MySQL on Docker, and this section will build on that knowledge.
Before you can sync your Salesforce account with your database, you’ll need to populate the database with some data. To do this, you must change your folder structure and the docker-compose.yml file you created when you connected your Boomi Atom runtime to your MySQL database.
In your project’s root directory, create a folder named ‘mysql-data’. This folder will store your MySQL data and ensure it persists even when the Docker container stops running.
Next, in your docker-compose.yml file, add a volume mapping for the MySQL service. This line will link the ‘mysql-data’ folder on your host machine to the container’s internal data directory.
image: mysql:latest
container_name: mysql
# add this line
volumes:
– mysql-data:/var/lib/mysql:Z
environment:
– MYSQL_ROOT_PASSWORD=<root user password>
– MYSQL_USER=<username>
– MYSQL_PASSWORD=<password>
– MYSQL_DATABASE=<name of your MySQL database>
ports:
– “3306:3306″
After updating your docker-compose.yml file, run this command to build and run your images.
Creating a table in your MySQL Database
Run this command in your terminal to start an interactive shell in your running MySQL Docker container.
Next, log into this shell using this command.
The next step is to create a table named ‘customers’ to store your customer data. This table will include ‘CUSTOMER_ID’, ‘EMAIL’, ‘NAME’, ‘STATE’, and ‘CITY’ fields.
CUSTOMER_ID integer,
NAME varchar(255),
STATE varchar(255),
CITY varchar(255),
EMAIL varchar(255)
);
To check if your tables have been successfully created, run this command.
Inserting data in your MySQL database
After you create your tables, use the following command to insert data into this table.
VALUES (1, ‘user1 name’, ‘user1 state’, ‘user1 city‘, ‘user1 email‘),
(2, ‘user2 name‘, ‘user2 state’, ‘user2 city’, ‘user2 email’),
(3, ‘user3 name’, ‘user3 state’, ‘user3 city’, ‘user3 email’);
Run this command to see your data.
Creating custom data fields on your Salesforce account
Salesforce is a powerful cloud-based tool that enables you to manage customer interactions and boost sales.
However, before importing your database data into your Salesforce account, you need to create a custom ‘email’ and an external ‘customer_id’ field, as the Salesforce Account object does not offer these fields primarily.
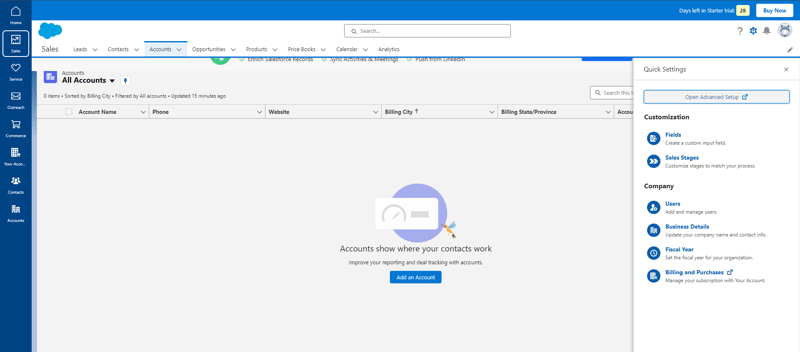
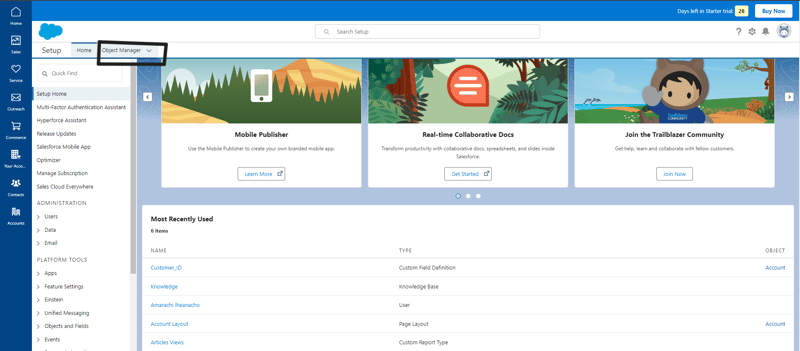
To create these fields, first log in to your Salesforce account. Then, navigate to Quick Settings and Open Advanced Setup.
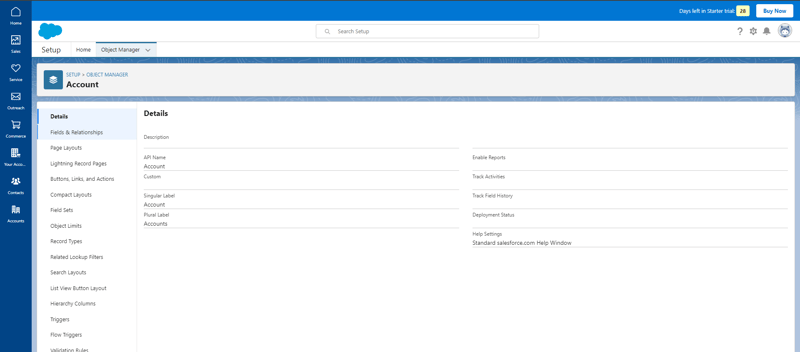
From the Setup page, navigate to the Object Manager tab at the top. Then, click on the Account label.
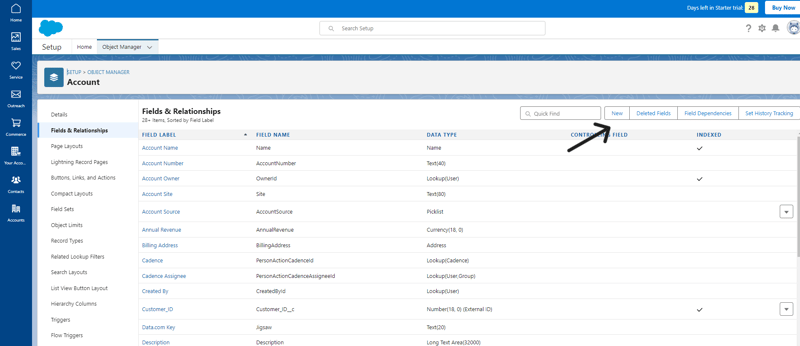
Navigate to the Fields & Relationships section on the Account object manager page. In the top-right corner, click the New button.
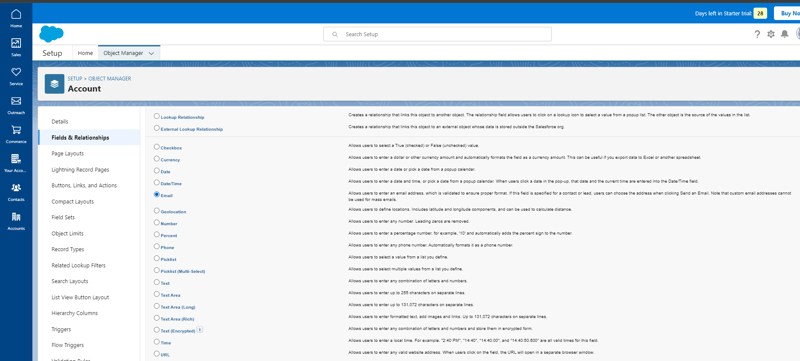
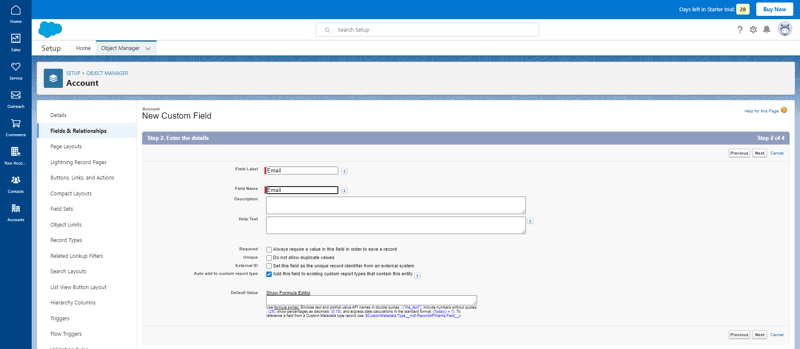
Next, choose the type of information the custom field will contain. Since you are creating a custom field for email addresses, select email.
For the Field Label and Field Name, enter Email. Then, click the Next -> Next -> Save buttons to save the email custom field.
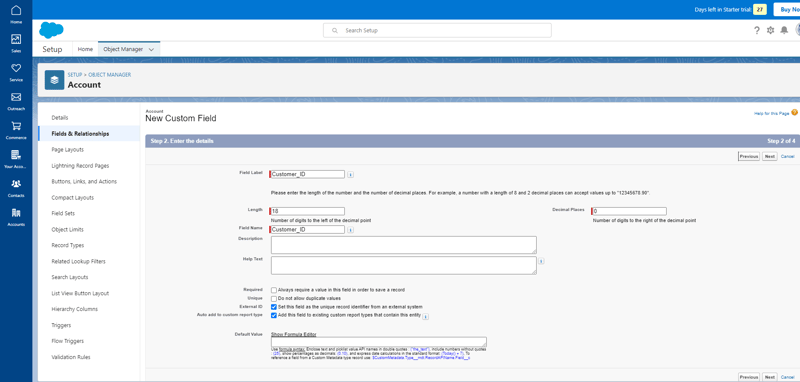
To create a new external custom Customer_ID field, follow these steps:
Click New.
Choose Number as the field type.
Enter Customer_ID for both the Field Label and Field Name.
Mark the checkbox next to External ID to designate this Customer_ID as a unique identifier from an external system.
Click Next -> Next -> Save to finalize the creation of the Customer ID field.
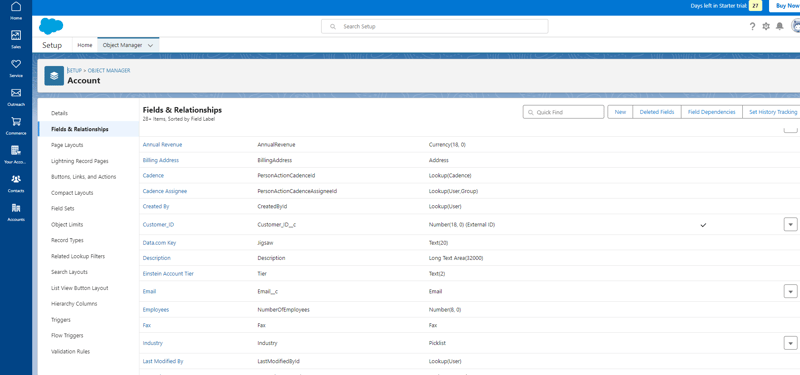
You should see both fields in your Fields & Relationships page when you are done.
Syncing your MySQL database to your Salesforce account
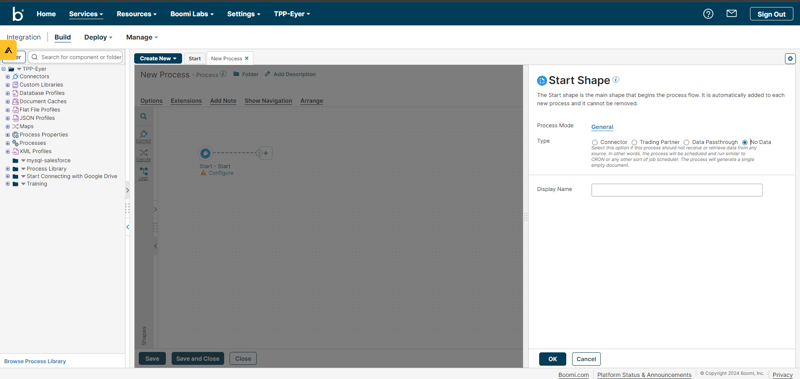
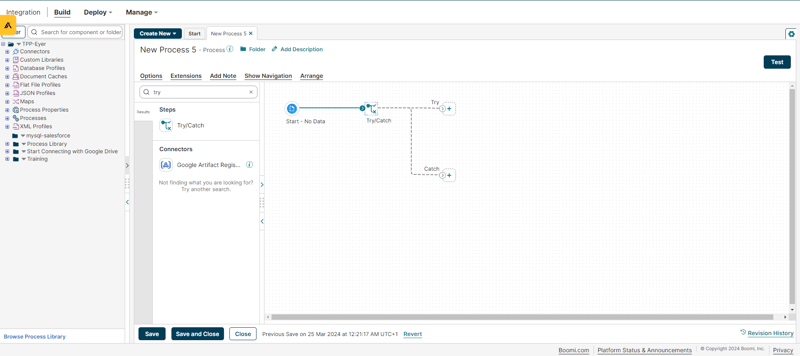
You’ll need to create a Boomi process to synchronize data between these applications. Navigate to the Integration page, click the Create New button at the top, and select Process from the dropdown menu.
This will open the Start Shape sidebar. Choose the No Data radio button, indicating the process won’t receive external data, and confirm with the OK button.
Next, locate the Try/Catch Shape in the sidebar and drag it onto the canvas. This will open the Try/Catch Shape sidebar. Click on the** Failure Trigger** dropdown field and change its value from Document Errors to All Errors.
To ensure your shapes are properly connected, verify that the lines connecting them have changed from dotted gray lines to solid green lines, as shown in the image below.
Like try/catch blocks in programming languages, the Try/Catch shape handles errors during processing, either at the process level or for individual documents.
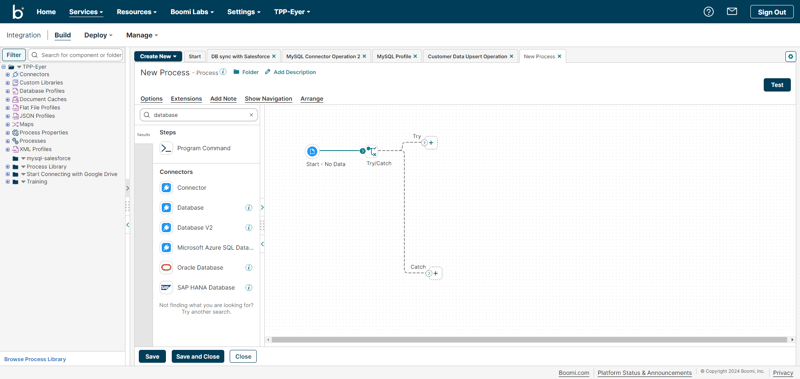
Selecting your database connection
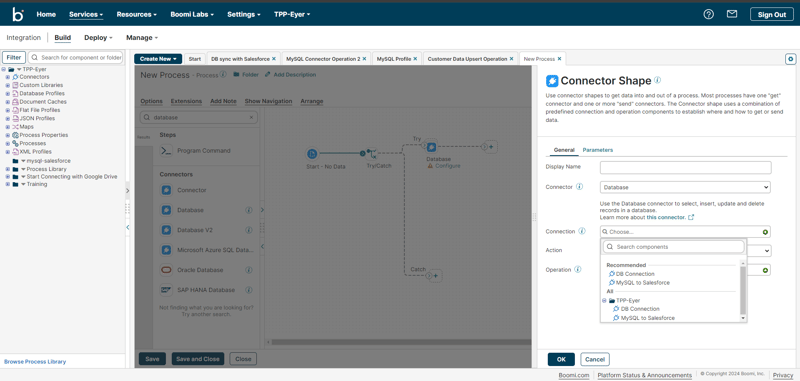
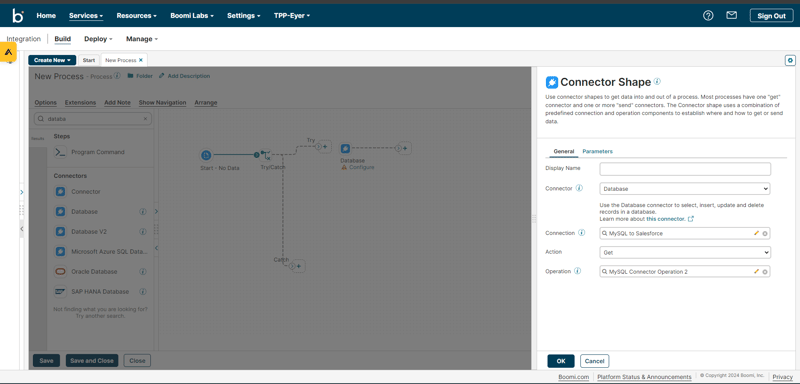
Next, search for the Database connector shape in the sidebar and drag the Database connector onto the canvas. This opens up the Connector Shape sidebar.
In the Connector Shape sidebar, click on the Connection input field and select the connection you created in the prerequisites section.
Creating a database operation
To create a new operation, click the + sign in the Operation input field. In Boomi, a database operation defines how you interact with the database specified in the connection.
Clicking the + sign opens the Database Options page.
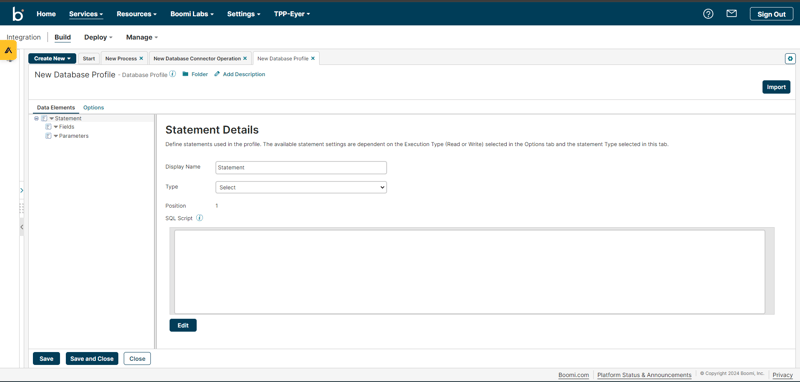
Navigate to the Profile field and click the + symbol to create a new Database Profile for the operation.
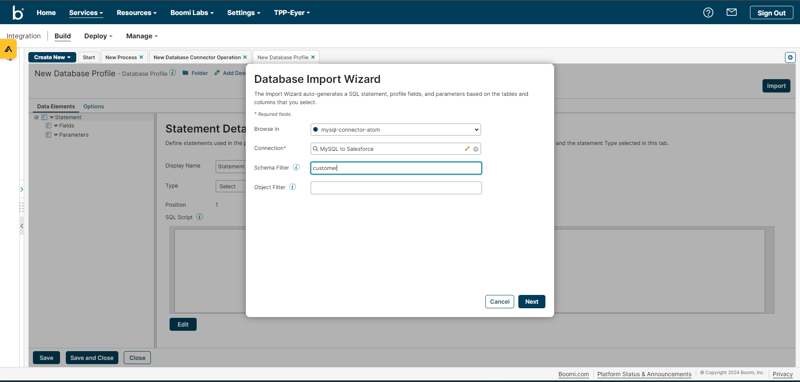
On the Database Profile page, click the Statement menu, followed by the Import button on the top right-hand corner to import your database connection.
The Import button opens up a Database Import Wizard menu. Here, fill out the following fields with your credentials:
The Boomi Atom you want to run this Boomi process on
The Database connection you created
A schema filter of customers
Once you are done, your Database Import Wizard modal should look like the image below:
After clicking Next, you’ll be prompted to choose a table for synchronization. Select the desired table and click Next again.
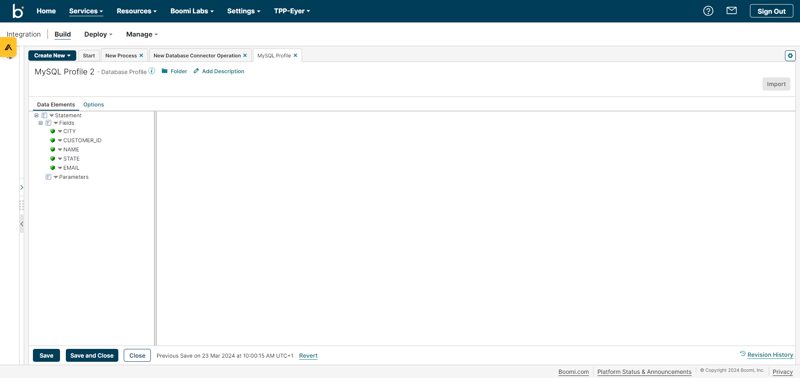
Next, select the columns you want to move to your Salesforce account. You can choose all columns or exclude any as needed. Once you’ve made your selections, click Next, followed by the Finish button.
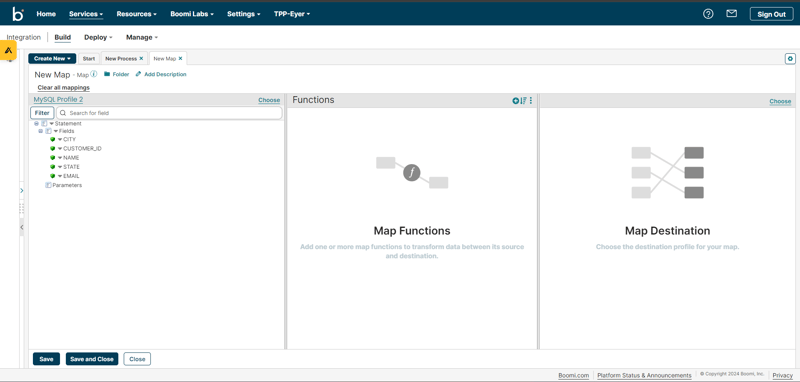
Finally, expand the Fields menu to verify that your Database profile has been imported correctly into the Connector.
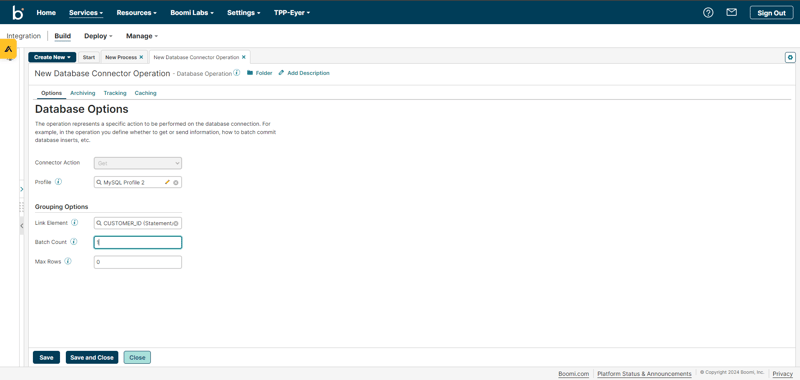
After saving and closing the Profile page, you’ll be returned to the Database Options page. Here, set up the link between your data points:
Click on the Link Element field.
From the Fields menu, choose Customer_ID. This tells Boomi to group records that share the same Customer_ID into a single document.
Set the Batch Count to 1 for data retrieval to process data one record at a time. Leave Max Rows at 0 to retrieve all rows from the database.
After saving and closing the profile page, you’ll see the Connector Shape sidebar. Click the OK button there.
Mapping the Database Fields to the Salesforce Account Field
To ensure error handling during syncing, drag the Try/Catch Shape block onto the canvas before mapping your database fields to the corresponding Salesforce Account fields.
Next, drag the Map shape onto the canvas and connect it to the try path from the Try/Catch block. This will open up a Map sidebar. In the Map input field; click the + button to create a new map.
Clicking the + button opens up a Map page. On this page, click the Choose button in the Map Source section. This action opens a Choose a Profile modal. In this modal, choose Database as the Profile Type, and expand on your menu to select the DB profile you created.
You’ll need to create a Salesforce profile before you can map these fields to each other. So, save and close this map for now.
Next, click the OK button on your Map Shape sidebar to return to the canvas.
Adding a Salesforce Connector
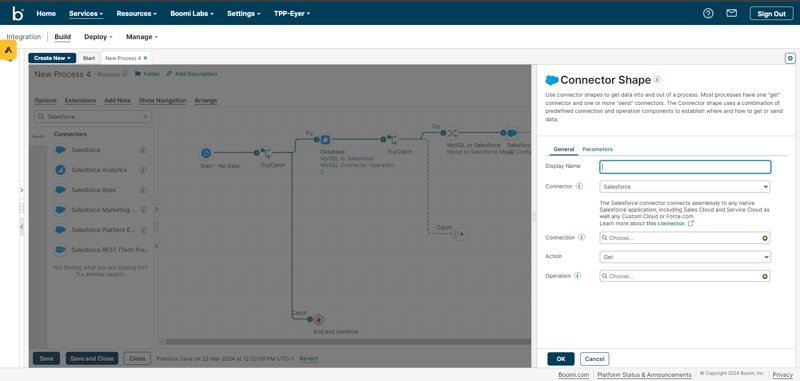
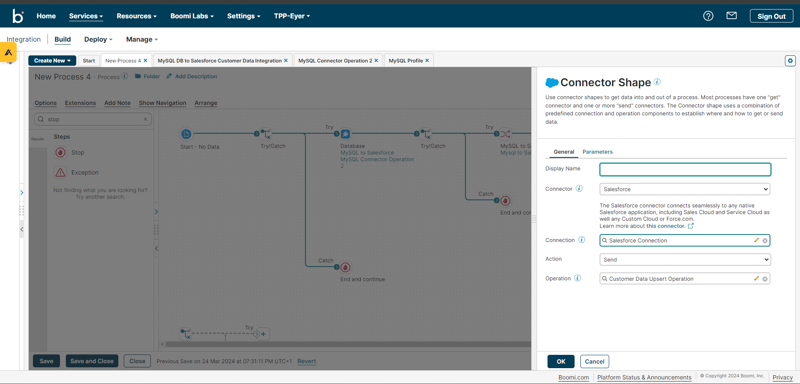
Search for the Salesforce connector in your sidebar and drag it onto the canvas. This action opens the Connector Shape sidebar, allowing us to configure the Salesforce Connector Shape.
Since you’re upserting data into your Salesforce account, change the action from Get to Send.
Creating a Salesforce connection
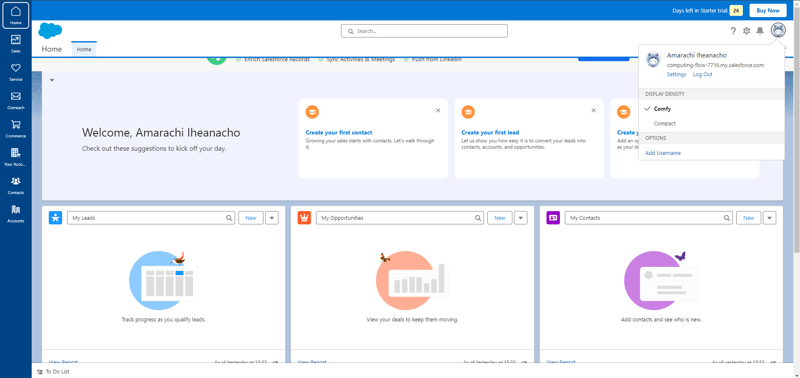
A Salesforce Security Token is required to connect to your Salesforce application. To obtain your token, log in to your Salesforce account, click on your avatar, and navigate to settings. This process ensures a more secure connection by adding an extra layer of authentication.
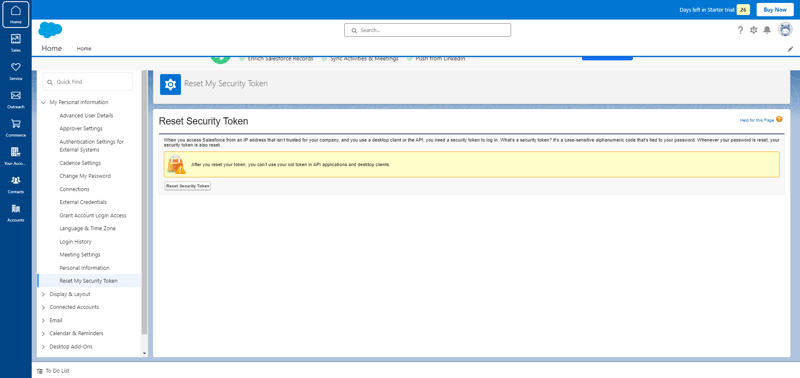
Next, navigate to Reset Security Token and then reset your security token. You should see your new token in your email.
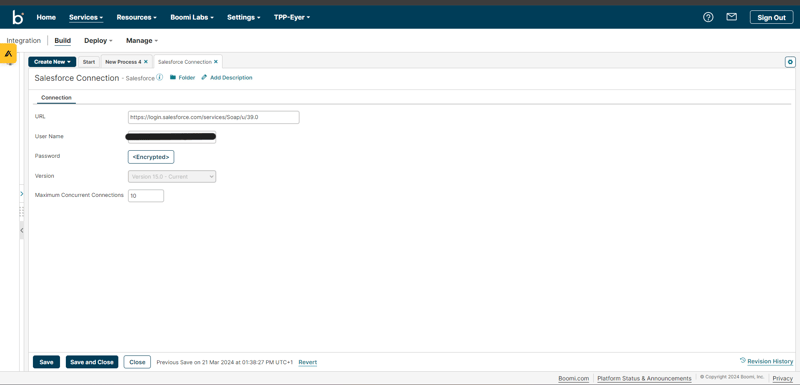
Next, create a Salesforce connection by clicking the + button in the Connection input field. This opens up a new page; fill out this page with your credentials:
Salesforce username
Salesforce connector password, which is your Salesforce password, and your Token
Once you are done, your connection will look like this.
Save and close this page, which will lead you back to the Salesforce connector sidebar.
Creating a Salesforce Operation
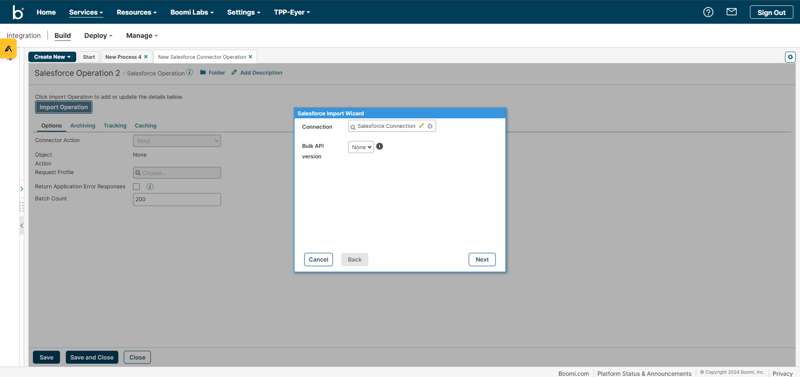
Click the + sign in the Operation input field to create a new Operation.
Next, click the Import Operation button to create a profile. Clicking this button will open the Salesforce Import Wizard. Choose the Salesforce Connection you created in the modal’s Connection field.
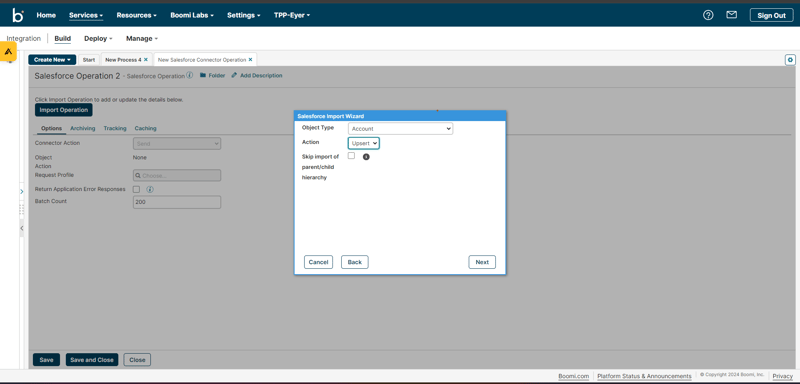
Click on Next. In this modal, you specify the Salesforce object where you want to insert the data. This tutorial inserts it into the Account object. Then, change the Action from Create to Upsert and click the Next -> Next -> Finish buttons.
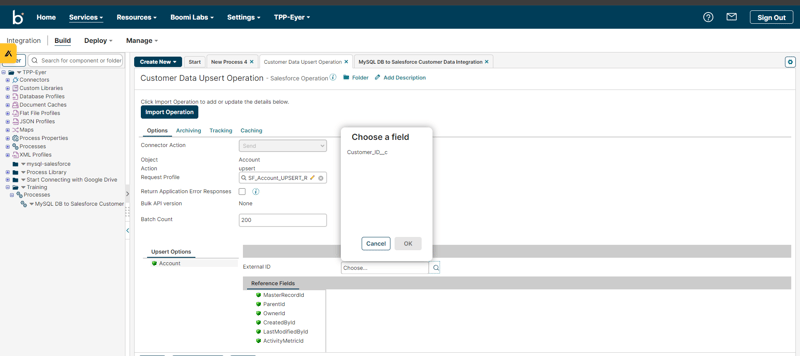
In the next step, choose the Customer_ID custom field you created earlier for the External ID field. Then, save your changes and close the window.
To save your changes, click the OK button for the Salesforce Connector Shape.
Next, open the Database to Salesforce Map Shape sidebar and click the pencil icon to edit the Map shape.
On the right side of the page, the Map destination, find the Choose button and click it. This action will open the Choose a Profile modal.
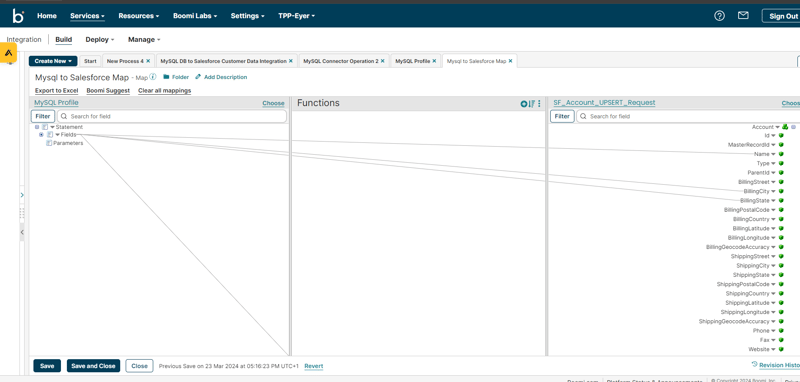
Select XML from the Profile Type dropdown menu within the modal. Then, expand the menu and choose the Salesforce Profile you just created. Confirm your selection by clicking OK.
The next step involves linking the corresponding fields between your database and Salesforce. Simply drag your cursor from a field on the left side and connect it to its matching field on the right. Once you’ve mapped all the fields, your page should resemble the example provided.
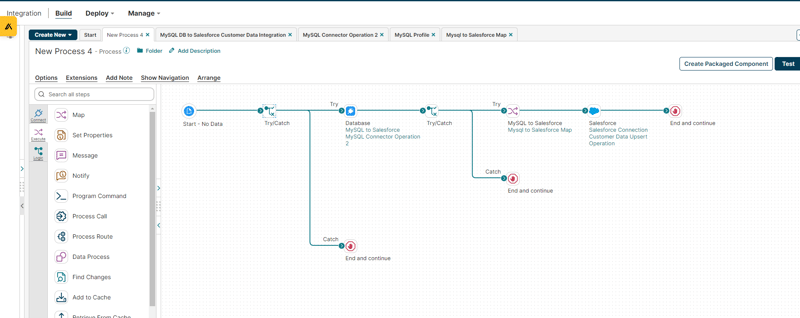
Finally, add two End and Continue shapes and connect the shapes to both the Salesforce connector and the Catch path of the second Try/Catch shape.
Next, click on Arrange, then save and test the process.
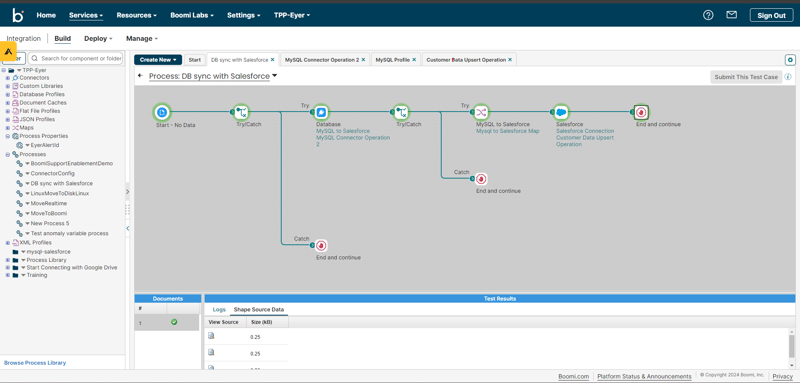
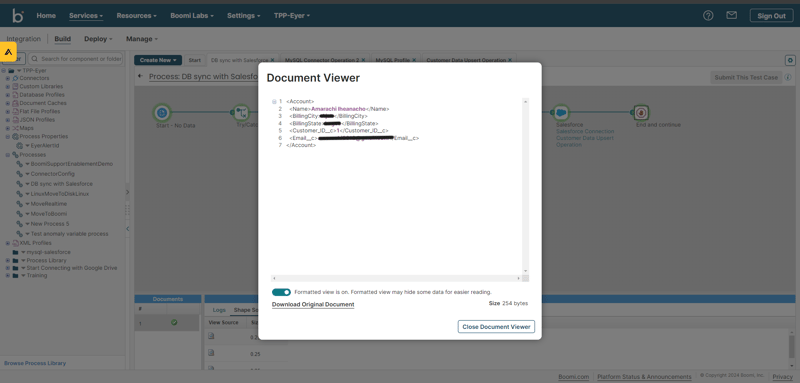
To verify if your database has successfully synced with your Salesforce Account, click the last End and Continue Shape, then follow by clicking the Shape Source Data tab below.
You will see packets; click on one to see your data.
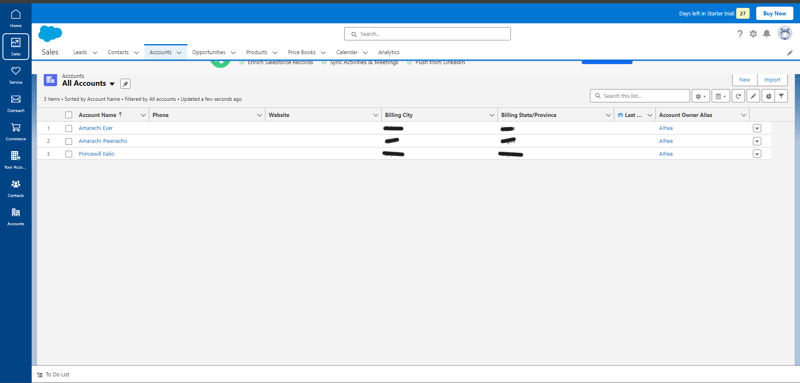
After completing the process, your database data will be visible in your Salesforce application.
That’s a Wrap!
This guide has demonstrated the allure of Integration Platform as a Service (iPaaS) and its ability to streamline data integration between applications. This article specifically focused on connecting your MySQL database to your Salesforce application, but this is just the tip of the iceberg. Please refer to the official documentation to learn about Boomi’s extensive capabilities.
![[Self-Study] Microsoft Azure Fundamentals: Describe cloud concepts Module](https://media.dev.to/cdn-cgi/image/width=800%2Cheight=%2Cfit=scale-down%2Cgravity=auto%2Cformat=auto/https%3A%2F%2Fdev-to-uploads.s3.amazonaws.com%2Fuploads%2Farticles%2F3xokov3efaqljamhjpvb.jpg)
