
Introduction
This post will demonstrate how we implemented a login and lobby system into our game.
Table of contents
Architecture
Login
Lobby
Teams
Conclusion
Architecture
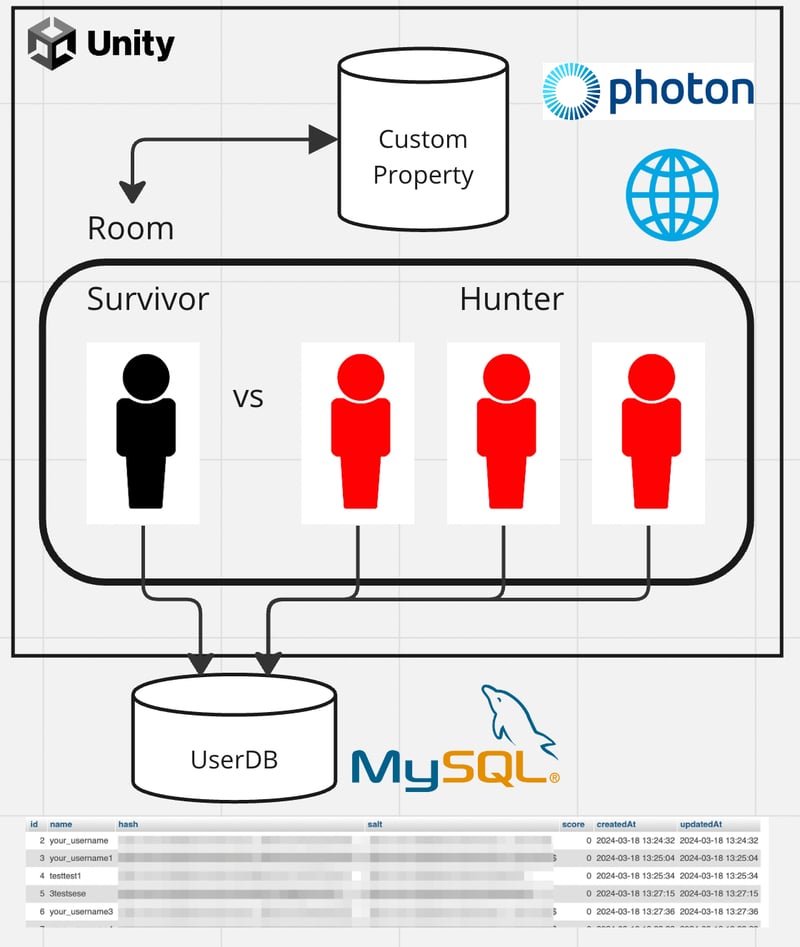
We primarily utilize Unity and Photon for the development of our multi player game.
The image below illustrates game architecture.
Photon
Photon is a Unity package that enables us to establish networks with the performance and reliability of Photon realtime.
MySQL
MySQL is a Relational Database.
Custom Properties
Photon Custom Property refers to user-defined properties that can be related with players and rooms within Photon Network.
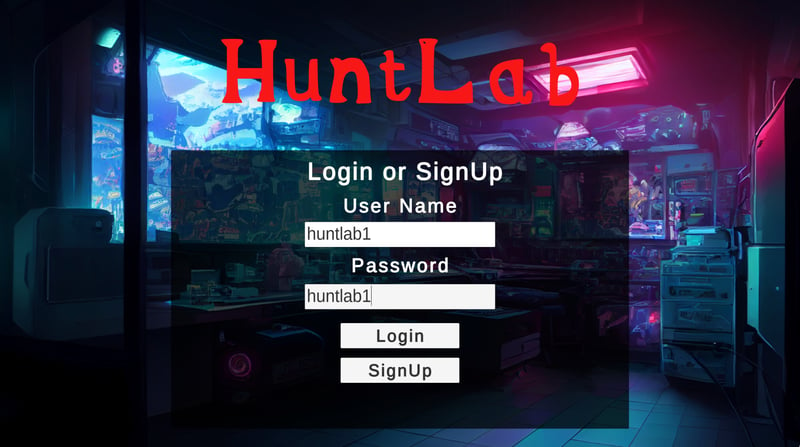
Login
We have implemented a login system where users can sing up with their username and password, and subsequently login in using these credentials.
User information is stored in MySQL. For security purposes, passwords are hashed before being stored
Request
The program requests API server to login in using the following code snippet.
{
// form
WWWForm form = new WWWForm();
form.AddField(“name”, nameLoginInput.text);
form.AddField(“password”, passwordLoginInput.text);
WWW www = new WWW(APIURL, form);
yield return www;
Debug.Log(www.text);
if (www.text[0] == ‘0’)
{
username = nameLoginInput.text;
score = int.Parse(www.text.Split(‘t’)[1]);
photonManager.MainMenuDisplay(username);
}
else
{
Debug.Log(“User login failed . Error #” + www.text);
}
}
Lobby
In the lobby we have implemented, players have the ability to create a room and join it. Additionally, they can choose to play as either a Hunter or
a Survivor like below image.
Photon
Photon is easy to use and facilitates networking in Unity. With its wide array of functions and triggers, developers can easily implement multiplayer games.
public override void OnPlayerEnteredRoom(Photon.Realtime.Player newPlayer)
{
GetAllPlayer();
}
As shown in the code above, we can overwrite the original functions, effectively turning them into triggers. In the above case, we can execute any function you want when the user enters the room.
Teams
In our game, before the game starts, it is necessary to divide users into two teams( 1 Survivor and 3 Hunters ). We use Unity custom properties to manage team information, allowing us to share information among users.
options.MaxPlayers = 4;
// Create Hunter Team
Hashtable hunter = new Hashtable();
hunter.Add(“Team”, “Hunter”);
hunter.Add(“Participants”, 0);
hunter.Add(“MaxTeamSize”, MaxHuntersPerTeam); // MaxHuntersPerTeam: 3
// Create Survivor Team
Hashtable survivor = new Hashtable();
survivor.Add(“Team”, “Survivor”);
survivor.Add(“Participants”, 0);
survivor.Add(“MaxTeamSize”, MaxSurvivorPerTeam); // MaxHuntersPerTeam: 1
options.CustomRoomProperties = new Hashtable() { { “Teams”, new Hashtable[] { hunter, survivor } } };
options.CustomRoomPropertiesForLobby = new string[] { “Teams” };
As shown in the code above, we store team information like the number of participants and the maximum team size in Custom Room Properties.
Conclusion
Through the implementation of lobby and login system, we gained a understanding of the foundation of developing multi player game. We are ready to proceed with the development of the main game.

