
Introduction
Nuxt.js is a robust and versatile framework that is primarily used for building server-rendered applications with Vue.js. In this comprehensive guide, we’re going to delve into the process of setting up a Nuxt 3 project template. This template will be integrated with ESLint, TypeScript, and Tailwind CSS. These tools, when combined, can significantly enhance productivity, enforce a high standard of code quality, and streamline the process of styling.
Pre-requisites
Node (In this example I used the 20.10.0 version, but any older version can work. )
Npm (tested with v7)
Pnpm (but you can use just npm / yarn)
Setting Up Nuxt 3
Nuxt 3 is the latest iteration of the Nuxt.js framework. It comes with a host of significant improvements and innovative features that make the process of Vue.js development more efficient and enjoyable. The setup process for a new project with Nuxt 3 is straightforward.
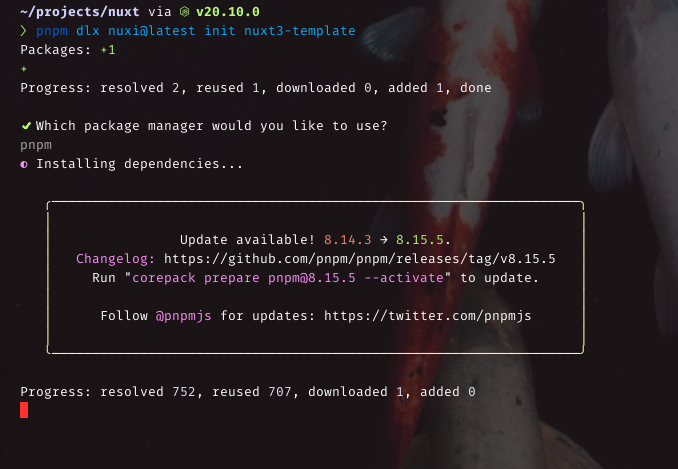
Firstly, you’ll need to install Node.js and npm. These are fundamental to running the Nuxt 3 framework. Once you have these installed, you can create a new Nuxt 3 project using the nuxi@latest command. This command initiates a process that will guide you through the various setup stages, allowing you to customize your project according to your specific needs. In this guide I will use pnpm as package manager. So let’s init our project:
cd nuxt3-template
pnpm i && pnpm run dev
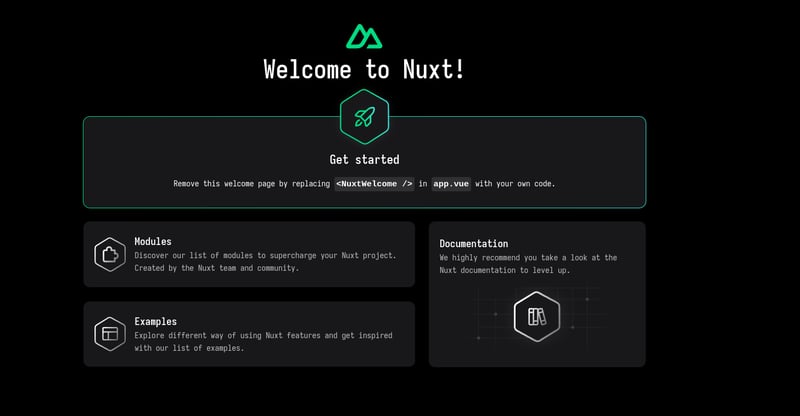
First result
After initiation we get a template project on nuxt 3. So let’s make it even better
Integrating ESLint and TypeScript
ESLint is a widely recognized tool that identifies and reports on patterns found in ECMAScript/JavaScript code. The integration of ESLint can drastically improve the quality of your code, and helps to prevent potential bugs from cropping up in the future.
On the other hand, TypeScript is a strongly typed superset of JavaScript that adds static types. It’s an invaluable tool that helps to detect errors early during the development phase, thus saving time and resources.
To add these to your Nuxt project, you’ll need to install the necessary dependencies and then implement the appropriate configurations in your project’s settings. With the ESLint and TypeScript integrations, your development environment becomes more robust by enforcing good coding practices and type safety
pnpm install -D eslint eslint-plugin-vue@latest
pnpm add -D @nuxtjs/eslint-module
pnpm install -D typescript @typescript-eslint/parser@latest @typescript-eslint/eslint-plugin@latest
Update nuxt.config.ts file:
export default defineNuxtConfig({
devtools: { enabled: false },
modules: [
‘@nuxtjs/eslint-module‘
]
})
Create .eslintrc.cjs file and add these lines of code:
module.exports = {
root: true,
parser: “vue-eslint-parser“,
parserOptions: {
parser: {
ts: “@typescript-eslint/parser“
}
},
env: {
node: true,
browser: true
},
extends: [
“plugin:vue/vue3-recommended“
],
rules: {
“no-trailing-spaces“: [“warn“],
“prefer-promise-reject-errors“: “off“,
“vue/no-v-html“: “off“,
“no-trailing-spaces“: [“warn“],
“no-debugger“: process.env.NODE_ENV === “production“ ? “error“ : “off“,
“vue/multi-word-component-names“: [“error“, {
ignores: [“error“, “Error“]
}]
},
ignorePatterns: [‘dist‘, ‘node_modules‘, ‘build‘, ‘coverage‘, ‘docs‘, ‘test‘],
overrides: [
{
files: [“components/**/**/*.vue“],
rules: { “vue/multi-word-component-names“: “off“ }
}
]
}
If eslint doesn’t work the first time, you will need to delete node_modules and install the project again.
After these steps, the project will already have a configured eslint, which also acts as a formatter
Incorporating Tailwind CSS
Tailwind CSS is a utility-first CSS framework that offers an unprecedented level of customization. It allows developers to build responsive designs with relative ease. To include Tailwind CSS in your Nuxt project, you need to install it as a project dependency.
Once installed, you should create a Tailwind config file. This file is crucial as it allows you to customize your design according to your project’s needs. Following this, you need to update your Nuxt config file to include Tailwind CSS in your project’s build step.
One of the main advantages of Tailwind CSS is that you can write custom styles directly in your HTML. This reduces the need for separate CSS files and makes your styles easier to manage and maintain
Let’s init tailwind css config file:
pnpm dlx tailwindcss init
pnpm add –save-dev @nuxtjs/tailwindcss
Our tailwind.config.js file should look like this:
/** @type {import(‘tailwindcss’).Config} */
export default {
content: [
“./components/**/*.{js,vue,ts}“,
“./layouts/**/*.vue“,
“./pages/**/*.vue“,
“./plugins/**/*.{js,ts}“,
“./app.vue“,
“./error.vue“,
],
theme: {
extend: {},
},
plugins: [],
}
And update nuxt.config.ts file:
// https://nuxt.com/docs/api/configuration/nuxt-config
export default defineNuxtConfig({
devtools: { enabled: false },
modules: [
“@nuxtjs/eslint-module“,
// add tailwindcss module
‘@nuxtjs/tailwindcss‘
],
// add postcss support for tailwindcss
postcss: {
plugins: {
tailwindcss: {},
autoprefixer: {},
}
}
})
You should also remember to create a root file for tailwindcss
mkdir assets/
cd assets
mkdir css/
cd css
touch tailwind.css
@tailwind base;
@tailwind components;
@tailwind utilities;
If you want to see if tailwindcss works just copy this template and add it to app.vue
<template>
<div class=“flex flex-col w-full h-screen bg-zinc-950 items-center justify-center”>
<div class=“mx-auto”>
<h1 class=“text-3xl text-blue-400 font-bold underline”>
Nuxt 3 template
</h1>
<ul class=“text-white flex flex-col gap-y-3 mt-6 “>
<li class=“hover:text-blue-950”>
<a href=“https://www.typescriptlang.org/”>Typescript</a>
</li>
<li class=“hover:text-blue-950”>
<a href=“https://eslint.org/”>Eslint</a>
</li>
<li class=“hover:text-blue-950”>
<a href=“https://tailwindcss.com/”>TailwindCSS</a>
</li>
</ul>
</div>
</div>
</template>
Conclusion
While setting up a Nuxt 3 project with ESLint, TypeScript, and Tailwind CSS may initially seem like a daunting task, the benefits that these tools bring to the table make the effort worthwhile. They streamline your development process, ensure that your code maintains a high standard of quality, and offer a highly customizable styling solution.
By integrating these tools in your Nuxt project, you can elevate your Vue.js development to the next level, making for a more efficient, enjoyable, and productive coding experience
Check out the Github repo for the entire template!
Until next time, thank you for reading! 🐾

