
Objective:
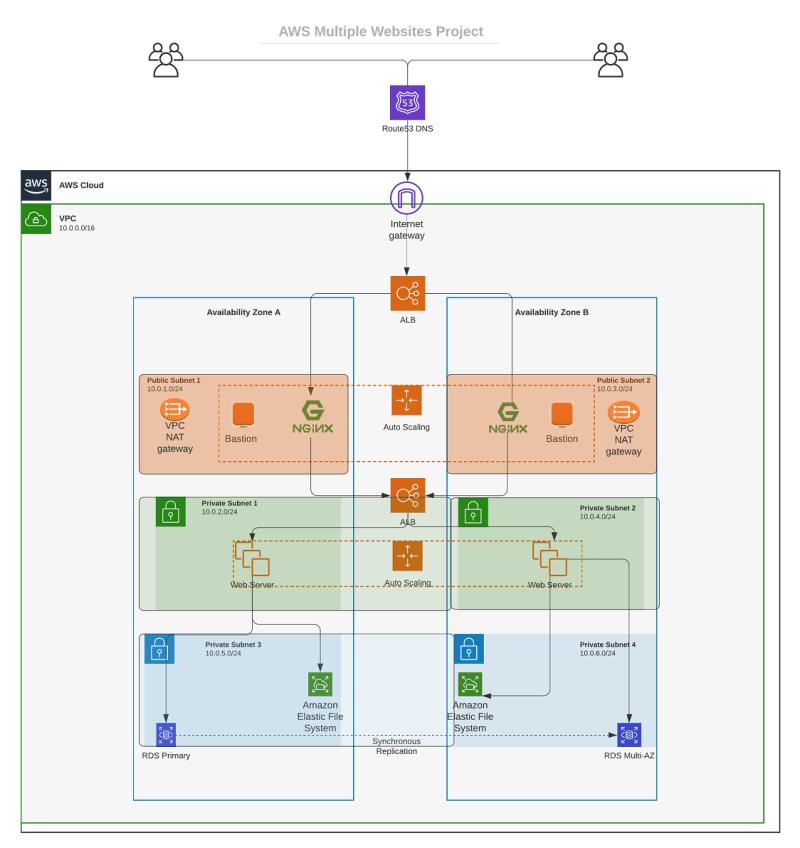
Build a secure infrastructure in AWS VPC for a company that uses WordPress CMS for its main company site and a tooling website for its DevOps team.
Reverse proxy technology with Nginx has been selected with the aim to improve security and performance.
Cost, reliability and scalability are the major considerations for the company, to make the infrastructure resilient to server failures, accomodate increased traffic and have reasonable cost.
Infrastructure:
Initial setup
Create a subaccount in AWS to manage all resources for the company’s AWS solution and assign any appropriate name e.g ‘DevOps’
From the root account, create an organization unit (OU) and move the subaccount into the OU. We will launch Dev resources in the subaccount
Create a domain name for the company website on domain name providers. You can obtain a free domain name from freenom website
Create a hosted zone in AWS and map the hosted zone name servers to the domain name.
Setup a Virtual Private Cloud on AWS
Create a VPC
Create subnets (public and private subnets) as shown in the architecture. The subnets Ips are CIDR IPs. We can use utility sites like IPinfo.io to see the range of IP addresses associated with each subnet.
Create private and public route tables and associate it with with the private and public subnets respectively
Edit a route in public route table, and associate it with the Internet Gateway. This allows the public subnet to access the internet
Create a NAT gateway and assign an elastic IP to it. You can use a NAT gateway so that instances in a private subnet can connect to services outside your VPC but external services cannot initiate a connection with those instances.
Create security groups for:
Nginx servers: To allow access to from external application load balancer to the Nginx server
Bastion servers: Access to the Bastion servers should be allowed only from workstations that need to SSH into the bastion servers.
External Load Balancer: The external application load balancer will be accessible from the internet
Internal load balancer: The internal load balancer will allow https and http access from the Nginx server and SSH access from the bastion server
Web servers: The webservers will allow https and http access from the internal load balancer and SSH access from the bastion server
Data layer security group: The access to the data layer for the appliation (consisting of both the Amazon RDS storage and Amazon EFS as shown in the architecture), will consist of webserver access to the RDS storage and both webserver and Nginx access to the Amazon EFS file system.
Create a SSL/TLS certificate using Amazon Certificate Manager (ACM) to be used by the external and internal Application Load balancers (ALB)
Create a wild card SSL/TLS certificate to be used when creating the external ALB. We want to ensure connection to the external ALB is secured and data sent over the internet is encrypted. Since the external ALB will listen for client requests to both the tooling webserver and the wordpress server, we’ll create a wild card TLS certificate. Select DNS validation
Create Amazon EFS
Create Amazon Elastic file System (EFS) to be used by the web servers for files storage. The mount targets to be specified fot the elastic file system will be the subnets for the webservers. Specifying the mount targets makes the EFS storage available to the webservers
Also, we specify access points on the EFS we created for the web servers. Amazon EFS access points are application-specific entry points into a shared file system. In this project, we create two access points on the EFS one for each web servers, each with its own root directory path specified. Set the POSIX user and user group ID to root user and the root directory path to
/wordpress
and /tooling respectively.
– The root directory creation permission is set to 0755 to allow read write permissions on the file system by the clients
Create KMS key to be used for RDS
Next, navigate to AWS KMS page to create a cryptographic key to be used to secure the MySQL relational database for the project.
Create a symmetric key
Set the admin user for the key. You can leave the ‘key usage permission’ with the default settings
Create DB subnet group
A DB subnet group is a collection of subnets (typically private) that you create for a VPC and that you then designate for your DB instances.
From project architecture, specify the appropriate private subnets (private subnet 3 and 4) for the DB.
Create AWS RDS
Select MySQL engine for the RDS
Select Dev/Test template. This is an expensive service. For this purpose of this project we can still use free tier template, however, we will not be able to encrypt the database using the KMS key we created.
set the DB name
Set master username and password
Select the VPC for the DB
Ensure the DB is not publicly accessible
Select the appropriate security group for the DB
set the initial database name
Create compute resources
#### Setup compute resources for Nginx
provision EC2 instance for Nginx
Install the following packages
epel-release
python
htop
ntp
net-tools
vim
wget
telnet
We also need to install a self signed SSL certificate on the Nginx AMI. The Nginx AMI will be attached to a target group that uses HTTPs protocol and health checks. The load balancer establishes TLS connections with the targets using certificates that you install on the targets
Nginx instance installations:
yum install -y dnf-utils http://rpms.remirepo.net/enterprise/remi-release-8.rpm
yum install wget vim python3 telnet htop git mysql net-tools chrony -y
systemctl start chronyd
systemctl enable chronyd
#configure SELinux policies
setsebool -P httpd_can_network_connect=1
setsebool -P httpd_can_network_connect_db=1
setsebool -P httpd_execmem=1
setsebool -P httpd_use_nfs 1
#install Amazon efs client utils
git clone https://github.com/aws/efs-utils
cd efs-utils
yum install -y make
yum install -y rpm-build
make rpm
yum install -y ./build/amazon-efs-utils*rpm
#setup self-signed certificate for the Nginx AMI
sudo mkdir /etc/ssl/private
sudo chmod 700 /etc/ssl/private
openssl req -x509 -nodes -days 365 -newkey rsa:2048 -keyout /etc/ssl/private/kiff.key -out /etc/ssl/certs/kiff.crt
sudo openssl dhparam -out /etc/ssl/certs/dhparam.pem 2048
We will reference the SSL key and cert in the Nginx Reverse.conf configuration file. Also we will specify host header in the config file to forward traffic to
the tooling server.
Nginx reverse.conf file
worker_processes auto;
error_log /var/log/nginx/error.log;
pid /run/nginx.pid;
# Load dynamic modules. See /usr/share/doc/nginx/README.dynamic.
include /usr/share/nginx/modules/*.conf;
events {
worker_connections 1024;
}
http {
log_format main ‘$remote_addr – $remote_user [$time_local] “$request” ‘
‘$status $body_bytes_sent “$http_referer” ‘
‘”$http_user_agent” “$http_x_forwarded_for”‘;
access_log /var/log/nginx/access.log main;
sendfile on;
tcp_nopush on;
tcp_nodelay on;
keepalive_timeout 65;
types_hash_max_size 2048;
default_type application/octet-stream;
# Load modular configuration files from the /etc/nginx/conf.d directory.
# See http://nginx.org/en/docs/ngx_core_module.html#include
# for more information.
include /etc/nginx/conf.d/*.conf;
server {
listen 80;
listen 443 http2 ssl;
listen [::]:443 http2 ssl;
root /var/www/html;
server_name *.kiff-web.space;
ssl_certificate /etc/ssl/certs/kiff.crt;
ssl_certificate_key /etc/ssl/private/kiff.key;
ssl_dhparam /etc/ssl/certs/dhparam.pem;
location /healthstatus {
access_log off;
return 200;
}
location / {
proxy_set_header Host $host;
proxy_pass https://internal-Kiff-internal-ALB-1756005909.eu-west-3.elb.amazonaws.com/;
}
}
}
We perform the above installations on the EC2 instance for the AMI step by step instead of adding them all to the launch template’s user data, to reduce to size of
the user data
Create an AMI from the instance
Create a Nginx target group of Instance type. Targets in the Nginx target groups will be accessed by the external Load balancer.
Prepare a launch template from the AMI instance
From EC2 Console, click Launch Templates from the left pane
Choose the Nginx AMI
Select the instance type (t2.micro)
Select the key pair
Select the security group
Add resource tags
Click Advanced details, scroll down to the end and configure the user data script to update the yum repo and install nginx. The userdata for Nginx:
yum install -y nginx
systemctl start nginx
systemctl enable nginx
git clone https://github.com/joeloguntoyeACS-project-config.git
mv /ACS-project-config/reverse.conf /etc/nginx/
mv /etc/nginx/nginx.conf /etc/nginx/nginx.conf-distro
cd /etc/nginx/
touch nginx.conf
sed -n ‘w nginx.conf’ reverse.conf
systemctl restart nginx
rm -rf reverse.conf
rm -rf /ACS-project-config
Setup compute resources for Bastion server
Provision EC2 instance for Bastion server
Bastion instance installations:
yum install -y dnf-utils http://rpms.remirepo.net/enterprise/remi-release-8.rpm
yum install wget vim python3 telnet htop git mysql net-tools chrony -y
systemctl start chronyd
systemctl enable chronyd
Connect to the RDS from the Bastion server and create DBs named toolingdb and wordpressdb for the two webservers
SSH into the RDS instance
ssh-add project-key.pem
ssh -A ec2-user@ip_address
mysql -h <RDS_endpoint> -u <username> -p
>>create database wordpressdb;
>>create database toolingdb;
Setup compute resources for web server
Provision EC2 instance for web servers
Web server installations:
yum install -y dnf-utils http://rpms.remirepo.net/enterprise/remi-release-8.rpm
yum install wget vim python3 telnet htop git mysql net-tools chrony -y
systemctl start chronyd
systemctl enable chronyd
#configure SELinux policies
setsebool -P httpd_can_network_connect=1
setsebool -P httpd_can_network_connect_db=1
setsebool -P httpd_execmem=1
setsebool -P httpd_use_nfs 1
#install Amazon EFS client utils for mounting the targets on the EFS
git clone https://github.com/aws/efs-utils
cd efs-utils
yum install -y make
yum install -y rpm-build
make rpm
yum install -y ./build/amazon-efs-utils*rpm
#setup self-signed certificate for apache server
yum install -y mod_ssl
openssl req -newkey rsa:2048 -nodes -keyout /etc/pki/tls/private/kiff-web.key -x509 -days 365 -out /etc/pki/tls/certs/kiff-web.crt
# edit the ssl.conf file to specify the part to the certificate and the key
vi /etc/httpd/conf.d/ssl.conf
Create an AMI from the instance
We will create two launch templates from this AMI, one each for the wordpress server and the tooling server. The launch templates will differ in the user data for each server. The launch tmeplate
Configure user data for the worpress launch template:
mkdir /var/www/
sudo mount -t efs -o tls,accesspoint=fsap-0f9364679383ffbc0 fs-8b501d3f:/ /var/www/
yum install -y httpd
systemctl start httpd
systemctl enable httpd
yum module reset php -y
yum module enable php:remi-7.4 -y
yum install -y php php-common php-mbstring php-opcache php-intl php-xml php-gd php-curl php-mysqlnd php-fpm php-json
systemctl start php-fpm
systemctl enable php-fpm
wget http://wordpress.org/latest.tar.gz
tar xzvf latest.tar.gz
rm -rf latest.tar.gz
cp wordpress/wp-config-sample.php wordpress/wp-config.php
mkdir /var/www/html/
cp -R /wordpress/* /var/www/html/
cd /var/www/html/
touch healthstatus
sed -i “s/localhost/kiff-database.cdqtynjthv7.eu-west-3.rds.amazonaws.com/g” wp-config.php
sed -i “s/username_here/Kiffadmin/g” wp-config.php
sed -i “s/password_here/admin12345/g” wp-config.php
sed -i “s/database_name_here/wordpressdb/g” wp-config.php
chcon -t httpd_sys_rw_content_t /var/www/html/ -R
systemctl restart httpd
Configure user data for tooling launch template:
mkdir /var/www/
sudo mount -t efs -o tls,accesspoint=fsap-01c13a4019ca59dbe fs-8b501d3f:/ /var/www/
yum install -y httpd
systemctl start httpd
systemctl enable httpd
yum module reset php -y
yum module enable php:remi-7.4 -y
yum install -y php php-common php-mbstring php-opcache php-intl php-xml php-gd php-curl php-mysqlnd php-fpm php-json
systemctl start php-fpm
systemctl enable php-fpm
git clone https://github.com/Livingstone95/tooling-1.git
mkdir /var/www/html
cp -R /tooling-1/html/* /var/www/html/
cd /tooling-1
mysql -h kiff-db.cdqpbjkethv0.us-east-1.rds.amazonaws.com -u kiffAdmin -p toolingdb < tooling-db.sql
cd /var/www/html/
touch healthstatus
sed -i “s/$db = mysqli_connect(‘mysql.tooling.svc.cluster.local’, ‘admin’, ‘admin’, ‘tooling’);/$db = mysqli_connect(‘kiff-db.cdqpbjkethv0.us-east-1.rds.amazonaws.com ‘, ‘kiffAdmin’, ‘admin12345’, ‘toolingdb’);/g” functions.php
chcon -t httpd_sys_rw_content_t /var/www/html/ -R
systemctl restart httpd
Target group IMG:
Create load balancers (the external load balancer and the internal load balancer)
Create external load balancer.
Assign at least two public subnets
set protocol as HTTPs on port 443
Register the Nginx target group for the external load balancer
select the security group for the external load balancer
set path for healthchecks as /healthstatus
Create the internal load balancer
Assign at least two private subnets
set protocol as HTTPs on port 443
select the security group for the internal load balancer
set path for healthchecks as /healthstatus
Register the wordpress target group as the default target for the internal load balancer
Configure a listener rule to allow the internal load balancer forward traffic to the tooling target group based on the rule set.
Since we’ll configure host header in our Nginx reverse proxy server, we will specify the listener rule on the ALB to forward traffic to the tooling target if the host header is the domain name : tooling.kiff-web.space
Create Autoscaling groups for the launch templates (Bastion, Nginx, tooling and wordpress servers)
Configure Autoscaling for Nginx
Select the right launch template
Select the VPC
Select both public subnets
Enable Application Load Balancer for the AutoScalingGroup (ASG)
Select the Nginx target you created before
Ensure that you have health checks for both EC2 and ALB
The desired capacity is 2
Minimum capacity is 2
Maximum capacity is 4
Set scale out if CPU utilization reaches 90%
Ensure there is an SNS topic to send scaling notifications
Configure Autoscaling For Bastion
Select the right launch template
Select the VPC
Select both public subnets
Select No load balancer for bastion Autoscaling group, since the Bastion server is not targeted by any load balancer
Set scale out if CPU utilization reaches 90%
Enable health checks
The desired capacity is 2
Set Minimum capacity to 2
Maximum capacity to 4
Ensure there is an SNS topic to send scaling notifications
Configure Autoscaling group for tooling and wordpress webserver
Select the right launch template
Select the VPC
Select both private subnets 1 and 2
Enable Application Load Balancer for the AutoScalingGroup (ASG)
Select the target groups you created before
Ensure that you have health checks for both EC2 and ALB
The desired capacity is 2
Minimum capacity is 2
Maximum capacity is 4
Set scale out if CPU utilization reaches 90%
Ensure there is an SNS topic to send scaling notifications
Create A Records in the Route 53 hosted zone
We need to ensure that the main domain for the WordPress website can be reached, and the subdomain for Tooling website can also be reached using a browser.
create A record for tooling and wordpress
set record type to ‘A-Routes to a IPV4 address’
Set Route Traffic to ‘Alias to application load balancer and classic load balancer’
Set the load balancer
Healthchecks status for wordpress targets:
Accessing the tooling and wordpress servers:
Note:
Ensure that SELinux policies are properly configured on the server instances.
Ensure you delete all the resources you created to avoid accumulating charges.

