
This article will teach you the concepts in GraphQL to enable you to perform queries and mutations on a data set. GraphQL is a query language and specifications for APIs that enable clients to request specific data, promoting efficiency and flexibility in data retrieval.
At the end of this article, you will know:
What GraphQL is
The problem GraphQL solves
The difference in using HTTP methods in REST API vrs query and mutation in GraphQL API to fetch and manipulate data.
How to define the shape of the data to query using Schema
How to query and mutate data on a GraphQL server using ApolloSandbox
In this tutorial, you will learn how to fetch and mutate using the local data of students and course array
Prerequisite
Familiarity with JavaScript
Familiarity with NodeJS
Introduction to GraphQL
GraphQL is a query language for your API, and a server-side runtime for executing queries using a type system you define for your data.
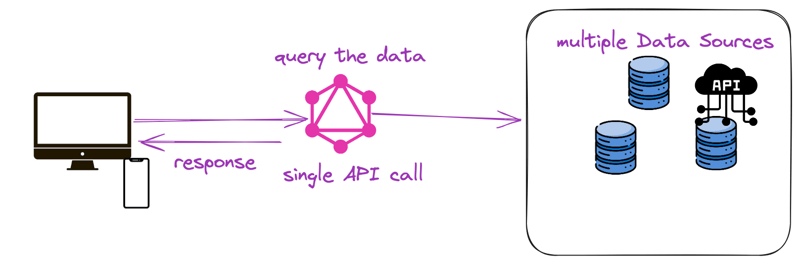
This means it provides a way to request and modify data from multiple data sources ( for instance, a REST API, SQLite database, and services) in a single query
GraphQL adopts the concept of a graph an approach of interconnecting different data to form a relationship. In modern applications, numerous data can be connected to form the app data graph. For instance, if you are building a blogging app that has resources (data) such as:
Posts
Authors
Comments
Followers
These entities can be connected to form a relationship. Whenever a developer wants to access a resource, he writes a query that specifies exactly what data he needs.
GraphQL is akin to visiting a restaurant, and telling the chef exactly what you want for your menu rather than accepting the provided menu.
For your menu, you can specify:
The type of protein (chicken, fish, tofu) to be served
The cooking method (grilled, baked, etc) to be used.
The sides ( salad, veggies, etc) to be added
And any specific sauces or toppings.
Similarly, with GraphQL, you can request specific fields from different parts of a data. The server then fulfills your request, giving you the exact data you need, without any unnecessary information.
There are two main components of GraphQL:
GraphQL Server
GraphQL Client
The GraphQL server is responsible for implementing the GraphQL API on the server side. Examples of GraphQL servers are:
Express
Apollo server
The GraphQL client allows apps to interact with the GraphQL server. It enables fetching and updating data in a declarative manner.
Examples of GraphQL clients are:
Relay
Apollo Client
What problem does GraphQL solve: data fetching with REST API vrs GraphQL
Generally, front-end developers display data on the UI of an app by sending requests to multiple endpoints.
For instance in building a blogging app. You will have a screen that displays the titles of the posts of a specific user. The same screen also displays the names of the last 3 followers of that user.
With a REST API, these resources may be on different endpoints. To fetch these resources, you may need to send different requests.
For instance, here are the steps to fetch and display the data in the blogging app using a REST API:
Fetch request to /users/<id> endpoint to fetch the initial data for a specific user.
Another request to the /users/<id>/posts endpoint is to return all the posts and then filter out the title.
Finally, a request to /users/<id>/followers endpoint to return a list of the followers for the specified user.
In this scenario, you are making three requests to different endpoints to fetch the required data to build the UI.
This introduces two issues:
Over-fetching
Under-fetching
Overfetching is when a client downloads additional information than is required in the UI. For instance in the /users/<id>/posts/ endpoint, the data required is the title for each post. However, additional information may be returned such as:
id
post body,
likes, etc.
These will not be displayed in the UI, and can lead to:
Unnecessary transmission of data over the network.
Increased response times, and possibly impacting the performance of the client app.
Underfetching is when a client needs to make multiple requests to the server to gather all the necessary data for a particular view or operation. This happens when a specific endpoint doesn’t provide enough of the required information hence the client will have to make additional requests to fetch everything it needs.
Underfetching can lead to unnecessary network calls as numerous exchanges between the client and server increase the request time and network traffic.
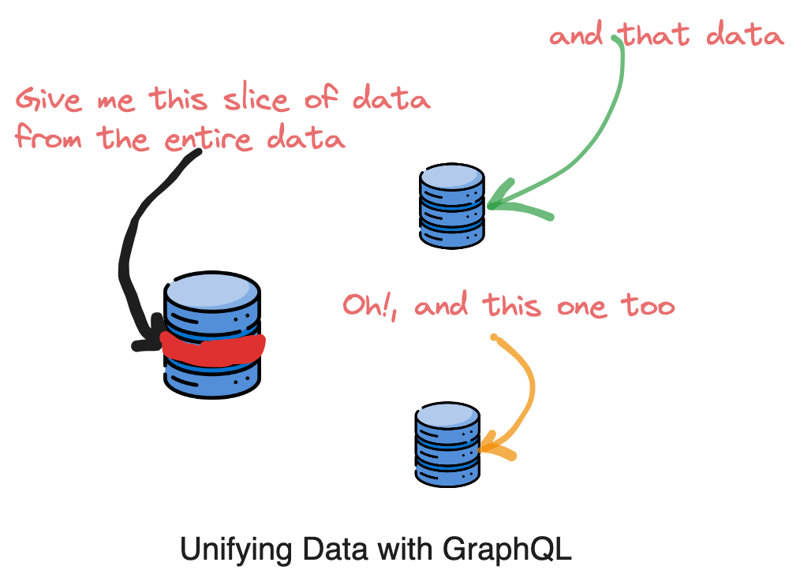
GraphQL solves these issues of underfetching and overfetching by enabling clients to specify their exact data requirements in a *single query*. A “single” query means only one request is made to a GraphQL server to fetch specific data. That query will contain all the data required by the client.
Understanding the client and server roles
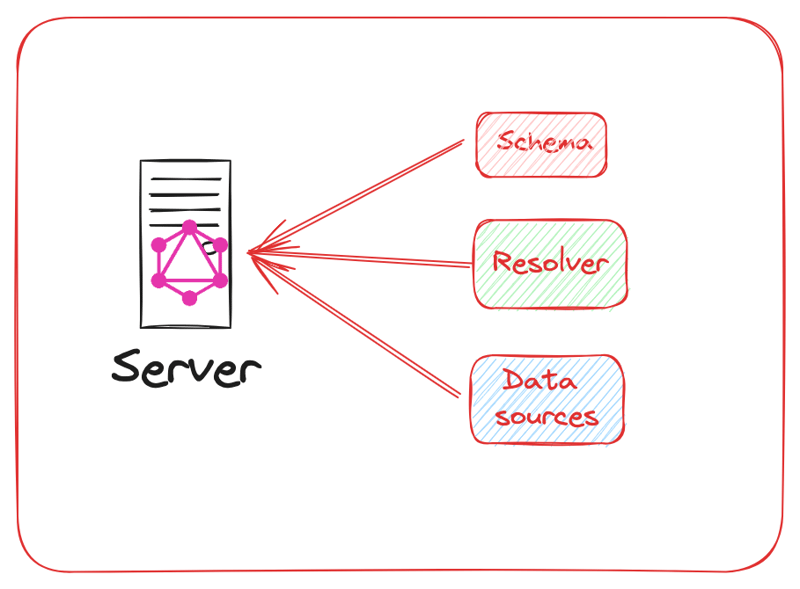
The GraphQL API is built on top of a GraphQL server. The server is the central point for receiving GraphQL queries. Once the query is received, it will be matched against a defined schema (you will learn more about schema as you proceed). The server retrieves the requested data by interacting with databases, microservices, or other data sources.
The GraphQL server consists of:
Schema: This represents the structure or shape of your data set.
Resolvers: They are functions that specify how to process specific GraphQL operations and contain the logic for fetching the requested data.
Data Sources: any available data source. Eg. MySQL, MongoDB, etc
The GraphQL Client enables apps to interact with a GraphQL API. You will describe the data your app needs in the GraphQL client, send queries and mutations to the server, and receive the response.
Examples of GraphQL clients are:
Apollo Client
Fetch QL
Relay
So far, you know what GraphQL is and the problem it solves. In the next section, you will learn how to build a GraphQL Server using the Apollo server.
Setting up a GraphQL Server
In this section, you will:
Build and run an Apollo Server
Define the GraphQL Schema that represents the structure of your data sets.
Let’s get started
Step 1: Creating a new project
Create a directory and navigate into the directory
Inside the directory, initialize a Node.js project and set it up to use ES modules
npm init –yes && npm pkg set type=”module“
Install graphql and apollo-server dependencies using the command below:
npm install @apollo/server graphql
Step 2: Create an instance of the Apollo server
Create an index.js file inside the root directory. This will contain all the server requirements.
Add the code below to the index.js file
import { ApolloServer } from “@apollo/server“;
import { startStandaloneServer } from “@apollo/server/standalone“;
const server = new ApolloServer({
//typeDefs,
//resolvers,
});
const { url } = await startStandaloneServer({
server,
listen: { port: 4000 },
});
console.log(`Server ready on port ${url}`);
In the code above:
The new ApolloServer() constructor creates a new instance of the server. This accepts an object with two properties: the schema definition and the set of resolvers.
Next, you will pass the server instance to the startStandaloneServer function. This will create an Express server, install the ApolloServer instance as middleware, and prepare your app to handle incoming requests.
Step 3: Define your GraphQL Schema and types
The GraphQL schema specifies the available data, its format (data types), and the operations(queries, mutation) that can be performed on it. When the query is initiated the data returned should match the structure defined in the schema.
Here is what you should know about a schema:
The schema is a collection of types (and the relationship between these types).
Every type you define can be categorized into:
Scalar: This is similar to the primitive types in JavaScript ( String, Float, Int,Boolean, ID , etc)
Object: This represents the core items that can be fetched and what fields it has.
The schema also has two special types:
Query and Mutation : These detail what data you can request or mutate. You will learn more about queries and mutations types later.
Below is the syntax of an object type definition:
#field name and the corresponding type
fieldName: scalarType
}
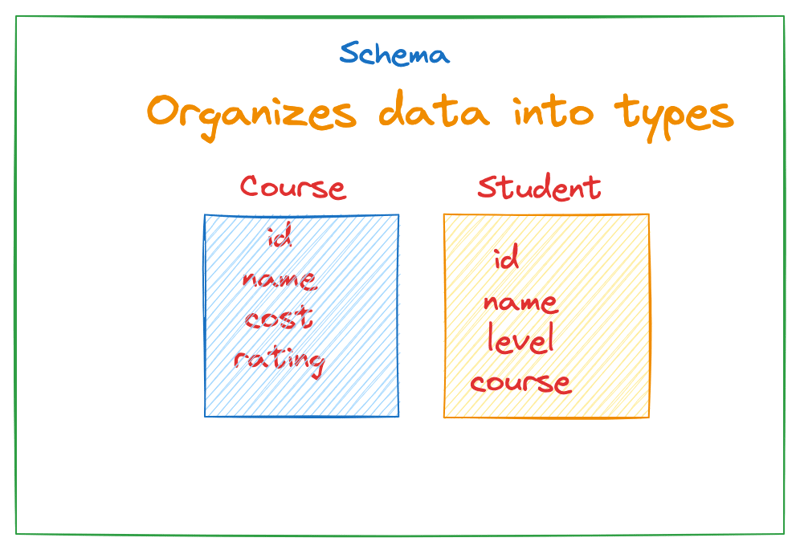
In this tutorial, clients can query from an array of students and course data. Hence, you will define the structure for the Course and Student as object type in the schema.
Here’s an example of a Course object in a schema definition.
# This represents a Course object with fields that object has
type Course {
id:ID
name:String
cost:String
rating: Float
}
Let’s examine the type above:
Course is the name of the object type.
The details between the { and } are fields of the Course type. That means id, name, cost , and rating are the only visible fields in any GraphQL query that works on the Course object.
The ID, String and Float are the scalar types. It means the returned data for the field should be of type String, Float or ID
Now, let’s create a schema.js file in the root directory, and define a variable called typeDefs to store all our types in the schema. Later, you will pass this typeDefs to the server.
export const typeDefs = `#graphql
# Your schema will go here
`;
# define the Course object
type Course {
id:ID
name:String
cost:String
rating: Float
}
# define the Student type
type Student {
id: ID
name: String
level: String
courses:[String]
} `;
In the above, we have two objects in our schema: Course and Student each with its structure.
Understanding theQuery Type
Let’s tell GraphQL what to retrieve when we query. The Query type indicates what you can fetch from the data source.
Here is what you need to know about the Query type:
It can be compared to the ‘read’ operations in a CRUD (Create, Read, Update, Delete) system.
In the Query type are fields that acts as entry points into the rest of our schema.
The advantage of GraphQL is that you can fetch data from various resources using a single query ( Query type). However, with REST APIs different endpoints are required to fetch various resources (e.g api/students, api/courses).
Below is the syntax for a Query :
type Query {
# within indicate the specify fields to query and what the expected results should be
field: returnedType
field: returnedType
}
On the front-end, we want to fetch an array of courses, students, and the details of a specific student
Here is how we will define them in our root Query
type Query {
#get courses array
courses: [Course]
#get students array
students:[Student]
#Fetch a specific student by providing a student’s ID as argument
student(id:ID!): Student
}
In the code above, clients will be able to execute a single query by specifying the courses and students fields.
courses: This returns an array of courses of type Course
students: This returns an array of students of type Student
student: This field accepts anid parameter and returns specific student details
Step 4: Define your data set
In the previous steps, we define the structure of our data and what we can query. Now, we will define the data itself.
Apollo Server can fetch data from any source you connect to ( for instance, SQLLite database, REST API, etc).
In this tutorial, you will use a local data source.
Create a db.js file in your root directory
Add the code below
{
id: “1“,
name: “Web Development“,
cost: “300“,
rating: 4.5,
},
{
id: “2“,
name: “Digital Marketting“,
cost: “230“,
rating: 3.0,
},
{
id: “3“,
name: “Data Analytics“,
cost: “345“,
rating: 3.9,
},
{
id: “4“,
name: “Cyber Security“,
cost: “341“,
rating: 3.1,
},
{
id: “5“,
name: “Mobile Apps“,
cost: “465“,
rating: 2.1,
},
{
id: “6“,
name: “Artificial Intelligence“,
cost: “604“,
rating: 5.0,
},
{
id: “7“,
name: “Maching Learning“,
cost: “345“,
rating: 2.5,
},
{
id: “8“,
name: “Dev Ops“,
cost: “567“,
rating: 2.6,
},
{
id: “9“,
name: “Backend Development“,
cost: “345“,
rating: 3.1,
},
];
let students = [
{
id: “1“,
name: “Emmanuel Smith“,
level: “100“,
courses: [“Web Development“, “Dev Ops“],
},
{
id: “2“,
name: “Robert Taylor“,
level: “200“,
courses: [“Backend Development“, “Machine Learning“],
},
{
id: “3“,
name: “Emly Lastone“,
level: “100“,
courses: [“Frontend Development“],
},
{
id: “4“,
name: “Clement Sams“,
level: “300“,
courses: [“Mobile Apps“],
},
{
id: “5“,
name: “Lius Gracias“,
level: “100“,
courses: [“Machine Learning“, “Backend Development“],
},
{
id: “6“,
name: “Jeniffer Baido“,
level: “200“,
courses: [“Data Science“],
},
{
id: “7“,
name: “Natash Gamad“,
level: “300“,
courses: [“Cyber Security“],
},
{
id: “8“,
name: “Paul Graham“,
level: “100“,
courses: [“Web Development“],
},
{
id: “9“,
name: “Musti Madasd“,
level: “300“,
courses: [“Artiificial Inteligence“],
},
{
id: “10“,
name: “Victor Bruce“,
level: “200“,
courses: [“Mobile Apps“, “Backend Development“],
},
{
id: “11“,
name: “Lilian Taylor“,
level: “200“,
courses: [“Web Development“],
},
{
id: “12“,
name: “Smith Chef“,
level: “100“,
courses: [“Backend Development“],
},
];
export default { courses, students };
Step 5: Add the typeDefs to the server
The Apollo Server needs to know about the types defined in the schema.js.
In the index.js file:
import the typeDefs specified in the schema.js
Pass the typeDefs as an argument to the new ApolloServer({})
…
import { typeDefs } from “./schema“; const server = new ApolloServer({
typeDefs, #type defs passed as an argument
#resolvers will be passed here later
});
….
Next, we will define the logic for querying and mutating the data. To accomplish this, you will use resolvers
Step 6: Set up a resolver
Resolvers are functions that generate a response for every GraphQL query. A resolver’s mission is to populate the data for a field in your schema. It connects schemawith the data sources, fetches the requested data, and populates the fields in the schema with that data. Resolvers have the same name as the field that it populates data for.
In the schema.js you have the Query type below:
type Query {
# specify fields to query and what the expected results should be
courses: [Course]
students:[Student]
}
You will define resolvers for the courses and students fields of the root Query type so that they always return an array of Course and Student when queried.
Add the code below to the index.js file
const resolvers = {
Query: {
//resolver function for students field
students() {
//connect to the data source and return students data
return db.students;
},
// resolver function for courses field
courses() {
// connect to the data source and return courses data
return db.courses;
},
},
};
Here are the steps to define a resolver:
Define all the resolvers in a JavaScript object named resolvers. This object is called the resolver map
The resolver will have a key of Query with an object value
Within the object, you will define a function that connects to the data source performs the needed operation, and returns the specified data. The function name should be the same as the field to query
In the code above the students and courses resolver functions connect to the data in the db.js file, and return the students and courses data respectively.
Next, you will pass the resolvers object to the server:
// Pass schema definition and resolvers to the ApolloServer constructor
const server = new ApolloServer({
typeDefs,
resolvers,
});
…
Let’s recap what we have done:
Created an Apollo server
Defined the schema
Defined the resolver
Connected the resolver to the data
Passed the resolver and schema to the Apollo server instance
In the next sections, you will start the server, query, and mutate data from the source.
Step 8: Start the server
Let’s start the Apollo server by running the command below:
// if you have nodemon install use the command
nodemon index.js
You should now see the following output at the bottom of your terminal:
Fetching resources from the server
Our server is up and running. Now, we need to fetch data from the source. To do that, you will execute GraphQL queries on the server. Queries are operations that fetch resources from the server.
Because we do not have a frontend app, we will use Apollo Sandbox to execute the query. It provides a quick way to test GraphQL endpoints.
Visit http://localhost:4000 in your browser to open the sandbox. The Sandbox includes the Apollo Studio Explorer, which enables you to build and run operations on the Apollo server.
The Sandbox UI displays:
A middle panel for writing and executing queries
A right panel for viewing responses to the query results
Tabs for schema exploration, search, and settings
A URL bar for connecting to other GraphQL servers (in the upper left)
Let’s learn how to fetch data from the GraphQL server.
Below is the syntax for a query:
someField
}
Now, Let’s execute a query for the students and courses fields
Enter the query keyword
Type the name for your query ( e.g StudentQuery, CoursesQuery, etc)
Within the curly brackets ( {} ), enter the name of the field to query as defined by the root Query in your schema
Open another curly bracket ({} ) and specify the exact fields to query for the object
Because you are using the ApolloSandbox, you can enter these steps in the “Operations” panel and click the “blue” button in the upper right.
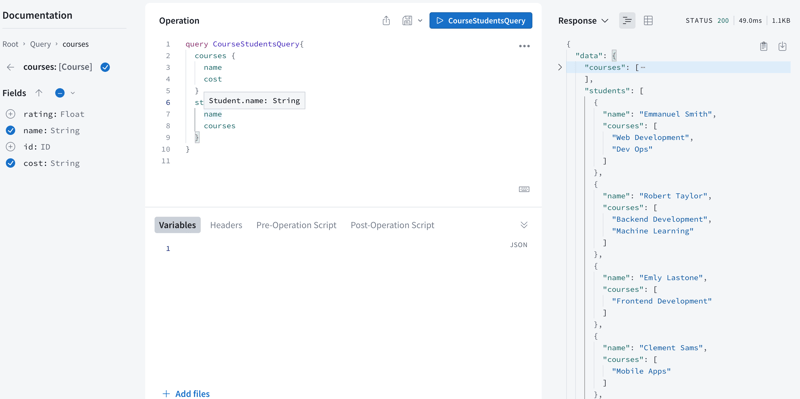
Now, type the code below into the Operations panel and click the blue button.
query CourseStudentsQuery{
courses {
# only get these fields from the query
name
cost
}
students {
# only get these fields from the query
name
courses
}
}
This action will:
connect to the server
call the resolver function for that field.
The resolver function connects to the data sources, performs the needed logic, and returns a response
The response is a JSON object containing only the specified fields.
The response will appear in the “Response” panel
Here is a screenshot of the operations and the response
One advantage of GraphQL is enabling clients to choose to query only for the fields they need from each object
In the query above, we requested only these fields for each query
courses: name and cost fields
students: name and courses fields
Hence, only these fields will show in the response. Now, we have fetched the specified data for two different resources with a single query eliminating over-fetching.
Understanding GraphQL arguments: querying for a specific field
In our schema, we have defined the entry points for courses and students, but we still need a way to query for a specific student by its ID. To do that, we’ll need to add another entry point to our schema.
An argument is a value you provide for a particular field in your query to help:
retrieve specific objects
filter through a set of objects
or even transform the field’s returned value.
To define an argument:
Add parentheses after the field name. Eg. fieldName()
Inside the parentheses, write the name of the argument followed by a colon, then the type of that argument. Eg. (id:ID ). Separate multiple arguments with commas.
Below is the syntax
fieldName(argName: argType)
}
In this tutorial, we want to query for a specific student by ID
Inside the Query type in schema.js:
Add the student field
Within the parenthesis specify the id argument and its type (id: ID)
Specify the returned object type Student
type Query {
#initial queries remains
…
#Fetch a specific student by providing a student’s ID as argument
student(id:ID!): Student
}
Next, in the index.js define a resolver for the student field that uses the provided ID to fetch details of the student.
const resolvers = {
Query: {
…
//resolver for the student field to fetch a specific student
student(parent, args, contextValue, info) {
return db.students.find((student) => student.id === args.id);
},
},
};
A resolver can optionally accept four positional arguments: (parent, args, contextValue, info)
The args argument is an object that contains all GraphQL arguments provided for the field in the schema.
Inside the body of the resolver function, we connect to the database and find a student with id that equals the args.id
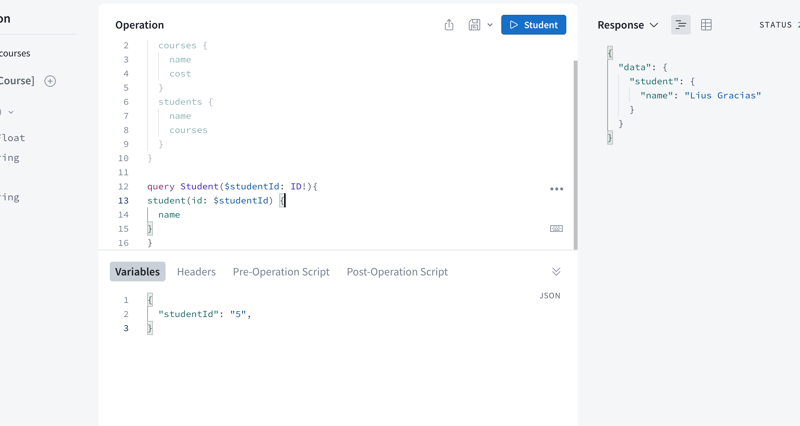
Because we have defined the resolver function for the student, we can query for a specific student with the ID.
Here is how the operation will look like in ApolloSandbox
In the “Variables” section, we have a variable studentId with a value of 5
In the “Operation” section is Student query. It accepts the variable $studentId with a type of ID!
The $ indicates a variable and the name after indicates the variable name
Next, we specify the field to query and pass in the variable
We then specify that we only want to return the name field for that query
You know how to fetch data from the server using the ApolloSandbox. Next, let’s learn how to mutate data.
Mutating data on a GraphQL server
A mutation is an operation that allows you to insert new data or modify the existing data on the server. This is similar to POST, PUT, PATCH and DELETE requests in REST
To modify data, you use the Mutatation type.
Here is how to mutate data in our schema:
Start with the type keyword followed by the name Mutation
Inside the curly braces, specify the entry point. That is the field to mutate.
We recommend using a verb to describe the specific action followed by the data the mutation will act on. Eg. addStudent, deleteStudent, createStudent
Pass the ID as an argument to the field to mutate
Specify the return type after the user makes the mutation.
Let’s delete a student from the database. Here is how to do that
type Mutation{
#entry point to delete a student
deleteStudent(id: ID!): [Student]
}
In the code above:
We use deleteStudent(id: ID!) field to indicate we want to delete a student’s data by passing the id as an argument.
Once the user has deleted a student, we return updated data that specifies an array of Student object.
Next, you will define the resolver function for this mutation. Inside the index.js and in the resolver object, type the code below:
const resolvers = {
//code here remains the same
…
//The Mutation object holds the resolver methods for all mutations
Mutation: {
//function to mutate data of a specified student
deleteStudent(_, args) {
db.students = db.students.filter((student) => student.id !== args.id);
return db.students;
},
},
};
In the code above:
We added a Mutation property to the resolvers object to indicate the mutation of data
We defined the deleteStudent(_, args) method and passed the args object as parameter
Inside the method, we access the database and filter out all students whose id does not match the args.id
Finally, we returned the results.
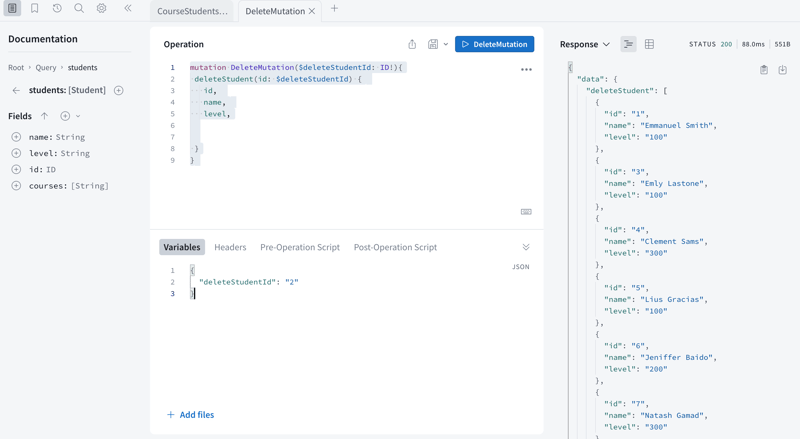
Now, let’s delete a student using the Sandbox.
Open a new tab and in the “Operation” section, add the following code below:
deleteStudent(id: $deleteStudentId) {
//Student object should have the following fields
id,
name,
level,
}
}
In the above:
We used the mutation key to indicate a mutation of data
DeleteMutation is the general name for the mutation. We pass the $deleteStudentId variable as a parameter. This will hold the value passed in the ‘Variable” section of the ApolloSandbox
The deleteStudent(id: $deleteStudentId) is the field defined in the schema. It accepts the ID we passed in the “Variable” section
Within the body of the deleteStudent we specify the fields the Student object should return after deleting
Finally, in the “Variable” section, indicate the ID of the student to delete and click on the “DeleteMutation” button. The specified student will be deleted and the response is displayed in the “Response” section.
Let’s learn how to add a new student.
In the Mutation type, define addStudent field. This field will accept a student argument of type StudentInputsand return a Student type
Add the code below the Mutation:
type Mutation{
# add addStudent field
addStudent(student: StudentInput!): Student
}
In the next line after the Mutation, define the StudentInput. This will contain all the fields the new student will have
type Mutation{
deleteStudent(id: ID!): [Student]
addStudent(student: StudentInput!): Student
}
# data to pass to addStudent
input StudentInput{
name: String
level: String
courses:[String]
}
Next, go to the index.js and in the Mutation property of the resolvers object, we will define a addStudent resolver function that adds a new student to the data.
Add the code below the Mutation:
const resolvers = {
Query: {
…
},
//The Mutation object holds the resolver methods for all mutations
Mutation: {
…
// this will add new student to the students data
addStudent(_, args) {
let student = {
…args.student,
id: Math.floor(Math.random() * 1000).toString(),
};
db.students.push(student);
return student;
},
},
}
In the code above:
Within the body of the addStudent method, we have defined a student object
The args.student contains all the arguments we will pass to the method and the id will generate a random ID
The db.student access the students’ data source, and we push the new student object to it
Finally, we return the details of the student we created.
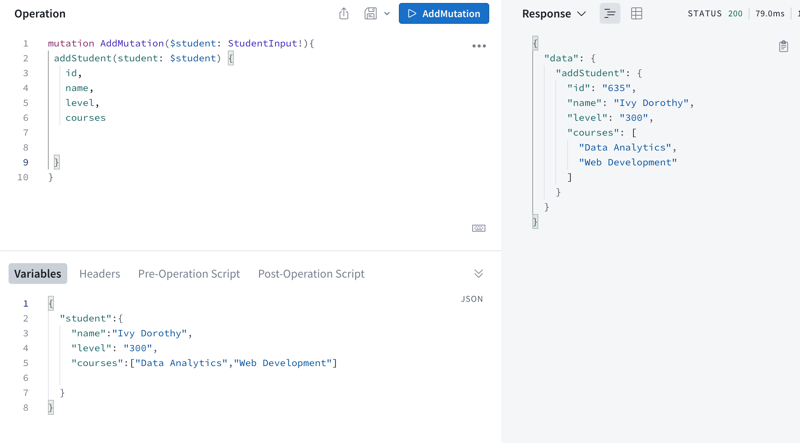
Here is the screenshot on how to add a new student in the sandbox:
The AddMutation accepts a $student variable of type StudentInput
The $student is passed to the addStudent function
In the “Variable” section, we define the input data. This is a student object with name, level and courses properties.
Summary
You now have the required knowledge to query and mutate data with GraphQL. In summary, GraphQL is a query language for API that provides a way to request and modify data from multiple data sources in a single query.
For further studies, check this comprehensive tutorial on ApolloGraphql

