
Generative AI continues to be a hot topic in the tech world with very rapid developments as the technology evolves. Google has been at the forefront of AI for a long time and researchers at Google developed the technology behind the latest Generative AI models which they outlined in their “Attention Is All You Need” paper. Over the last year Google has developed and released multiple models and services such as Bard, Palm and their latest offering Gemini and its open source variant Gemma. Gemini has a generous Free Tier of 60 requests per minute (Note they will retain your input data to train their models) which is useful for new apps. Many people utilize their mobile devices for a lot of their computing needs these days so we will explore how to incorporate the Gemini API into an Expo React Native mobile chat app.
⭐️ The complete source code referenced in this guide is available on GitHub https://github.com/dpills/aitomobile
Before getting started, go and generate a Gemini API Key in Google AI Studio.
Backend
We need a backend service to make the calls to the Gemini API so we can use a FastAPI WebSocket setup to facilitate this. Install the FastAPI dependencies along with the Google Generative AI library.
📝 pyproject.toml
name = “aitomobile”
version = “0.1.0”
description = “”
authors = [“dpills”]
[tool.poetry.dependencies]
python = “^3.12”
fastapi = “^0.110.0”
uvicorn = { extras = [“standard”], version = “^0.28.0” }
python-dotenv = “^1.0.1”
google-generativeai = “0.4.1”
[build-system]
requires = [“poetry-core”]
build-backend = “poetry.core.masonry.api”
Add your generated Gemini API Key to a .env file in the project folder.
📝 .env
Now setup the FastAPI WebSocket server to accept messages, send them to the Gemini API and stream the response back over the WebSocket. You can update the prompt as needed and test different prompts to see what gives you the best output. Reference the Prompt Strategies section of the Google AI docs for additional info.
📝 main.py
import os
import uuid
from typing import AsyncGenerator, NoReturn
import google.generativeai as genai
import uvicorn
from dotenv import load_dotenv
from fastapi import FastAPI, WebSocket
load_dotenv()
genai.configure(api_key=os.getenv(“GOOGLE_API_KEY“))
model = genai.GenerativeModel(“gemini-pro“)
app = FastAPI()
PROMPT = “””
You are a helpful assistant, skilled in explaining complex concepts in simple terms.
{message}
“”” # noqa: E501
async def get_ai_response(message: str) -> AsyncGenerator[str, None]:
“””
Gemini Response
“””
response = await model.generate_content_async(
PROMPT.format(message=message), stream=True
)
msg_id = str(uuid.uuid4())
all_text = “”
async for chunk in response:
if chunk.candidates:
for part in chunk.candidates[0].content.parts:
all_text += part.text
yield json.dumps({“id“: msg_id, “text“: all_text})
@app.websocket(“/ws“)
async def websocket_endpoint(websocket: WebSocket) -> NoReturn:
“””
Websocket for AI responses
“””
await websocket.accept()
while True:
message = await websocket.receive_text()
async for text in get_ai_response(message):
await websocket.send_text(text)
if __name__ == “__main__“:
uvicorn.run(
“main:app“,
host=“0.0.0.0“,
port=8000,
log_level=“debug“,
reload=True,
)
Thats all there is to it! now start the server so we can connect to it from our app.
INFO: Uvicorn running on http://0.0.0.0:8000 (Press CTRL+C to quit)
INFO: Started reloader process [65258] using WatchFiles
INFO: Started server process [65260]
INFO: Waiting for application startup.
INFO: Application startup complete.
Mobile App
As mentioned we will use Expo to create our React Native mobile app and you can use the create-expo-app utility to bootstrap a Typescript version.
✔ What is your app named? … AItoMobile
✔ Downloaded and extracted project files.
> yarn install
✅ Your project is ready!
To run your project, navigate to the directory and run one of the following yarn commands.
– cd AItoMobile
– yarn android
– yarn ios
– yarn web
Install these dependencies so we can properly render our chat interface, using expo install will make sure versions compatible with the current expo version will be used.
Update your App.tsx file to a basic chat setup which sets up the WebSocket connection to our backend persists previous messages and renders the Markdown responses.
import { StatusBar } from “expo-status-bar“
import { DateTime } from “luxon“
import React, { useEffect, useState } from “react“
import { Text, TextStyle, View, ViewStyle } from “react-native“
import { GiftedChat, IMessage } from “react-native-gifted-chat“
import Markdown from “react-native-markdown-display“
export default function App() {
const [messages, setMessages] = useState<IMessage[]>([])
const [loading, setLoading] = useState(false)
const [ws, setWs] = useState<WebSocket>()
useEffect(() => {
const newWs = new WebSocket(“ws://localhost:8000/ws“)
newWs.onmessage = (event) => {
const data = JSON.parse(event.data)
setLoading(false)
setMessages((previousMessages) =>
GiftedChat.append(
previousMessages.filter((m) => m._id !== data.id),
[
{
_id: data.id,
text: data.text,
createdAt: new Date(),
user: { _id: 1 },
system: true,
},
],
),
)
}
async function getMessages() {
const messageData = await AsyncStorage.getItem(“messages“)
const messages: IMessage[] | null = messageData ? JSON.parse(messageData) : null
setMessages(
messages
? messages
: [
{
_id: 1,
text: “How can I help?“,
createdAt: new Date(),
user: { _id: 1 },
system: true,
},
],
)
}
getMessages()
setWs(newWs)
return () => {
newWs.close()
}
}, [])
useEffect(() => {
async function saveMessages() {
try {
await AsyncStorage.setItem(“messages“, JSON.stringify(messages))
} catch (e) {
console.log(`Failed to save messages: ${e}`)
}
}
saveMessages()
}, [messages])
return (
<View style={$container}>
<StatusBar style=“auto” />
<GiftedChat
placeholder=“How can I help?”
messages={messages}
onSend={(messages) => {
if (ws && messages && messages.length > 0) {
const message = messages[0]
setMessages((previousMessages) => GiftedChat.append(previousMessages, messages))
setLoading(true)
ws.send(message.text)
}
}}
user={{ _id: 2 }}
renderAvatar={null}
isTyping={loading}
renderSystemMessage={(props) =>
props.currentMessage?.text ? (
<View style={$msgContainer}>
<View style={$wrapper}>
<Markdown
style={{
body: {
fontSize: 16,
},
}}
>
{props.currentMessage?.text}
</Markdown>
{props.currentMessage?.createdAt ? (
<Text style={$msgTime}>
{DateTime.fromJSDate(new Date(props.currentMessage?.createdAt)).toFormat(
“h:mm a“,
)}
</Text>
) : null}
</View>
</View>
) : null
}
/>
</View>
)
}
const $container: ViewStyle = {
flex: 1,
paddingBottom: 20,
paddingTop: 60,
}
const $msgContainer: ViewStyle = {
flex: 1,
marginTop: 5,
marginBottom: 10,
marginHorizontal: 10,
}
const $wrapper: ViewStyle = {
borderRadius: 15,
backgroundColor: “#f0f0f0“,
marginRight: 25,
paddingHorizontal: 10,
paddingBottom: 5,
minHeight: 20,
justifyContent: “flex-start“,
}
const $msgTime: TextStyle = {
fontSize: 10,
marginTop: 5,
}
Make sure you have an IOS or Android simulator installed with XCode or Android Studio and start the mobile app dev server.
Starting Metro Bundler
› Opening exp://192.168.50.102:8081 on iPhone 15 Pro
…
› Metro waiting on exp://192.168.50.102:8081
› Scan the QR code above with Expo Go (Android) or the Camera app (iOS)
› Using Expo Go
› Press s │ switch to development build
› Press a │ open Android
› Press i │ open iOS simulator
› Press w │ open web
› Press j │ open debugger
› Press r │ reload app
› Press m │ toggle menu
› Press o │ open project code in your editor
› Press ? │ show all commands
Logs for your project will appear below. Press Ctrl+C to exit.
iOS Bundled 1375ms (node_modules/expo/AppEntry.js)
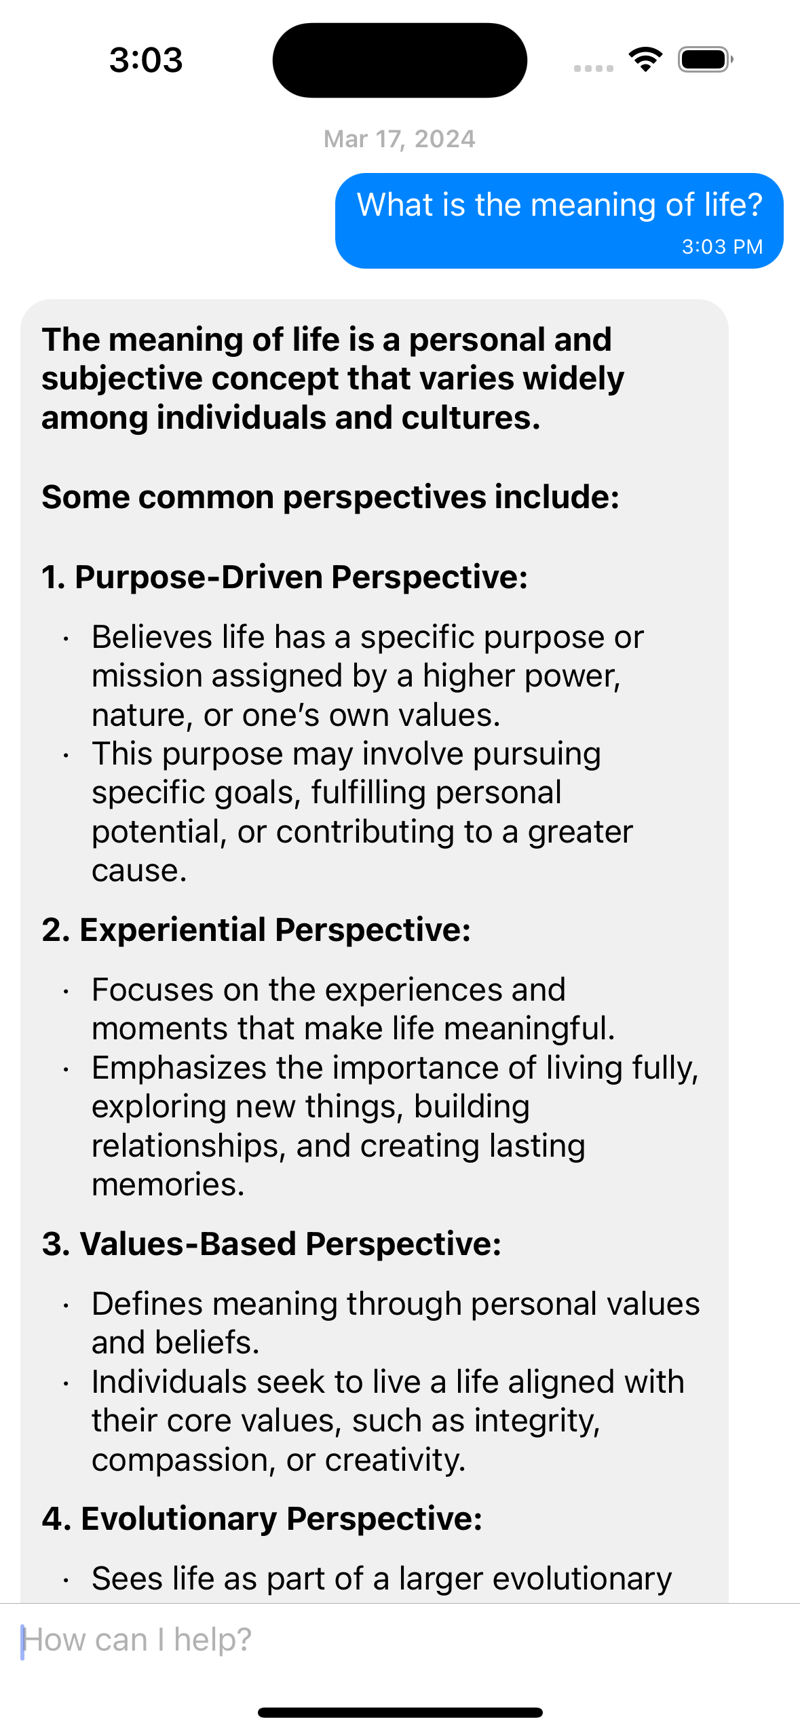
You should now see the chat interface in Expo Go and can test out a question!
The response message will stream the update and our backend development server logs should show the client connecting, the question asked and the chunks of the response being sent back.
DEBUG: < GET /ws HTTP/1.1
DEBUG: < host: localhost:8000
DEBUG: < sec-websocket-version: 13
DEBUG: < upgrade: websocket
DEBUG: < sec-websocket-key: UzwxQuxXmRR1K/lT6sPYxw==
DEBUG: < connection: Upgrade
DEBUG: < origin: http://localhost:8000
INFO: (‘127.0.0.1’, 64657) – “WebSocket /ws” [accepted]
DEBUG: > HTTP/1.1 101 Switching Protocols
DEBUG: > Upgrade: websocket
DEBUG: > Connection: Upgrade
DEBUG: > Sec-WebSocket-Accept: uHRvWGNZ/CCWmy80rcxRax6Fipc=
DEBUG: > date: Sun, 17 Mar 2024 19:02:52 GMT
DEBUG: > server: uvicorn
INFO: connection open
DEBUG: = connection is OPEN
DEBUG: < TEXT ‘What is the meaning of life?’ [28 bytes]
DEBUG: > TEXT ‘{“id”: “db926495-f85d-40cf-a901-bf92cb953ee7″, …ely among individuals”}’ [153 bytes]
DEBUG: > TEXT ‘{“id”: “db926495-f85d-40cf-a901-bf92cb953ee7″, …r mission assigned by”}’ [311 bytes]
DEBUG: % sending keepalive ping
DEBUG: > PING 81 e2 c2 99 [binary, 4 bytes]
DEBUG: < PONG 81 e2 c2 99 [binary, 4 bytes]
DEBUG: % received keepalive pong
DEBUG: > TEXT ‘{“id”: “db926495-f85d-40cf-a901-bf92cb953ee7″, …zes the importance of”}’ [613 bytes]
DEBUG: > TEXT ‘{“id”: “db926495-f85d-40cf-a901-bf92cb953ee7″, …d solace in embracing”}’ [1249 bytes]
DEBUG: > TEXT ‘{“id”: “db926495-f85d-40cf-a901-bf92cb953ee7″, …at shape their lives.”}’ [1908 bytes]
DEBUG: % sending keepalive ping
This is a small local example but I hope it shows you how simple it can be to add an AI powered chat to a cross-platform mobile application and gives you some basic building blocks to create a great experience for your users! 😊
✨ P.S. I have been building a React Native mobile app using a similar setup to help with the Home Buying process in the U.S. which I recently went through. If you or someone you know is looking to buy a home feel free to try it out from the Apple App Store or see an overview on the Website. Also if you are willing to beta test the app on Android please send me an email at dpills@protonmail.com 🙂
