
Check this post in my web notes!
Welcome back to our Vue.js CRM series! In our previous article, we delved into the realm of data visualization, unlocking the power of Vuetify Dynamic Table Components. Now, as we continue our journey, we shift our focus to a critical aspect of any CRM system—document operations.
In this installment, we’re diving deep into CRUD operations, the backbone of efficient data management. Whether you’re creating, retrieving, updating, or deleting data, these operations are pivotal for a seamless CRM experience.
Today, we’ll explore practical examples, guiding you through the integration of Vue.js with Firestore for robust document handling. From creating a document to updating and removing it, we’ve got you covered.
So, buckle up as we embark on a journey through the intricacies of Document CRUD Operations in Vue.js CRM. Ready to amplify your understanding and enhance your CRM functionalities? Let’s dive into the specifics and kick off with a concise plan for today’s exploration.
1. Crafting New Database Entries
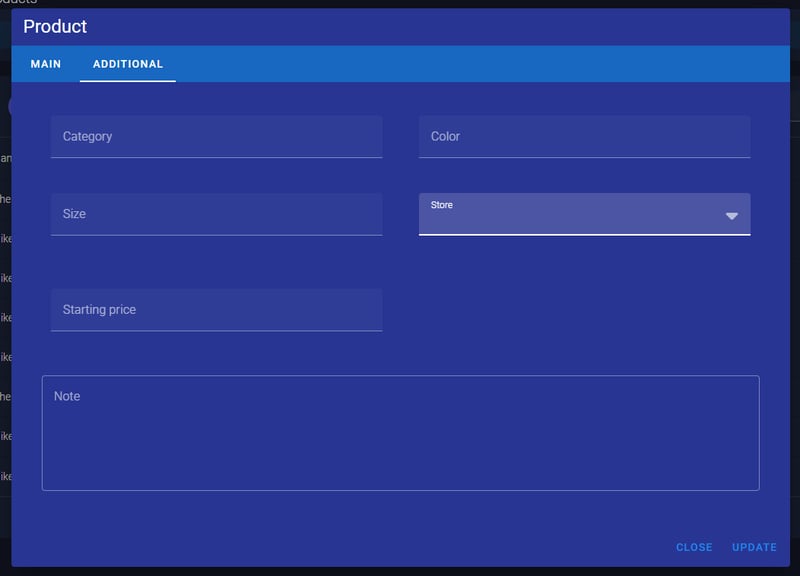
In our previous article we were working with modals, so let’s use modals for adding new products, for example. For that purpose, we will use vuetify tabs and forms.
create a new component “ProductModal.vue” in the products folder;
copy tabs from Vuetify documentation and paste the template inside our new component;
copy forms and paste them into tabs;
rename tabs, add v-model directives to every input so that we could control the data workflow;
Here is my example of a modal form:
<v-card color=”indigo-darken-3″>
<v-card-title>
<span class=”text-h5″>product</span>
</v-card-title>
<v-tabs
v-model=”tab”
bg-color=”primary”
>
<v-tab value=”one”>main</v-tab>
<v-tab value=”two”>additional</v-tab>
</v-tabs>
<v-card-text>
<v-window v-model=”tab”>
<v-window-item value=”one”>
<v-container>
<v-row>
<v-col
cols=”12″ sm=”6″>
<v-row>
<v-col
cols=”12″
>
<v-text-field
label=”name”
required
v-model=”name”
></v-text-field>
</v-col>
<v-col cols=”12″>
<v-text-field
label=”articul”
required
v-model=”articul”
></v-text-field>
</v-col>
<v-col cols=”12″>
<v-text-field
label=”quantity”
required
v-model=”quantity”
></v-text-field>
</v-col>
<v-col cols=”12″>
<v-text-field
label=”price”
required
v-model=”price”
></v-text-field>
</v-col>
</v-row>
</v-col>
</v-row>
</v-container>
</v-window-item>
<v-window-item value=”two”>
<v-container>
<v-row>
<v-col cols=”12″ sm=”6″>
<v-col cols=”12″>
<v-text-field
label=”category”
required
v-model=”category”
></v-text-field>
</v-col>
<v-col cols=”12″>
<v-text-field
label=”size”
required
v-model=”size”
></v-text-field>
</v-col>
</v-col>
<v-col cols=”12″ sm=”6″>
<v-col cols=”12″>
<v-text-field
label=”color”
required
v-model=”color”
></v-text-field>
</v-col>
<v-col cols=”12″>
<v-select
label=”store”
:items=”storesList”
required
v-model=”store”
></v-select>
</v-col>
</v-col>
</v-row>
<v-row>
<v-col cols=”12″>
<v-textarea
:label=”$t(‘note’)”
variant=”outlined”
v-model=”note”>
</v-textarea>
</v-col>
</v-row>
</v-container>
</v-window-item>
</v-window>
</v-card-text>
<v-card-actions>
<v-spacer></v-spacer>
<v-btn
color=”blue-darken-1″
variant=”text”
@click=”closeModal”
>
close
</v-btn>
<v-btn
v-else
color=”blue-darken-1″
variant=”text”
:loading=”loading”
@click.prevent=”createNewProduct”
>
save
</v-btn>
</v-card-actions>
</v-card>
</template>
Great! We have our form for creating new products and next what we need to add – is methods that will get data from the form and send it to the firestore database. For that reason, we will add new pinia store “products”, and add an action that will asynchronously send data to the firestore database. Do not forget to import all necessary libs. Here is an example:
import { firestore } from ‘../firebase/firebase’;
import { doc, collection, setDoc} from “firebase/firestore”;
export const useProductsStore = defineStore({
id: ‘products’,
state: () => ({}),
actions: {
async aCreateProduct(product) {
try {
const newStoreRef = doc(collection(firestore, “products”));
product.id = newStoreRef.id;
await setDoc(newStoreRef, product);
} catch (error) {
const errorCode = error.code;
const errorMessage = error.message;
console.log(errorCode,errorMessage);
}
},
}
});
In this action we create a document with a random id, then receive the id and store it in the product, after that, we will save our product under that current ID. Next, we need to add a new “save” method that will use our action and send data to Firestore. In that “createNewProduct” method we will:
call the “createProduct” action and as a parameter send our product;
receive updated products from the database, to update the products list in our app;
close modal;
show an alert about the result;
try {
await this.productsStore.aCreateProduct();
await this.productsStore.aGetProductsList();
this.modalStore.aSetModalStatus(false);
this.modalStore.aSetAlert({
status: true,
type: ‘success’,
title: ‘Success’,
text: ‘Product has been created’
})
} catch (error) {
console.log(error);
this.modalStore.aSetAlert({
status: true,
type: ‘error’,
title: ‘Error’,
text: error
})
}
},
Awesome! We can run our app, open the modal, and check the building process. Please, feel free to share with me the results you have!
2. Read documents from the Firestore Database
To fetch all the collection we need to add a new action into our “products” store that will receive collection, parse, and store in state.
Here is an example:
try {
this.productsList = [];
const querySnapshot = await getDocs(collection(firestore, “products”));
querySnapshot.forEach((doc) => {
const element = doc.data();
this.productsList.push(element);
});
} catch (error) {
const errorCode = error.code;
const errorMessage = error.message;
console.log(errorCode,errorMessage);
}
},
That’s it, now we can use getters and render the products list in the table, just create a new page and use the Vuetify table. You can use an example from our previous post about data visualization, where we were rendering a users list.
3. Update document in our collection
If we need to update a document, we simply need to use the “setDoc” function and send a new document with the id to Firestore. Let’s check the code:
await setDoc(doc(firestore, “products”, product.id), product);
},
This action will simply rewrite the whole document that is stored at the ID that we defined. But how to update that product in our app?
Let’s add some “update functionality” changes to our “ProductModal.vue” component. Firstly, we will add a created hook in which we will get a product that we need to update and set to our main component data. That will set product values into modal data.
const productsStore = useProductsStore();
this.product = productsStore.find(
product => product.id === productsStore.product.id
);
}
Next, change the values that you need to update, and call the update function. In that function, we will call the update action, then receive all products to update our list, then close the modal and show an alert.
try {
await this.productsStore.aUpdateProduct(product);
await this.productsStore.aGetProductsList();
this.modalStore.aSetModalStatus(false);
this.modalStore.aSetAlert({
status: true,
type: ‘success’,
title: ‘Success’,
text: ‘Product has been updated’
})
} catch (error) {
console.log(error);
this.loading = false;
this.modalStore.aSetAlert({
status: true,
type: ‘error’,
title: ‘Error’,
text: error
})
}
}
Great! Now we can create, read, and update data in our collections, the last option that is left is removing items.
4. Delete item from the database
We will not talk a lot about that, because there is a simple function “deleteDoc” in which as a parameter we have to pass a document with the document id. Here is an action example:
try {
await deleteDoc(doc(firestore, “products”, product.id));
} catch (error) {
console.log(error);
}
},
We need to add a button that will call our remove action with the product parameter.
In conclusion, this article has taken you through a vital phase of Vue.js CRM development – the implementation of CRUD operations. From creating and updating documents to reading and deleting them using Firestore, we’ve covered the essentials. The incorporation of vuetify tabs and forms adds a layer of user-friendly functionality, contributing to an enhanced CRM experience. As you implement these features, remember to adapt them to your specific project requirements. With CRUD operations successfully integrated, your Vue.js CRM is now equipped for dynamic and efficient data management. Feel free to explore, experiment, and share your thoughts as you continue to refine and optimize your CRM functionalities. Happy coding!
As we wrap up this segment of Vue.js CRM development, consider this not just an endpoint but a stepping stone for your project’s evolution. The journey doesn’t conclude here; rather, it extends to further enhancements, optimizations, and the continuous quest for an increasingly seamless user experience. Now armed with data visualization, modals, alerts, and robust CRUD operations, your Vue.js CRM is well on its way to becoming a comprehensive and user-friendly solution. Keep innovating, exploring new features, and refining your application to meet the evolving needs of your users. The road ahead is brimming with possibilities!
Also, I will be happy to check your examples and provide feedback or assistance as you navigate through the intricacies of Vue.js CRM development. Feel free to share your code snippets, challenges, or any innovative additions you make to your project. Let’s foster a collaborative learning environment where we can support each other in our Vue.js endeavors. Happy coding!

