

Welcome to the ultimate guide for hosting your web application on Amazon Web Services (AWS). In this comprehensive walkthrough, we’ll cover every aspect of deploying a fully functional web app, from setting up the frontend and backend to managing databases, all while ensuring automation for a seamless development workflow.
Whether you’re a seasoned developer looking to migrate to AWS or a newcomer exploring cloud hosting options, this guide is tailored to assist you in navigating the AWS ecosystem. By the end of this journey, you’ll have a robust and scalable architecture that incorporates the best AWS practices, including automation with AWS CodePipeline.
Step 1: Managing Access with IAM
Before diving into the technical details, let’s establish a secure foundation for your web app by managing access permissions effectively. AWS Identity and Access Management (IAM) is the key to ensuring a secure environment. Follow these steps to set up IAM for your project:
1.1 Create IAM Groups
IAM groups allow you to organize users with similar access requirements. Let’s start by creating groups for different teams:
Billing Team: Team with billing access and permissions
Development Team: Team with full developer permissions
DevOps Team: Team with DevOps permissions
Read-Only Access Team: Team with read-only access
Dev Limited Permission Team: Team with limited developer permissions (for future use)
Associate users with their respective groups. IAM groups simplify permission management, ensuring that users have the appropriate access levels for their roles. This structured approach enhances security and streamlines user administration.
Step 2: Building a Robust Network Infrastructure with Amazon VPC
Now that you’ve secured access to your AWS environment using IAM, let’s focus on creating a resilient and well-organized network using Amazon Virtual Private Cloud (VPC). Amazon VPC allows you to launch AWS resources in a logically isolated section of the cloud, providing you with full control over your virtual networking environment.
2.1 Establish VPCs for Development and Production
Begin by creating dedicated VPCs for your webapp. Here we are making a VPC in us-east-1 region.
2.2 Subnetting
Next, divide each VPC into subnets across different Availability Zones for increased fault tolerance. Divide subnets as public, private and RDS subnets each of them for dedicated purpose.
two Public Subnets for network connectivity.
two Private subnets for backend.
two Private subnets for database.
2.3 Enable Internet Connectivity with Internet Gateways
To allow communication between your VPCs and the internet, create and attach Internet Gateway to the VPC.
2.4 Configure Route Tables
Create route tables to define how traffic should flow between subnets. You need to create 3 route tables:
1.For Public Subnets: Attach the public subnets to this route table.
2.For backend Subnets: Associate 2 private subnets created for backend to this route table.
3.For Database Subnets: Associate 2 subnets dedicated to database here.
Public Subnet Routes
Private Subnet Routes
RDS Private Subnets Routes
By strategically associating route tables with corresponding subnets, you establish a well-organized and secure network infrastructure, laying the foundation for a robust and scalable web application hosting environment on AWS.
2.5 NAT Gateway
We need NAT gateway for giving our backend access to the internet for downloading and installing necessary packages. Go to the NAT console and create NAT Gateway in public subnet. Add the route to private route table directing all the traffic to NAT.
Step 3 Set Up Repository
3.1 Creating and Cloning Repository
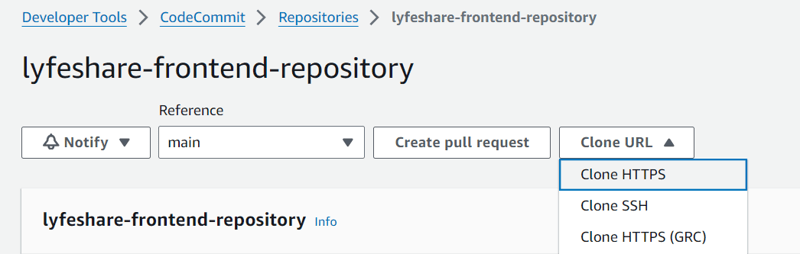
Create AWS CodeCommit repositories each for frontend and backend and copy the clone URL from the Console.
Then, clone the repository to your local development environment for both frontend and backend using the following Git command:
Make code changes, and commit using:
git commit -m “Your descriptive commit message here”
Push the committed changes to the CodeCommit repository:
Frontend Setup
4.1 Amplify
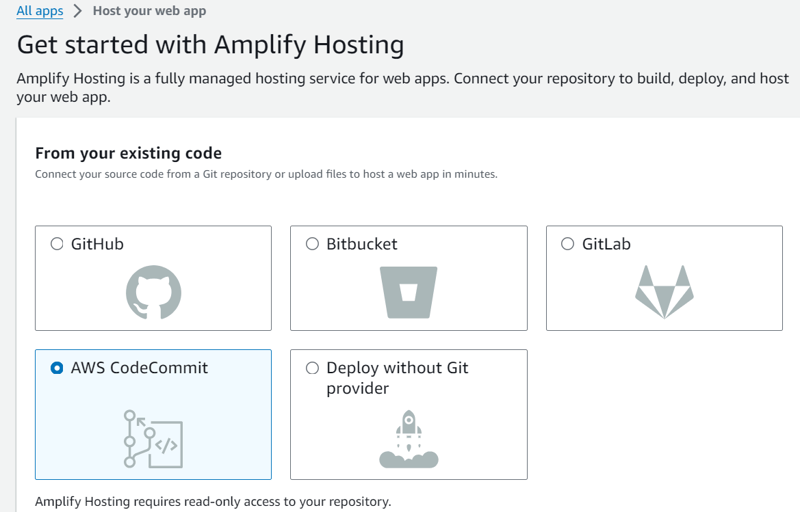
Deploy your frontend application using AWS Amplify, a managed service. The deployment process is automated through built-in CI/CD pipelines connected to the CodeCommit repository.
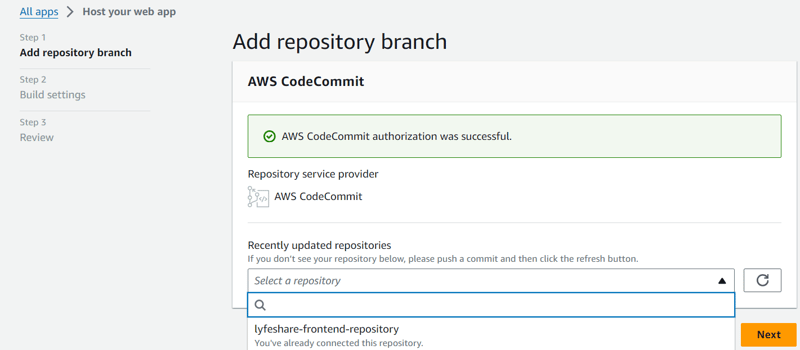
Start with choosing option of hosting a web-app in Amplify console.
Then choose AWS CodeCommit as a source.
Choose the repository created earlier as a source. and select the branch.
Add the environment variables needed in you application. Make sure to add the API of backend once its setup is done.
If you don’t have any environment variables to add then keep other settings as they are and select Save and Deploy after checking the configurations once. Now the frontend on our WebApp is ready.
Step 5 Backend Setup
5.1 Elastic Beanstalk Setup
AWS Elastic Beanstalk is a fully managed service designed to simplify the deployment and management of applications in the cloud. Offering built-in support for various programming languages, databases, and frameworks, Elastic Beanstalk streamlines web application deployment while providing robust capabilities for load balancing, autoscaling, and launching EC2 instances.
Beanstalk Application
An Elastic Beanstalk application acts as a container for deploying and managing related web application resources. It serves as a logical grouping for components such as application versions, environments, and configurations.
Beanstalk Environment
An Elastic Beanstalk environment represents the runtime configuration for your web application. This includes resources like Amazon EC2 instances, databases, load balancers, and auto-scaling settings.
Components Managed by Beanstalk
Elastic Beanstalk takes care of several essential components:
Load Balancer
Autoscaling Groups
EC2 Instances
Security Groups
Service Roles (IAM)
Logging in Beanstalk
Logs from the EC2 instances can be collected using the Beanstalk log feature, providing comprehensive details from instance launching to the present date.
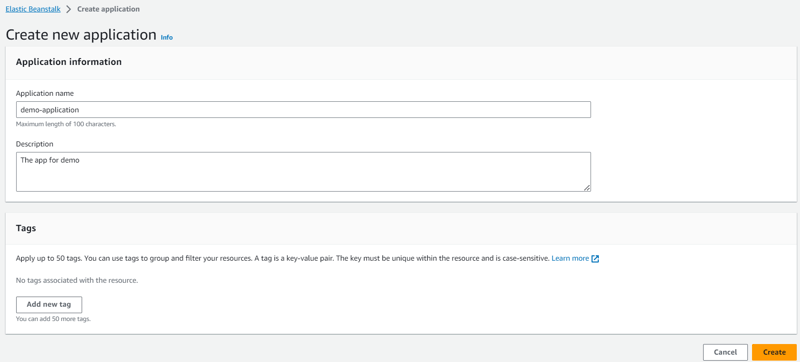
5.2 Creating Application
Click on “Create Application” to start the process. Enter a unique and descriptive Application name. Optionally, provide a “Description” for your application. Click “Create” to proceed.
After creating the application, click on “Create Environment” within the application dashboard. Select “Web server environment” as the environment tier. For “Environment name,” use a naming convention as per your requirement. Choose a “Platform” that aligns with your backend technology. In this case, we are using Node.js 18 running on 64bit Amazon Linux 2023. Under the “Application code,” choose the option of sample code as of now. We will get back to this with AWS CodePipeline.
Choose the appropriate option for Presents as per your need. Note that the Single instance presets are primarily recommended for development use cases and will save costs. The High availability presets are recommended for production environments.
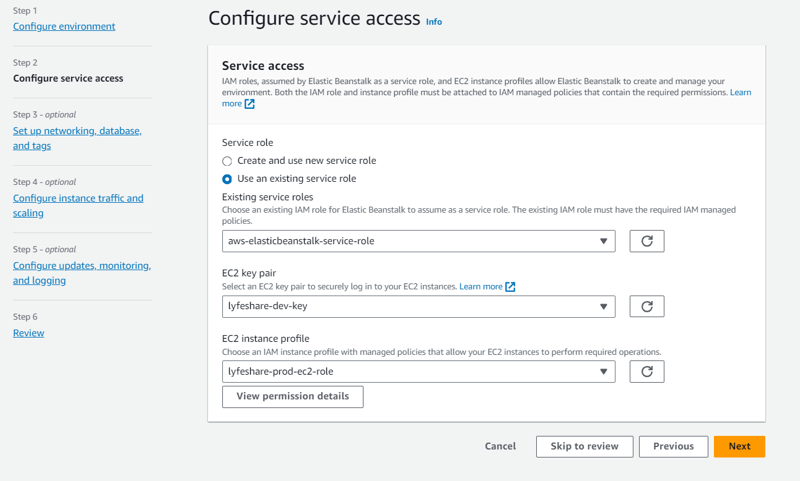
Next is to configure service access. Choose the default service role. If you don’t already have key-pair, go to EC2 console and create one. Use that here. Make an EC2 instance profile with “AWSElasticBeanstalkWebTier” permission.
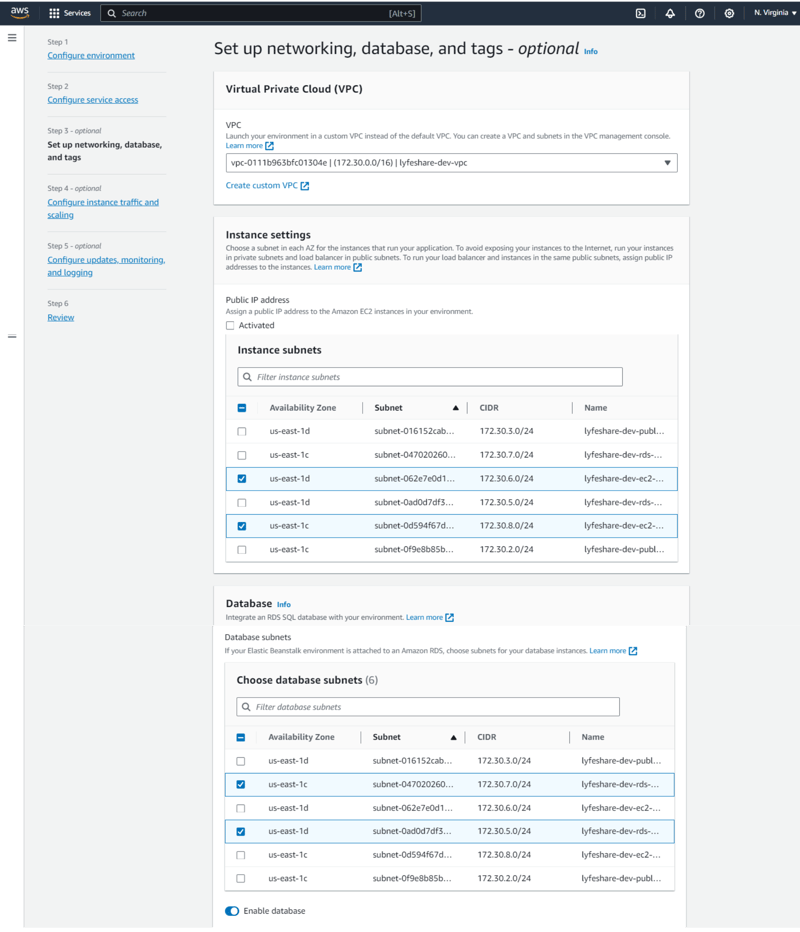
5.3 Network Setup in Beanstalk
Choose the VPC and the subnets that you have created for the backend. Similarly, choose the subnets for database. Also, click on enable database option to allow beanstalk to manage the database as well.
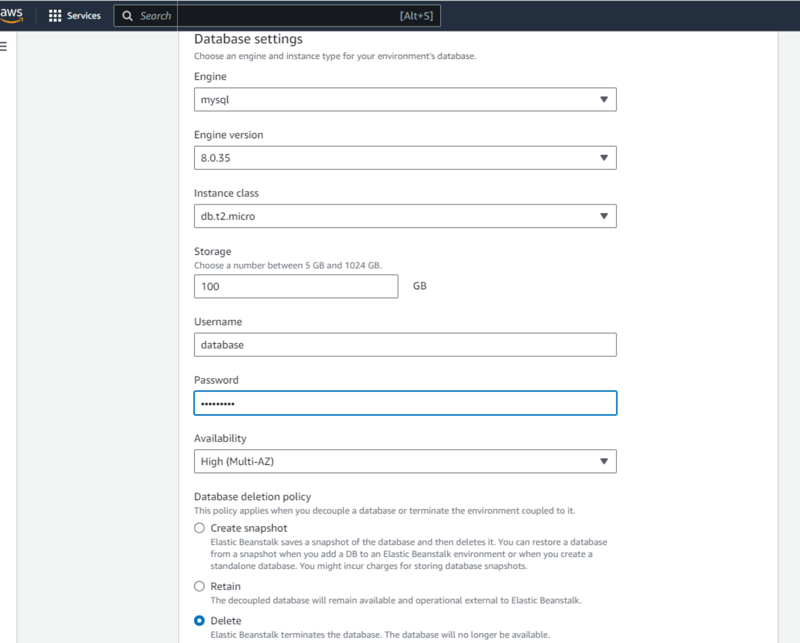
5.4 Database Creation
Choose the appropriate database settings for your application. Here we are using mysql database.
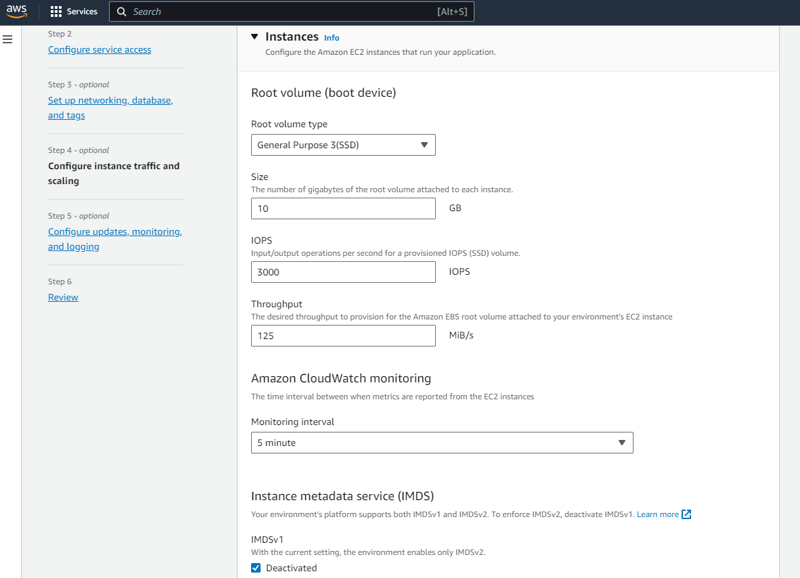
5.5 Backend Traffic and Scaling
This step essentially revolves around the configurations of backend instance and the way you want it to scale. Select appropriate configurations pertaining to instance for your application.
Here we are going to enable autoscaling and load balancing. Change the environment type to “load balanced” and choose the minimum and maximum capacity- the minimum number of backend instances and the maximum number that you want to scale.
There are various things in this step that can be configured ranging from scaling policy to AMI and instance type. Here we will keep all those things default. You can alter then as per your need.
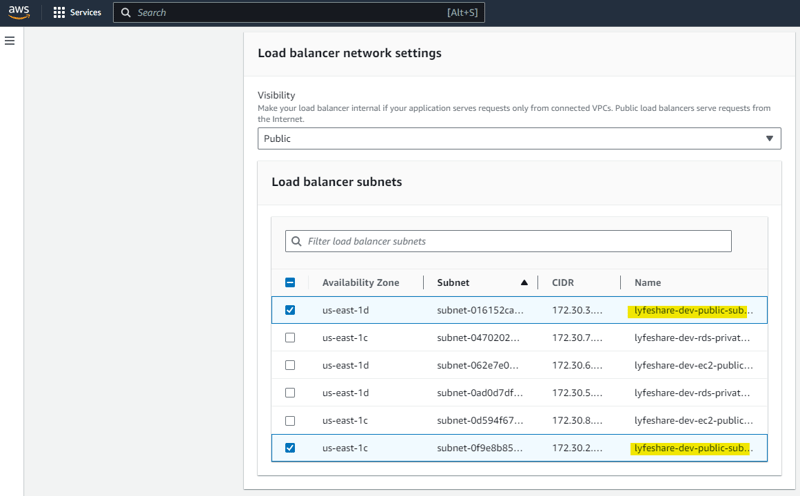
Moving to load balancer settings, by default the subnets for the backend EC2 will be selected. Make sure to change those to the public subnets we created.
Keep the other options as they are for load balancer. Note that the security group for load balancer will be created by beanstalk itself. We don’t need to worry about it. Also, you can add listeners and listeners rules as per your application need in the beanstalk console itself. We will avoid that here.
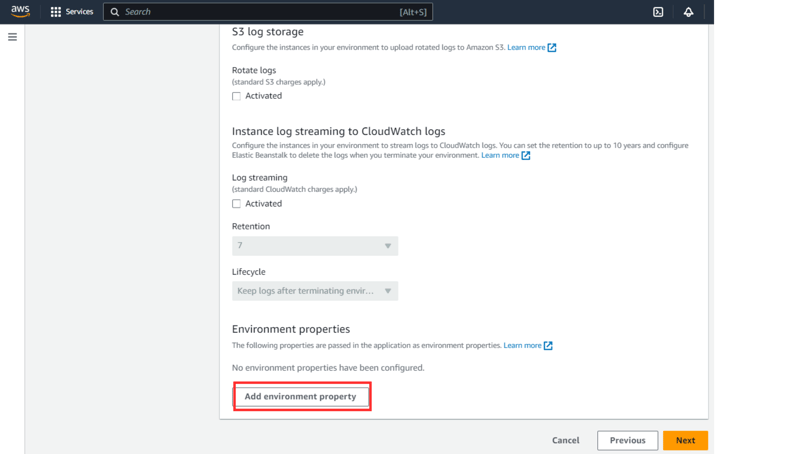
5.6 Logging and Monitoring
Here we are going to keep all the options as default. You can change them as per your monitoring and updates needs. There is option to put maintenance window as well. All the environment variables needed in the application can be added here.
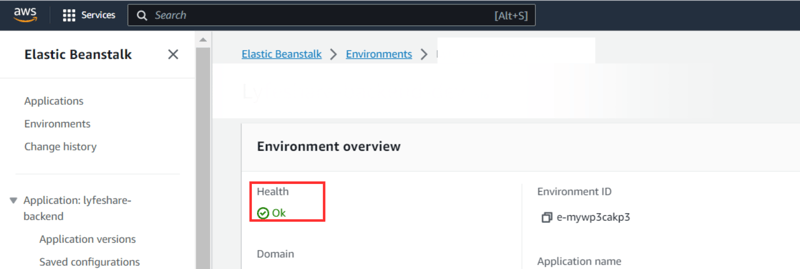
Review the entire environment configurations and then submit. It may take a few minutes for the environment to be up. Check that the status of the environment is OK.
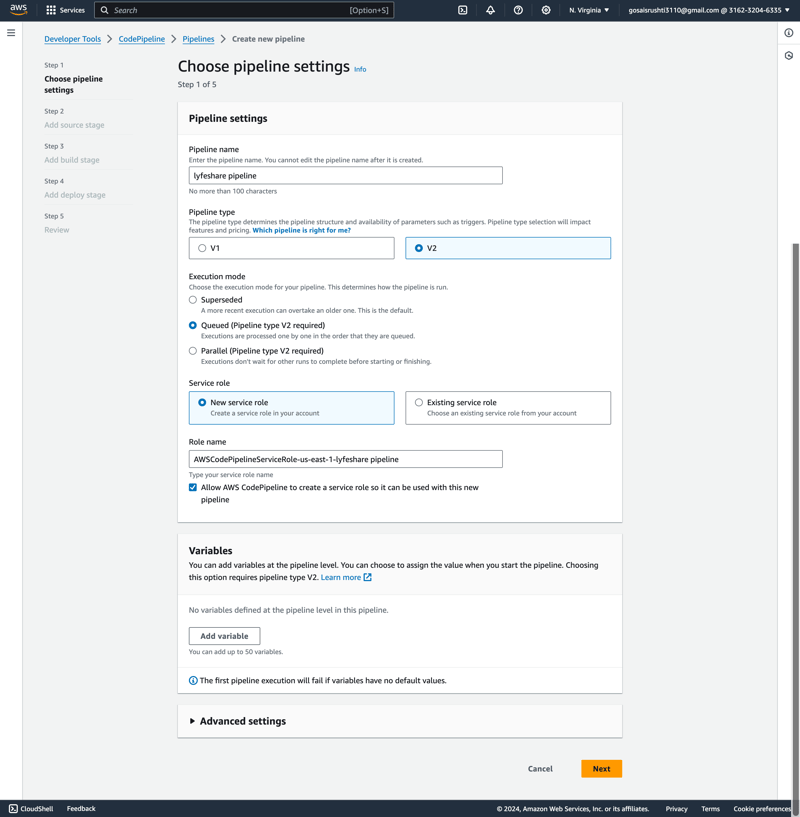
Step 6 Pipeline Configuration
This is the simplest step. Go to AWS CodePipeline and select the create button. Give appropriate name to your pipeline and to the service role. Keep all the other settings as default in first step.
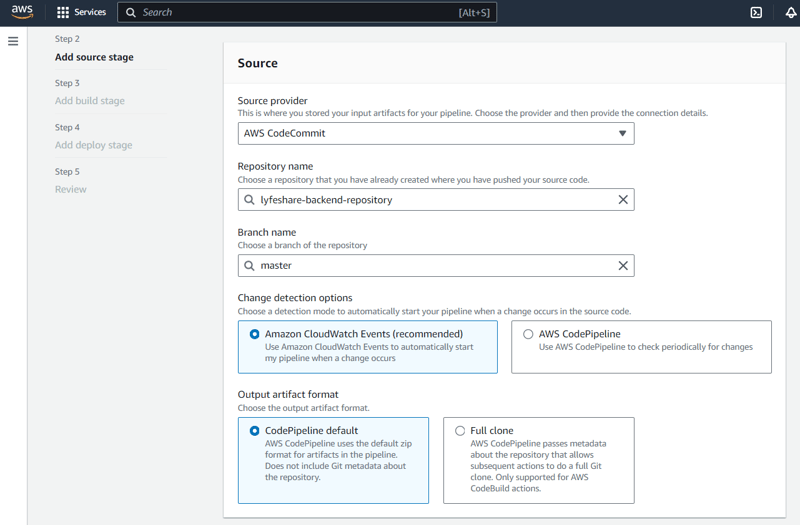
Choose source as AWS CodeCommit as we want to use the backend repository we created earlier. Choose the repository and the branch. Keep other options default.
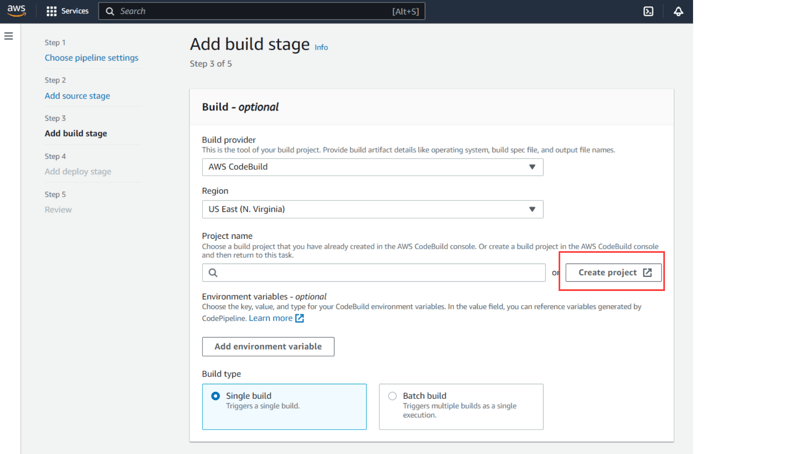
Next step is build. Choose AWS CodeBuild for the build stage of pipeline. Click on create project if you don’t have project created. It will open a CodeBuild console in new window.
Keep the build project configurations as default. Note that CodeBuild uses an instance in background for creating build. Means you can change the underlying image as well.
Once the build project is created go back to CodePipeline and choose the project you created.
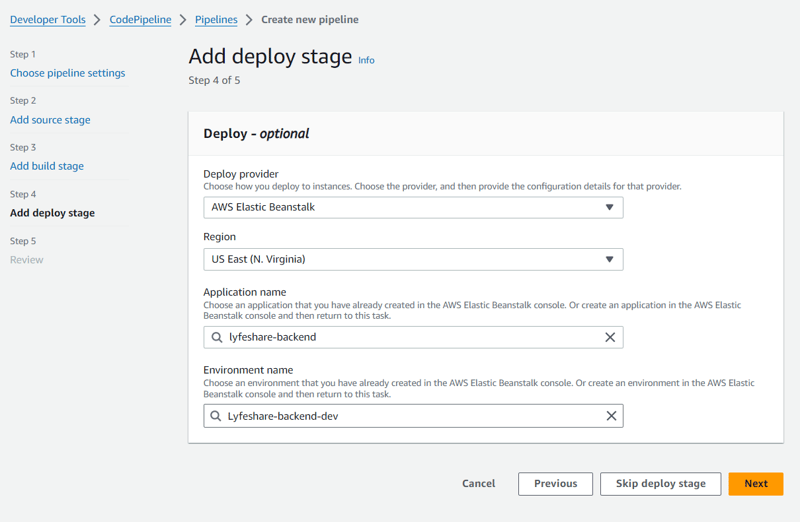
Move to the next stage which is deploy. Choose AWS Elastic Beanstalk as the Deploy Provider. Select the application name that we created and environment to which you want to deploy the code.
Review the pipeline configurations and create the pipeline. This will trigger the pipeline and beanstalk build as well. And the code will go to your beanstalk backend instances.
Congratulations! You have your web-app up and running. Please comment down for any doubts and get them solved!

