
Recently, I wrote a boring text explaining the advantages of PIM for Groups. Today, I want to step further and show how to automate it.
What? Automate PIM for Groups? Why?
Yep. You can have a list of security group members from your PowerShell script, can you? You can administer a security group membership, right? But can you assign PIM eligibility for a user without expiration from a PowerShell script? I doubt that. However, that is a very similar operation and should be performed easily.
What permissions do we need to begin?
Let us assume that we have an EntraID tenant in which you can have one of two roles: Global Administrator or Privileged Role Administrator.
To read PIM-related data from Entra ID, you might get out with Global Reader, but making any change is only allowed for the two mentioned above.
PowerShell and modules?
The entire post is about using PowerShell to automate PIM for Groups. Technically, you can use any supported language or none since everything is available via Microsoft Graph API. However, the examples here are written in PowerShell.
Today, the latest version is 7.4.
To play with the examples, you will need to install several PowerShell modules:
install-module Microsoft.Graph.Groups
install-module Microsoft.Graph.Users
install-module Microsoft.Graph.Identity.Governance
install-module Microsoft.Graph.Identity.DirectoryManagement # Import them
import-module Microsoft.Graph.Groups
import-module Microsoft.Graph.Users
import-module Microsoft.Graph.Identity.Governance
import-module Microsoft.Graph.Identity.DirectoryManagement
Are we ready? Can we start?
Yes. Almost.
We need to authenticate the PowerShell session against Microsoft Graph and request permissions.
Readme: https://aka.ms/graph/sdk/powershell
SDK Docs: https://aka.ms/graph/sdk/powershell/docs
API Docs: https://aka.ms/graph/docs NOTE: You can use the -NoWelcome parameter to suppress this message. pwsh> get-mgContext ClientId : 14d82eec-204b-4c2f-b7e8-296a70dab67e
TenantId : c23a6ba9-4536-4e44-a7b8-9c643e365d2f
Scopes : {Group.ReadWrite.All, openid, PrivilegedAssignmentSchedule.ReadWrite.AzureADGroup, profile…}
AuthType : Delegated
TokenCredentialType : InteractiveBrowser
CertificateThumbprint :
CertificateSubjectName :
Account : RomanKiprin@Selflearning527.onmicrosoft.com
AppName : Microsoft Graph Command Line Tools
ContextScope : CurrentUser
Certificate :
PSHostVersion : 7.4.2
ManagedIdentityId :
ClientSecret :
Environment : Global
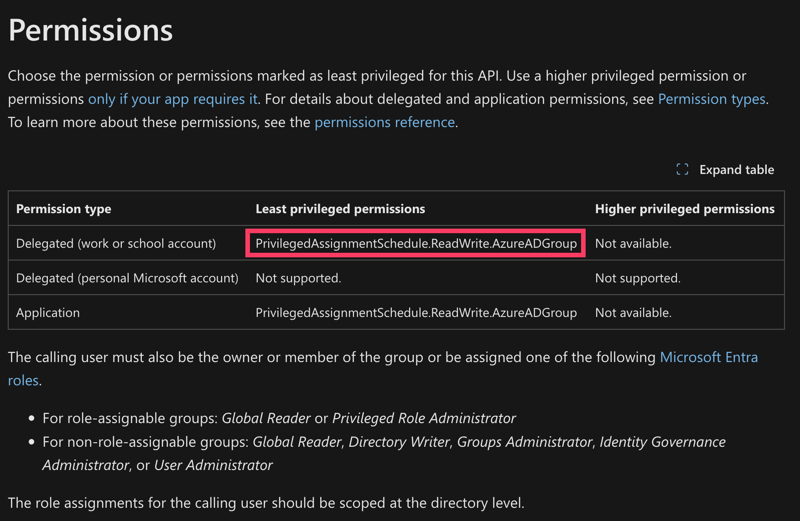
Why do we need these particular permissions?
The short answer – trust me!
If, for some reason, you don’t, here is a screenshot of one of the Microsoft Graph API calls List assignmentScheduleRequests:
Every Microsoft Graph API call has a “Permissions” paragraph, and you can perform your research.
You can also look at Microsoft Graph permissions reference. But in this post, I will stop with permissions.
Can we start playing with PIM already?
I know, I know. Let’s set up global variables and create/check our Entra ID object!
pwsh> $pimGroupName01 = “PIM-GROUP-PLAY-01”
pwsh> $userName01 = “pim-user-play-01”
And then, let’s create a couple of groups and …
pwsh>
pwsh> if ($null -eq $g01) {
$params = @{
DisplayName = $($groupName01)
MailEnabled = $False
MailNickName = $($groupName01)
SecurityEnabled = $True
Description = “PIM for Groups tests”
}
$g01 = New-MgGroup @params
} pwsh> $pg01 = Get-MgGroup -Filter (“DisplayName eq ‘{0}'” -f $pimGroupName01)
pwsh>
pwsh> if ($null -eq $pg01) {
$params = @{
DisplayName = $($pimGroupName01)
MailEnabled = $False
MailNickName = $($pimGroupName01)
SecurityEnabled = $True
Description = “PIM for Groups tests”
}
$pg01 = New-MgGroup @params
} pwsh> $g01 DisplayName Id MailNickname Description GroupTypes
———– — ———— ———– ———-
GROUP-PLAY-01 d8800de8-1e79-4881-8cb3-814c0f6cd935 GROUP-PLAY-01 PIM for Groups tests {}
pwsh>
pwsh> $pg01 DisplayName Id MailNickname Description GroupTypes
———– — ———— ———– ———-
PIM-GROUP-PLAY-01 853d7402-51b4-4cd4-9b8d-9f159311859d PIM-GROUP-PLAY-01 PIM for Groups tests {}
… a user:
pwsh>
pwsh> $u01 = Get-MgUser -Filter (“DisplayName eq ‘{0}'” -f $userName01)
pwsh>
pwsh> if ($null -eq $u01) {
$PasswordProfile = @{Password = ‘<here-should-be-password>’}
$params=@{
DisplayName = $userName01
AccountEnabled = $true
MailNickName = $userName01
PasswordProfile = $PasswordProfile
UserPrincipalName = “$($userName01)@$($domain.Id)“
}
$u01 = New-MgUser @params
}
pwsh> $u01 DisplayName Id Mail UserPrincipalName
———– — —- —————–
pim-user-play-01 c8816325-d172-44f5-b72d-a1b8de5673c2 pim-user-play-01@Selflearning527.onmicrosoft.com
So we can confirm the groups…
… and the user are visible via the Portal
What will we do?
I spent quite some time preparing the stage for the demonstration, and the goal of this text might have slipped out a little.
My previous text provides a profound explanation of the PIM for Group technology. Based on its terms, let’s say what we will do.
We will make a user (pim-user-play-01) PIM eligible to activate the membership of the PIM Group (PIM-GROUP-PLAY-01).
We will make ALL members of the security group (GROUP-PLAY-01) PIM eligible to activate the membership of the PIM Group (PIM-GROUP-PLAY-01).
We will check if the specific user or group is PIM-eligible.
We will activate PIM eligibility.
We will remove PIM eligibility.
And perform some additional bonus stuff, too.
Stay tuned for the “Part 2. Playing with PIM for Groups via API“!


