
Go is a statically typed, compiled high-level programming language for building systems, command-line interfaces (CLI), and more. It is typically designed for use on the backend; however, there are times when you want to use the same language to build a full-stack application with a functional backend and a visual frontend.
In most cases, Go developers opt for frontend frameworks/libraries like React, Vue, Angular, etc., to build the frontend part of the application. This means they must learn JavaScript/TypeScript, framework-specific paradigms, and other frontend-related overheads.
In this guide, you’ll learn how to build a fullstack application with Go using Templ, HTMX, and Xata.
Technology Overview
Templ: is a templating engine that lets you build HTML with Go. It also lets you use Go syntax like if, switch, and for statements to build a robust frontend. You will use Templ to build reusable components and pages for the frontend.
HTMX: is a frontend library that lets you access modern browser features directly using HTML rather than JavaScript. You will use HTMX to process the form submission and perform other dynamic operations.
Xata: is a serverless database with analytics and free-text search support that makes a wide range of applications easy to build.
Prerequisites
To follow along with this tutorial, the following are needed:
Go version 1.20 or higher installed
Basic understanding of Go
Xata account. Signup is free
Getting started
To get started, you need to install Templ binary. The binary generates Go code from a Templ file.
Create a directory.
Next, initialize a Go module to manage project dependencies.
Finally, we proceed to install the required dependencies with:
github.com/gin-gonic/gin is a framework for building web applications.
github.com/a-h/templ is the Templ library used in the project.
github.com/joho/godotenv is a library for loading environment variables.
Structuring the application
To do this, create a cmd, internals, and views folder in our project directory.
cmd is for structuring the application entry point.
internals is for structuring API-related files.
views is for structuring frontend-related files.
Setup the database on Xata
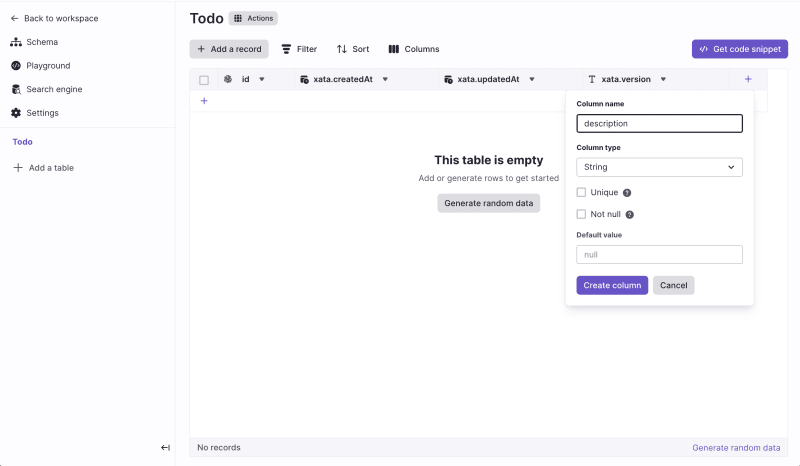
Log into the Xata workspace and create a todo database. Inside the todo database, create a Todo table and add a description column of type String.
Get the Database URL and set up the API Key
To get the database URL, click the Get code snippet button and copy the URL. Then click the API Key link, add a new key, save and copy the API key.
Setup environment variable
Create a .env file in the root directory and add the copied URL and API key.
XATA_API_KEY=<REPLACE WITH THE COPIED API KEY>
Build the application Frontend
To build the frontend, you’ll use Templ and HTMX to structure the application and add dynamism to a Todo application.
Create the application components
Inside the views folder, create a components/header.templ file and add the snippet below:
templ Header() {
<head>
<script
src=“https://unpkg.com/htmx.org@1.9.10”
integrity=“sha384-D1Kt99CQMDuVetoL1lrYwg5t+9QdHe7NLX/SoJYkXDFfX37iInKRy5xLSi8nO7UC”
crossorigin=“anonymous”
></script>
<script src=“https://cdn.tailwindcss.com”></script>
<meta charset=“UTF-8” />
<meta name=“viewport” content=“width=device-width, initial-scale=1.0” />
<title>GO Fullstack</title>
</head>
}
The snippet creates a Header component and adds HTMX and TailwindCSS CDNs. TailwindCSS is a low-level framework for styling.
Next, create a components/footer.templ file to create the application footer and style using TailwindCSS classes.
templ Footer() {
<footer class=“fixed p-1 bottom-0 bg-gray-100 w-full border-t”>
<div class=“rounded-lg p-4 text-xs italic text-gray-700 text-center”>
© Go Fullstack
</div>
</footer>
}
Finally, create an index.templ file inside the same views folder and add the snippet below:
import (
“fmt”
“go_fullstack/views/components”
)
type Todo struct {
Id string
Description string
}
templ Index(todos []*Todo) {
<!DOCTYPE html>
<html lang=“en”>
@components.Header()
<body>
<main class=“min-h-screen w-full”>
<nav class=“flex w-full border border-b-zinc-200 px-4 py-4”>
<h3 class=“text-base lg:text-lg font-medium text-center”>
GO Fullstack app
</h3>
</nav>
<div class=“mt-6 w-full flex justify-center items-center flex-col”>
// FORM PROCESSING
<form
hx–post=“/”
hx–trigger=“submit”
hx–swap=“none”
onsubmit=“reloadPage()”
class=“w-96”
>
<textarea
name=“description”
cols=“30”
rows=“2”
class=“w-full border rounded-lg mb-2 p-4”
placeholder=“Input todo details”
required
></textarea>
<button
class=“py-1 px-4 w-full h-10 rounded-lg text-white bg-zinc-800”
>
Create
</button>
</form>
<section class=“border-t border-t-zinc-200 mt-6 px-2 py-4 w-96”>
// LOOP THROUGH THE TODOS
<ul id=“todo-list”>
for _, todo := range todos {
<li class=“ml-4 ml-4 border p-2 rounded-lg mb-2” id={ fmt.Sprintf(“%s”, todo.Id) }>
<p class=“font-medium text-sm”>Todo item { todo.Id }</p>
<p class=“text-sm text-zinc-500 mb-2”>
{ todo.Description }
</p>
<div class=“flex gap-4 items-center mt-2”>
<a
href=“#”
class=“flex items-center border py-1 px-2 rounded-lg”
>
<p class=“text-sm”>Edit</p>
</a>
<button
hx–delete={ fmt.Sprintf(“/%s”, todo.Id) }
hx–swap=“delete”
hx–target={ fmt.Sprintf(“#%s”, todo.Id) }
class=“flex items-center border py-1 px-2 rounded-lg hover:bg-red-300”
>
<p class=“text-sm”>Delete</p>
</button>
</div>
</li>
}
</ul>
</section>
</div>
</main>
</body>
@components.Footer()
</html>
<script>
function reloadPage() {
setTimeout(function() {
window.location.reload();
}, 2000);
}
</script>
}
The snippet above does the following:
Imports the required dependencies
Creates a Todo struct to represent the response data coming from the backend
Creates an Index component that uses the Header and Footer components to structure the page. Then, it uses the HTMX attributes to process form submissions and deletion of todos by calling the respective endpoints / and /{todo.Id}
Generating Go files from the Templ files
Next, use the Templ binary you installed earlier to Generate Go codes from the views created above by running the command below in your terminal:
After you run this command, you’ll see new Go files generated for each view. You use generated file to render your frontend in next section.
The generated files are not to be edited.
Putting it together and building the backend
With that done, you can use it to build the backend and render the required page.
Create the API models and helper function
To represent the application data, create a model.go file inside the internals folder and add the snippet below:
type Todo struct {
Id string `json:”id,omitempty”`
Description string `json:”description,omitempty”`
}
type TodoRequest struct {
Description string `json:”description,omitempty”`
}
type TodoResponse struct {
Id string `json:”id,omitempty”`
}
The snippet above creates a Todo, TodoRequest, and TodoResponse struct with the required properties to describe requests and response types.
Finally, create a helpers.go file with a reusable function to load environment variables.
import (
“log”
“os”
“github.com/joho/godotenv”
)
func GetEnvVariable(key string) string {
err := godotenv.Load()
if err != nil {
log.Fatal(“Error loading .env file”)
}
return os.Getenv(key)
}
Create the application and API routes
Create a route.go file for configuring the API routes and add the snippet below:
import “github.com/gin-gonic/gin”
type Config struct {
Router *gin.Engine
}
func (app *Config) Routes() {
//routes will come here
}
The snippet above does the following:
Imports the required dependency
Creates a Config struct with a Router property to configure the application methods
Creates a Routes function that takes in the Config struct as a pointer
Create the API services
With that done, create a xata_service.go file for the application and update it by doing the following:
First, import the required dependencies and create a helper function:
import (
“bytes”
“encoding/json”
“fmt”
“net/http”
)
var xataAPIKey = GetEnvVariable(“XATA_API_KEY”)
var baseURL = GetEnvVariable(“XATA_DATABASE_URL”)
func createRequest(method, url string, bodyData *bytes.Buffer) (*http.Request, error) {
var req *http.Request
var err error‘
if method == “GET” || method == “DELETE” || bodyData == nil {
req, err = http.NewRequest(method, url, nil)
} else {
req, err = http.NewRequest(method, url, bodyData)
}
if err != nil {
return nil, err
}
req.Header.Add(“Content-Type”, “application/json”)
req.Header.Add(“Authorization”, fmt.Sprintf(“Bearer %s”, xataAPIKey))
return req, nil
}
The snippet above does the following:
Imports the required dependencies
Creates required environment variables
Creates a createRequest function that creates HTTP requests with the required headers
Lastly, add a createTodoService, deleteTodoService, and getAllTodosService methods to create, delete, and get the list of todos.
func createRequest(method, url string, bodyData *bytes.Buffer) (*http.Request, error) {
//createRequest code goes here
}
func (app *Config) createTodoService(newTodo *TodoRequest) (*TodoResponse, error) {
createTodo := TodoResponse{}
jsonData := Todo{
Description: newTodo.Description,
}
bodyData := new(bytes.Buffer)
json.NewEncoder(bodyData).Encode(jsonData)
fullURL := fmt.Sprintf(“%s:main/tables/Todo/data”, baseURL)
req, err := createRequest(“POST”, fullURL, bodyData)
if err != nil {
return nil, err
}
client := &http.Client{}
resp, err := client.Do(req)
if err != nil {
return nil, err
}
defer resp.Body.Close()
if err := json.NewDecoder(resp.Body).Decode(&createTodo); err != nil {
return nil, err
}
return &createTodo, nil
}
func (app *Config) deleteTodoService(id string) (string, error) {
fullURL := fmt.Sprintf(“%s:main/tables/Todo/data/%s”, baseURL, id)
client := &http.Client{}
req, err := createRequest(“DELETE”, fullURL, nil)
if err != nil {
return “”, err
}
resp, err := client.Do(req)
if err != nil {
return “”, err
}
defer resp.Body.Close()
return id, nil
}
func (app *Config) getAllTodosService() ([]*Todo, error) {
var todos []*Todo
fullURL := fmt.Sprintf(“%s:main/tables/Todo/query”, baseURL)
client := &http.Client{}
req, err := createRequest(“POST”, fullURL, nil)
if err != nil {
return nil, err
}
resp, err := client.Do(req)
if err != nil {
return nil, err
}
defer resp.Body.Close()
var response struct {
Records []*Todo `json:”records”`
}
decoder := json.NewDecoder(resp.Body)
if err := decoder.Decode(&response); err != nil {
return nil, err
}
todos = response.Records
return todos, nil
}
Create the API handlers
With that done, you can use the services to create the API handlers. Create a handler.go file inside internals folder and add the snippet below:
import (
“context”
“fmt”
“go_fullstack/views”
“net/http”
“time”
“github.com/a-h/templ”
“github.com/gin-gonic/gin”
)
const appTimeout = time.Second * 10
func render(ctx *gin.Context, status int, template templ.Component) error {
ctx.Status(status)
return template.Render(ctx.Request.Context(), ctx.Writer)
}
func (app *Config) indexPageHandler() gin.HandlerFunc {
return func(ctx *gin.Context) {
_, cancel := context.WithTimeout(context.Background(), appTimeout)
defer cancel()
todos, err := app.getAllTodosService()
if err != nil {
ctx.JSON(http.StatusBadRequest, err.Error())
return
}
var viewsTodos []*views.Todo
for _, todo := range todos {
viewsTodo := &views.Todo{
Id: todo.Id,
Description: todo.Description,
}
viewsTodos = append(viewsTodos, viewsTodo)
}
render(ctx, http.StatusOK, views.Index(viewsTodos))
}
}
func (app *Config) createTodoHandler() gin.HandlerFunc {
return func(ctx *gin.Context) {
_, cancel := context.WithTimeout(context.Background(), appTimeout)
description := ctx.PostForm(“description”)
defer cancel()
newTodo := TodoRequest{
Description: description,
}
data, err := app.createTodoService(&newTodo)
if err != nil {
ctx.JSON(http.StatusBadRequest, err.Error())
return
}
ctx.JSON(http.StatusCreated, data)
}
}
func (app *Config) deleteTodoHandler() gin.HandlerFunc {
return func(ctx *gin.Context) {
_, cancel := context.WithTimeout(context.Background(), appTimeout)
id := ctx.Param(“id”)
defer cancel()
data, err := app.deleteTodoService(id)
if err != nil {
ctx.JSON(http.StatusBadRequest, err.Error())
return
}
ctx.JSON(http.StatusAccepted, fmt.Sprintf(“Todo with ID: %s deleted successfully!!”, data))
}
}
The snippet above does the following
Imports the required dependencies
Creates a render function that uses the Templ package to render matching template
Creates an indexPageHandler function that returns a Gin-gonic handler and takes in the Config struct as a pointer. Inside the returned handler, use the getAllTodosService service to get the list of todos and then render the appropriate page using the generated code from the views package (frontend)
Creates a createdTodoHandler and deleteProjectHandler functions that return a Gin-gonic handler and take in the Config struct as a pointer. Use the service created earlier to perform the corresponding action inside the returned handler
Update the API routes to use handlers
Update the routes.go file with the handlers as shown below:
import (
“github.com/gin-gonic/gin”
)
type Config struct {
Router *gin.Engine
}
func (app *Config) Routes() {
//views
app.Router.GET(“/”, app.indexPageHandler())
//apis
app.Router.POST(“/”, app.createTodoHandler())
app.Router.DELETE(“/:id”, app.deleteTodoHandler())
}
Putting it all together
Create the application entry point to use to serve the routes. To do this, create a main.go file inside the cmd folder and add the snippet below:
import (
“go_fullstack/internals”
“github.com/gin-gonic/gin”
)
func main() {
router := gin.Default()
//initialize config
app := internals.Config{Router: router}
//routes
app.Routes()
router.Run(“:8080”)
}
The snippet above does the following:
Imports the required dependencies
Creates a Gin router using the Default configuration
Initialize the Config struct by passing in the Router
Adds the route and run the application on port :8080
With that done, you can start a development server using the command below:
The complete source code can be found on GitHub.
Conclusion
This post discusses how to build a fullstack application with Go, Templ, HTMX, and Xata. You can extend the application further to support viewing and editing todos.
These resources may also be helpful:

