
Next.js has become a standard choice for developing React applications, offering various deployment options across different platforms. While Vercel is a popular choice for building and deployment, specific project requirements may require deployment to GitLab. In this guide, I’ll illustrate the process of deploying a Next.js application to GitLab Pages.
GitLab Pages allows you to publish a static website directly from a repository. In this tutorial, we’ll create a pipeline that generates a static export of a Next.js application and publishes it automatically after each commit. Let’s start by creating a simple Next.js application.
Create a Next.js application
For this project I will be using the current LTS version of Node.js (v20.12.2), both locally and in the pipeline. It is important to keep this version consistent throughout the whole process to ensure that the features used locally will also work in the pipeline.
To create a new Next.js application, we need to run this command:
You will be prompted to answer a few questions to select the configuration that suits you best. Personally, I opted for TypeScript, ESLint, Tailwind CSS and the App Router. Additionally I installed shadcn/ui for the button component and Prettier for a consistent code formatting. While the application itself isn’t the primary focus, I created two pages to showcase routing and included an image for asset management.
Now, it is essential to create a new GitLab repository to store our newly created application before jumping into the export and deployment.
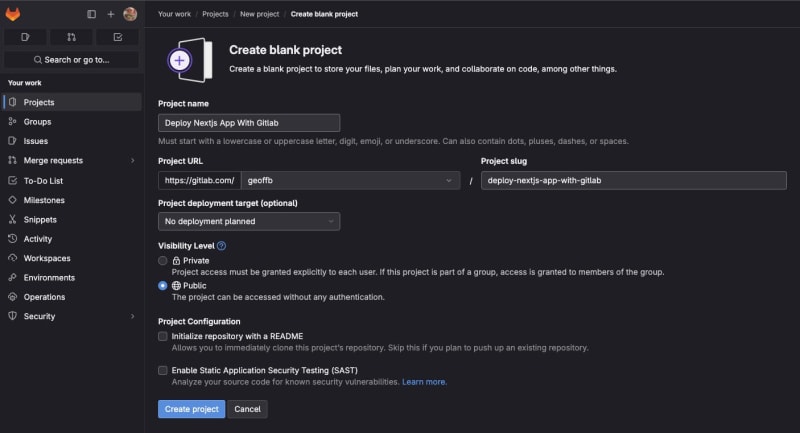
Setup a new gitlab repo
For this project, I will be creating a public repository where my Next.js application will be versioned.
Once completed, we can proceed to link our Next.js application with the new repository. To achieve this, navigate to the directory of the application and initialize Git.
git remote add origin git@gitlab.com:geoffb/deploy-nextjs-app-with-gitlab.git
After this setup is done, we can make our initial commit to push the entire application to the repository. You can access the application here: https://gitlab.com/geoffb/deploy-nextjs-app-with-gitlab
The only remaining task is to adjust the configuration of the Next.js application for static export and create a pipeline file to publish the website.
Create a static export and publish it!
In the Next.js documentation it states that:
Next.js enables starting as a static site or Single-Page Application (SPA), then later optionally upgrading to use features that require a server.
When running next build, Next.js generates an HTML file per route. By breaking a strict SPA into individual HTML files, Next.js can avoid loading unnecessary JavaScript code on the client-side, reducing the bundle size and enabling faster page loads.
Since Next.js supports this static export, it can be deployed and hosted on any web server that can serve HTML/CSS/JS static assets.
To build a static export you will need to edit the next.config.mjs and add this few lines:
const nextConfig = {
images: {
unoptimized: true,
},
output: ‘export‘,
}
export default nextConfig
output: specify that we will do a static export
images/unoptimized: will serve the images as they are instead of being optimized by the next/image component. https://nextjs.org/docs/app/api-reference/components/image#unoptimized
Now that our application is ready to be built as a static site, we need to tell GitLab what to publish. To accomplish this, let’s create a new file named .gitlab-ci.yml at the root of our repository.
stages:
– build
pages:
stage: build
script:
– npm install
– npm run build
artifacts:
paths:
– out
publish: out
only:
– main
The first line specifies the Docker image to be used for executing the job within the pipeline. It’s worth noting that I’ve opted for the same node version as previously specified, matching my local environment.
This pipeline currently consists of only one stage, the build stage. You have the flexibility to incorporate additional stages, such as a linting stage, according to your requirements.
The pages keyword tells the pipeline to upload the result of the job to the GitLab Pages. In this block of code we need to specify a few things:
stage: indicating the stage in which the job should run
script: the different commands to execute. To generate a static export of the Next.js application we only need to install the dependencies and build it.
artifacts: correspond to the output of the job, it is a list of files and directories. When exporting a Next.js application, the default output directory is typically named out (this can be configured in the next.config.mjs file).
publish: to use a different content directory other than the default public directory.
only: specifying to execute the pipeline on our current branch main
After committing the changes to both the next.config.mjs and the new .gitlab-ci.yml file, a pipeline will be automatically executed as you can see below:
The pipeline will execute the jobs within the stages. In this scenario, we have a straightforward pipeline with one job in one stage. This job will generate a static export of the Next.js application, which will then be automatically published to GitLab Pages. Once everything is done we can see that then pipeline succeeded:
Feel free to access the static website and explore its functionality by following this link. You can test navigation between the two pages and view the image asset. https://deploy-nextjs-app-with-gitlab-geoffb-985ba1d87bd969f03ee8f4e83b.gitlab.io/
In conclusion, we can say that Next.js provides a range of deployment solutions across diverse platforms. Throughout this guide, we’ve explored the steps involved in deploying a Next.js application to GitLab Pages, which includes many interesting topics that can be explored and expended.


