
Building Material Design application with RiotJS is pretty easy with BeerCSS, before starting, make sure you have created a Riot project running with Vite: https://dev.to/steeve/riotjs-vitejs-tutorial-fpn
This is a series of articles on RiotJS with BeerCSS, for creating components and learning best practices for a production application.
We use BeerCSS because it follows the specification of Material Design 3 with a small codebase (10x smaller than other similar Material Design Projects), and it’s ready to use with any Javascript framework!
First, install the BeerCSS framework through NPM:
Import both packages into the ./client/index.html with the following:
import “beercss“;
import “material-dynamic-colors“;
Such as:
<html>
<head>
<meta charset=“UTF-8”>
<title>RiotJS + BeerCSS</title>
</head>
<body>
<div id=“root”></div>
<script type=“module”>
/** Load riot.js **/
import * as riot from ‘riot‘
import App from ‘./index.riot‘
/** Load BeerCSS **/
import “beercss“;
import “material-dynamic-colors“;
const mountApp = riot.component(App)
mountApp(document.getElementById(‘root‘))
</script>
</body>
</html>
A second method for fetching CSS is using a CDN; even if it is performant, it may increase loading time and the number of HTTP requests, and the app will not work offline. Hosting the source files locally with NPM leads to a faster load time, and the app will work even offline.
Now a BeerCSS element can be loaded into the Riot application.
You can browse and copy any HTML element on the following page: https://www.beercss.com/
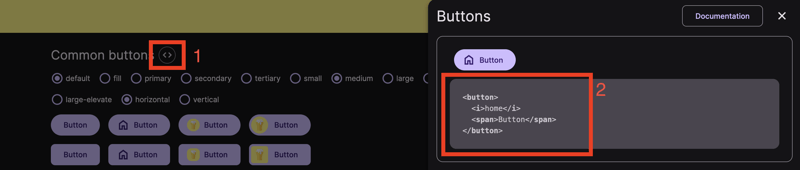
Let’s try a button: you can find the code for each element by clicking on the <> icon on the right of each title. (Red Mark 1 on the screenshot)
Then you can copy the HTML of the button (Red Mark 2 on the screenshot) into the ./client/index.riot, such as:
<div>
<h4>Riot + BeerCSS</h4>
<button>
<i>home</i>
<span>Button</span>
</button>
</div>
</index-riot>
Let’s start the Vite server to get a preview of the page on your web browser, run the command:
Now we can use any BeerCSS element, let’s copy other elements, such as a chip element. Here is the HTML of ./client/index.riot:
<div>
<h4>Riot + BeerCSS</h4>
<button>
<i>home</i>
<span>Button</span>
</button>
<a class=”chip”>
<i>done</i>
<span>Filter</span>
</a>
</div>
</index-riot>
The result:
Voilà 🎉 We created a base Riot application project using Material Design elements with BeerCSS. The next article will cover how to create and test a custom Material Design input component with Riot.
Feel free to comment if you have questions or need help about RiotJS.
Have a great day! Cheers 🍻


