
In the previous setup, we used an API gateway to connect our client to the server. In this part, we will add NGINX to our server as a reverse proxy for our Backend app. To do so, let’s follow these steps:
Open HTTPS Port
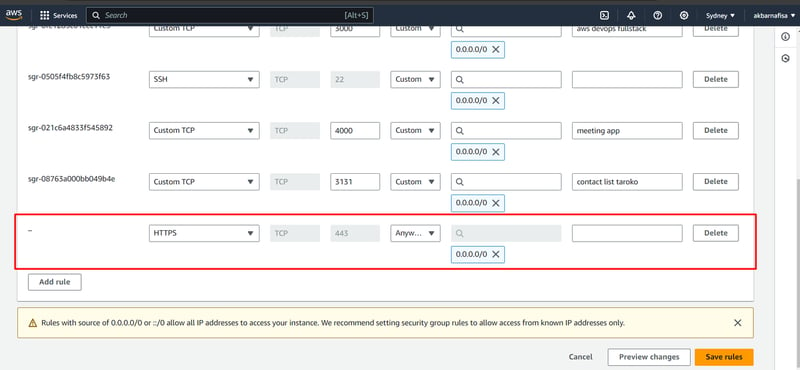
Firstly, let’s add port 443 to our security rule to enable our server to serve HTTPS.
Add Routes Traffic
Next, let’s add a new API api.akbarnafisa.com as a new API. To do so, let’s open AWS Route 53 and create a new traffic routing record.
Add New Docker Networks
Then, let’s add new Docker networks to connect our Backend app to the NGINX app. In this case, we add two new networks:
nginx.docker
my-project-server-prod-network
Add NGINX Config
In this config, we will add NGINX to act as a reverse proxy to our Backend App. You can clone the repository here.
Separate NGINX conf
In this config, we will separate the configuration to create Certbot and redirect to the Backend server. We do this because we need to set up the Certbot first before adding the reverse proxy config.
Connect to Server
Next, we connect to the EC2 server using VSCode. To do so, make sure we have the SSH extensions.
Then, click the icon in the bottom left corner.
Next, click connect to host.
Then, add the config by adding the Hostname and .pem file.
Change the Configuration
We need to change some configurations:
Change {email} inside docker-compose.yml to your email.
Change {api} inside docker-compose.yml and client.conf to your domain.
Create Certificate
To add the certificate, we can run the docker-compose up command.
If the process is successful, we will get this notification from the terminal.
To check the files inside, we can run this command:
cd /etc/letsencrypt/live/
Enable Reverse Proxy
After we create the certificate, the next step is to enable the reverse proxy. To do so, let’s uncomment this code from the client.conf.
Then, let’s run the docker container
Finaly, let’s open the the URL to check if the NGINX is working or not
Add New Reverse Proxy Path
There is a case where we want to add a new path to the reverse proxy. To do so, let’s add new config inside client.conf.
Then, let’s run this command to build the nginx image:
Make sure the image name is the same as the image in docker-compose.yml file.
Then, when we open the URL, we can see the new path is working.
