
Project Title: The Kubernetes Resume Challenge
ProjectRepo: https://github.com/robudexIT/resume-k8-challenge
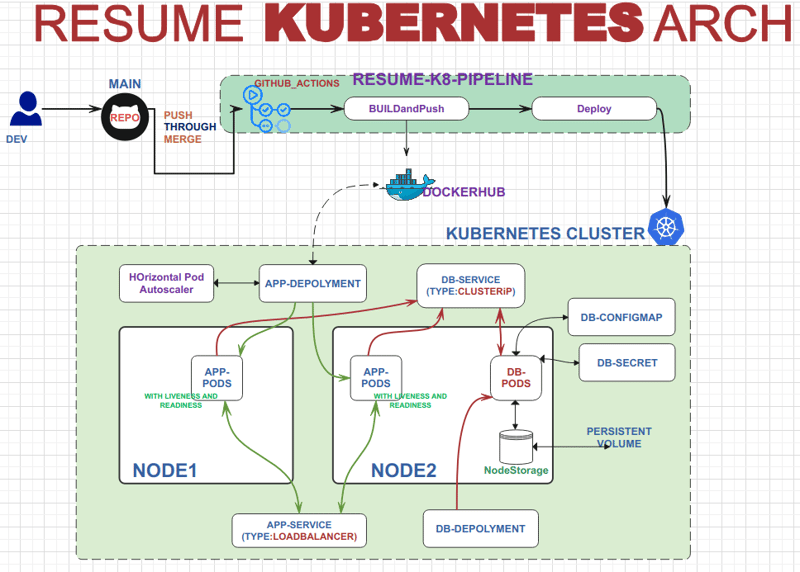
Project Architecture:
Project Overview:
Source: This project is based on the guidelines provided by Cloud Resume Challenge.
Objective: The primary objective of this project is to deploy an application with a focus on scalability, consistency, and availability using Docker and Kubernetes technologies.
Key Features:
Deployment of applications leveraging Docker containers for efficient management and isolation.
Utilization of Kubernetes features such as deployments, services, configmaps, secrets, persistent volumes, and autoscaling to enhance scalability and reliability.
Implementation of best practices for ensuring consistency and availability of the deployed application.
Exploration: The project will delve into various aspects of Kubernetes, including but not limited to:
Setting up deployments for managing application instances.
Configuring services to enable communication and load balancing.
Utilizing configmaps and secrets for managing configuration and sensitive data.
Implementing persistent volumes to ensure data persistence in Database Pods.
Incorporating autoscaling mechanisms to dynamically adjust resources based on workload demands in Application Pods.
CI/CD Integration: To streamline the development workflow, continuous integration and deployment (CI/CD) will be facilitated using GitHub Actions. This will enable automated building and deployment of code changes, ensuring a smooth and efficient development process.
Project Prerequisite
Dockerhub account
Digital Ocean Account for Kubernetes Service
Project Flow of Execution:
Create resume-k8-challenge project directory and cd to it.
cd resume-k8-challenge
Clone https://github.com/kodekloudhub/learning-app-ecommerce and rename the it to app
.
mv learning-app-ecommerce/ app/
Goto app/ directory and delete the .git directory
rm -rf .git
Go back to resume-k8-challenge directory and create Dockerfile and build the Docker Image and push it to dockerhub
touch Dockerfile
vim Dockerfile
Dockerfile
RUN apt update -y
RUN docker-php-ext-install mysqli pdo pdo_mysql
COPY ./app /var/www/html/
ENV DB_HOST=mariadb-service
EXPOSE 80
**FROM php:7.4-apache
**This line specifies the base image for your Docker container. In this case, it uses the PHP 7.4 version with Apache pre-installed.
RUN apt update -y
This command updates the package lists inside the container (apt update) and the -y flag automatically answers yes to any prompts, ensuring a non-interactive update.
RUN docker-php-ext-install mysqli pdo pdo_mysql
This command installs PHP extensions required for database connectivity. Specifically, it installs the MySQL and PDO
COPY ./app /var/www/html/
This line copies the contents of the app directory from your local machine into the /var/www/html/ directory inside the Docker container.
ENV DB_HOST=mariadb-service
This line sets an environment variable DB_HOST with the value mariadb-service. Environment variables are used to configure settings within the container, and in this case, DB_HOST likely specifies the host name or IP address of a MariaDB database server that your PHP application will connect to.
EXPOSE 80
This instruction exposes port 80 on the container.
Note: the mariadb-service **this **ENV DB_HOST=mariadb-service in the Dockerfile
*Build and Push the Docker Image: *
docker login
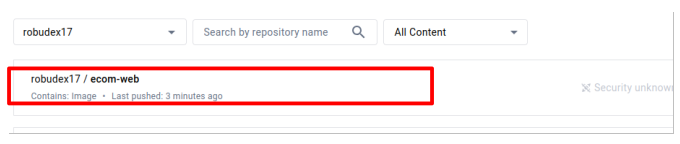
docker push robudex17/ecom-web:v1
Verify on your dockerhub account the image was successfully push:
Set Up Kubernetes on a Public Cloud Provider
For Kubernetes, I will use Digital Ocean
Install kubectl on your develepoment workstation.For installation, here’s link:(https://kubernetes.io/docs/tasks/tools/)
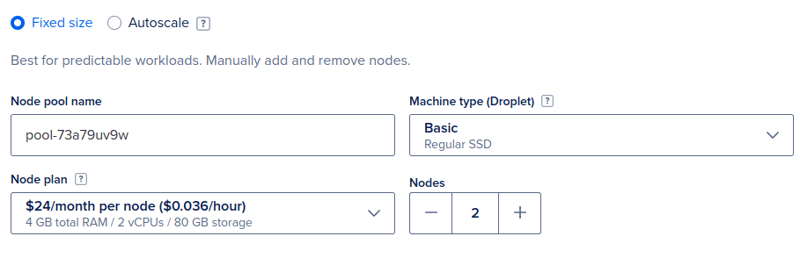
Login to Your Digital Ocean Account and Click Kubernetes
For this project, I will create only 2 nodes with the Basic Machine type.
scroll down at the bottom and click Create Cluster button.
It will take some time to create the Kubernetes Cluster. Once finished, select your newly created Kubernetes Cluster Manual tab and click the ‘download the cluster configuration file’. This configuration will be needed to access your cluster from your development workstation.
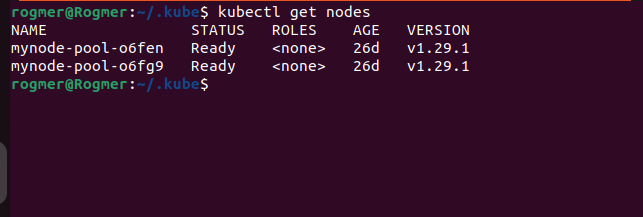
Copy the configuration file to the .kube/ directory and test your cluster using the kubectl get nodes command. It should return your two Kubernetes Nodes.
kubectl get nodes
Now that our Kubernetes cluster and Docker images are ready, it’s time to deploy the apps on the cluster.
Deploy The Apps in Kubernetes.
To organize all my Kubernetes manifests in one location, I created a ‘kubernetes’ folder in my project directory.
cd kubernetes
We will start by creating our mariadb secrets, configmap, persistent-volume **, **deployment and service.
touch db-configmap.yaml
touch db-storage-class.yaml
touch db-pv.yaml
touch db-pvc.yaml
touch db-deployment.yaml
touch db-service.yaml
*db-secrets.yaml *
kind: Secret
metadata:
name: db-secret
type: Opaque
stringData:
rootpassword: password123
dbuser: ecomuser
dbpassword: ecompassword
dbname: ecomdb
This YAML file defines a secret, which is a way to store sensitive information securely in Kubernetes.
The name of this secret is “db-secret“. You can think of it like a locked box where you keep important information.
The type “Opaque” means that Kubernetes doesn’t interpret the data in any specific way. It’s just raw, arbitrary data.
Inside this secret, there are four pieces of sensitive information:
rootpassword: This is the password for the main administrator (root) of a database system, like MySQL. In this example, it’s set to “password123“. You should replace this with your actual root password.
dbuser: This is the username used to access the database. In this case, it’s “ecomuser”. Replace it with the actual username you want to use.
dbpassword: This is the password for the database user (ecomuser). For security reasons, it’s set to “ecompassword” here, but you should use a strong and secure password.
dbname: This is the name of the database itself, such as “ecomdb“. Replace it with the actual name of your database.
db-configmap.yaml
kind: ConfigMap
metadata:
name: db-config
data:
db-load-script.sql: |
USE ecomdb;
CREATE TABLE products (
id mediumint(8) unsigned NOT NULL auto_increment,
Name varchar(255) default NULL,
Price varchar(255) default NULL,
ImageUrl varchar(255) default NULL,
PRIMARY KEY (id)
) AUTO_INCREMENT=1;
INSERT INTO products (Name, Price, ImageUrl)
VALUES
(“Laptop”, “100”, “c-1.png”),
(“Drone”, “200”, “c-2.png”),
(“VR”, “300”, “c-3.png”),
(“Tablet”, “50”, “c-5.png”),
(“Watch”, “90”, “c-6.png”),
(“Phone Covers”, “20”, “c-7.png”),
(“Phone”, “80”, “c-8.png”),
(“Laptop”, “150”, “c-4.png”);
apiVersion: v1: Specifies the Kubernetes API version being used, which is v1 for this ConfigMap resource.
kind: ConfigMap: Defines that this YAML manifest describes a Kubernetes ConfigMap resource.
metadata:: Contains metadata about the ConfigMap, such as its name.
name: db-config: Specifies the name of the ConfigMap resource as “db-config“. This is how you will refer to this ConfigMap within your Kubernetes cluster.
data:: Contains the actual data stored in the ConfigMap, using key-value pairs.
db-load-script.sql: |: This key-value pair stores a SQL script as the value, with the key “db-load-script.sql“. The | indicates that the following lines are part of a** multi-line** string.
db-storage-class.yaml
kind: StorageClass
metadata:
name: local-storage
provisioner: kubernetes.io/no-provisioner
volumeBindingMode: WaitForFirstConsumer
allowVolumeExpansion: true
This configuration in Kubernetes is like setting up a special storage rule called “local-storage.”
It tells Kubernetes that we’re not using any special tool to create new storage. Instead, we already have storage set up outside of Kubernetes.
When something needs storage (like a program running in Kubernetes), Kubernetes waits until that program asks for storage before providing it. This helps use storage resources more efficiently.
If we need to make our storage bigger in the future, this configuration allows us to do that. It’s like having the flexibility to add more space to our storage if we need it later on.
db-pv.yaml
kind: PersistentVolume
metadata:
name: mariadb-persistent-volume
spec:
storageClassName: local-storage
persistentVolumeReclaimPolicy: Recycle
capacity:
storage: 10Gi
accessModes:
– ReadWriteOnce
hostPath:
path: /var/mariadb
apiVersion: v1: Specifies the Kubernetes API version being used, which is v1 for the PersistentVolume resource.
kind: PersistentVolume: Indicates that this YAML manifest describes a Kubernetes PersistentVolume resource, which represents storage in the cluster that has a lifecycle independent of any individual pod using the volume.
metadata:: Contains metadata about the PersistentVolume, such as its name.
name: mariadb-persistent-volume: Specifies the name of the PersistentVolume resource as “mariadb-persistent-volume“. This is how you will refer to this PersistentVolume within your Kubernetes cluster.
spec:: Defines the specifications for the PersistentVolume.
storageClassName: local-storage: Specifies the StorageClass that this PersistentVolume should use. In this case, it’s set to “local-storage”, which we defined earlier.
persistentVolumeReclaimPolicy: Recycle: Sets the reclaim policy for the PersistentVolume. The value “Recycle” means that when the PersistentVolume is released, its resources will be recycled and made available for reuse.
capacity:: Specifies the storage capacity of the PersistentVolume.
storage: 10Gi: Sets the storage capacity to 10 gigabytes (10Gi). This indicates how much storage space is available in this PersistentVolume.
accessModes:: Defines the access modes for the PersistentVolume.
ReadWriteOnce: Specifies that the volume can be mounted as read-write by a single node at a time. This access mode is suitable for scenarios where only one pod needs read-write access to the volume.
hostPath:: Specifies the host path where the PersistentVolume will be located.
path: /var/mariadb: Sets the host path to “/var/mariadb”, indicating that the PersistentVolume will use storage located at that path on the host machine.
db-pvc.yaml
kind: PersistentVolumeClaim
metadata:
name: mariadb-pvc
spec:
storageClassName: local-storage
accessModes:
– ReadWriteOnce
resources:
requests:
storage: 10Gi
apiVersion: v1: Specifies the Kubernetes API version being used, which is v1 for the PersistentVolumeClaim resource.
kind: PersistentVolumeClaim: Indicates that this YAML manifest describes a Kubernetes PersistentVolumeClaim resource, which is a request for storage resources from a StorageClass.
metadata:: Contains metadata about the PersistentVolumeClaim, such as its name.
name: mariadb-pvc: Specifies the name of the PersistentVolumeClaim resource as “mariadb-pvc“. This is how you will refer to this PersistentVolumeClaim within your Kubernetes cluster.
spec:: Defines the specifications for the PersistentVolumeClaim.
storageClassName: local-storage: Specifies the StorageClass that this PersistentVolumeClaim should use. In this case, it’s set to “local-storage”, which we defined earlier.
accessModes:: Defines the access modes for the PersistentVolumeClaim.
ReadWriteOnce: Specifies that the volume can be mounted as read-write by a single node at a time. This access mode is suitable for scenarios where only one pod needs read-write access to the volume.
resources:: Specifies the requested resources for the PersistentVolumeClaim.
requests:: Indicates the requested resources within the PersistentVolumeClaim.
storage: 10Gi: Requests 10 gigabytes (10Gi) of storage capacity. This tells Kubernetes that the PersistentVolumeClaim needs at least 10 gigabytes of storage to be provisioned from the StorageClass.
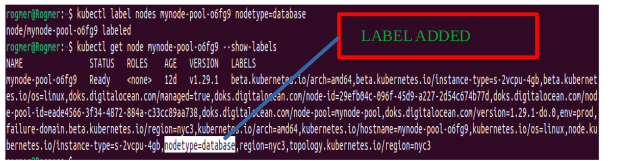
Note: Because I will utilize one of my Kubernetes nodes’ storage in a
PersistentVolume, ensuring that MySQL deploys on that node. This will be
achieved by adding a label to the node and using this label in the
deployment. Here are the commands:
kubectl label nodes <YOUR-CHOOSEN-NODENAME> nodetype=database
kubectl get node mynode-pool-o6fg9 –show-labels
db-deployment.yaml
kind: Deployment
metadata:
name: mariadb
labels:
db: mariadb
spec:
#replicas: 3
selector:
matchLabels:
db: mariadb
template:
metadata:
labels:
db: mariadb
spec:
affinity:
nodeAffinity:
requiredDuringSchedulingIgnoredDuringExecution:
nodeSelectorTerms:
– matchExpressions:
– key: nodetype
operator: In
values:
– database
volumes:
– name: initial-data
configMap:
name: db-config
– name: mariadb-persistend-storage
persistentVolumeClaim:
claimName: mariadb-pvc
containers:
– name: ecomdb
image: ‘mariadb:latest’
volumeMounts:
– name: initial-data
mountPath: /docker-entrypoint-initdb.d
– name: mariadb-persistend-storage
mountPath: /var/lib/mysql
env:
– name: MARIADB_ROOT_PASSWORD
valueFrom:
secretKeyRef:
name: db-secret
key: rootpassword
– name: MARIADB_DATABASE
valueFrom:
secretKeyRef:
name: db-secret
key: dbname
– name: MARIADB_USER
valueFrom:
secretKeyRef:
name: db-secret
key: dbuser
– name: MARIADB_PASSWORD
valueFrom:
secretKeyRef:
name: db-secret
key: dbpassword
apiVersion: apps/v1: Specifies the Kubernetes API version being used, which is apps/v1 for the Deployment resource.
kind: Deployment: Indicates that this YAML manifest describes a Kubernetes Deployment resource, which manages the lifecycle of pods.
metadata:: Contains metadata about the Deployment, such as its name and labels.
name: mariadb: Specifies the name of the Deployment as “mariadb”. This is how you will refer to this Deployment within your Kubernetes cluster.
labels:: Specifies labels for identifying instances managed by this Deployment, with the label “db: mariadb” indicating that it’s related to the MariaDB database.
spec:: Defines the specifications for the Deployment.
selector:: Specifies how the Deployment identifies which pods to manage.
matchLabels:: Specifies that pods managed by this Deployment must have the label “db: mariadb”.
template:: Defines the pod template used to create pods managed by the Deployment.
metadata:: Contains labels for the pod.
labels:: Specifies labels for identifying pods created from this template, with the label “db: mariadb” indicating that it’s related to the MariaDB database.
spec:: Specifies the specifications for the pod.
affinity:: Specifies node affinity to ensure that pods are scheduled on nodes with a specific nodetype label (e.g., “database”).
volumes:: Defines volumes to be used by the pod.
name: initial-data: Specifies a ConfigMap volume named “initial-data” to store initial database configuration data.
name: mariadb-persistent-storage: Specifies a PersistentVolumeClaim volume named “mariadb-persistent-storage” to provide persistent storage for MariaDB data.
containers:: Defines the containers running in the pod.
name: ecomdb: Specifies the container name as “ecomdb”.
image: ‘mariadb:latest‘: Specifies the Docker image to use for the container, which is the latest version of MariaDB.
volumeMounts:: Specifies how volumes are mounted into the container.
name: initial-data: Mounts the “initial-data” ConfigMap volume at the path “/docker-entrypoint-initdb.d” inside the container, where MariaDB expects initialization scripts.
name: mariadb-persistent-storage: Mounts the “mariadb-persistent-storage” PersistentVolumeClaim volume at the path “/var/lib/mysql” inside the container, where MariaDB stores its data.
env:: Sets environment variables for the container, which are fetched from a Secret named “db-secret”.
name: MARIADB_ROOT_PASSWORD: Sets the MariaDB root password from the “db-secret” Secret using a secretKeyRef.
name: MARIADB_DATABASE: Sets the MariaDB database name from the “db-secret” Secret using a secretKeyRef.
name: MARIADB_USER: Sets the MariaDB user from the “db-secret” Secret using a secretKeyRef.
name: MARIADB_PASSWORD: Sets the MariaDB user’s password from the “db-secret” Secret using a secretKeyRef.
db-service.yaml
kind: Service
metadata:
name: mariadb-service
spec:
type: ClusterIP
selector:
db: mariadb
ports:
– protocol: TCP
port: 3306
targetPort: 3306
apiVersion: v1: Specifies the API version being used. In this case, it’s using the core/v1 version of Kubernetes API.
kind: Service: Defines the type of Kubernetes resource being created, which is a Service. A Service in Kubernetes is an abstraction that defines a logical set of Pods and a policy by which to access them.
metadata: Contains metadata about the Service, such as its
name (mariadb-service in this case).
spec: Describes the desired state for the Service.
type: ClusterIP: Specifies the type of Service. In this case, it’s a ClusterIP Service, which means the Service will only be accessible from within the cluster.
selector: Specifies the Pods that this Service will route traffic to. In this manifest, it selects Pods with the label db: mariadb, indicating that this Service will forward traffic to Pods labeled with db=mariadb.
ports: Defines the ports that the Service will listen on and forward traffic to.
protocol: TCP: Specifies the protocol being used for the port (TCP in this case).
port: 3306: Specifies the port number on which the Service will listen for incoming traffic.
targetPort: 3306: Specifies the port number on the Pod to which the traffic will be forwarded. In this case, it’s targeting port 3306, which is commonly used for MySQL/MariaDB database connections.
Now that all mariadb manifest files are created, it’s time to apply it by this order.
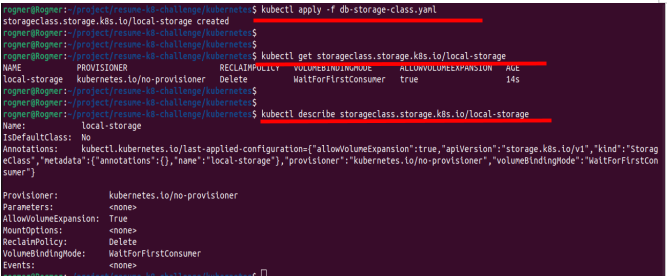
db-storage-class
kubectl get storageclass.storage.k8s.io/local-storage
kubectl describe storageclass.storage.k8s.io/local-storage
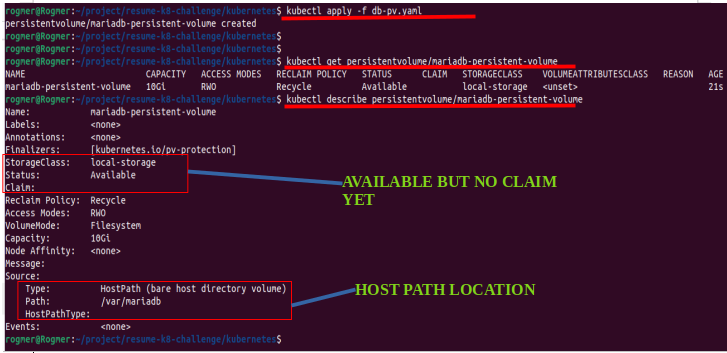
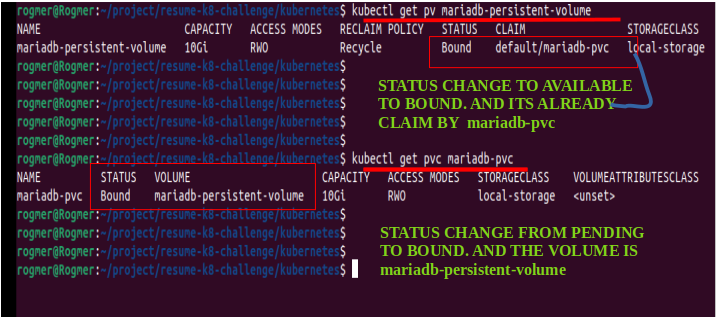
db-persistent-volume
kubectl get persistentvolume/mariadb-persistent-volume
kubectl describe persistentvolume/mariadb-persistent-volume
db-persistent-volume-claim
kubectl get persistentvolumeclaim/mariadb-pvc
kubectl describe persistentvolumeclaim/mariadb-pvc
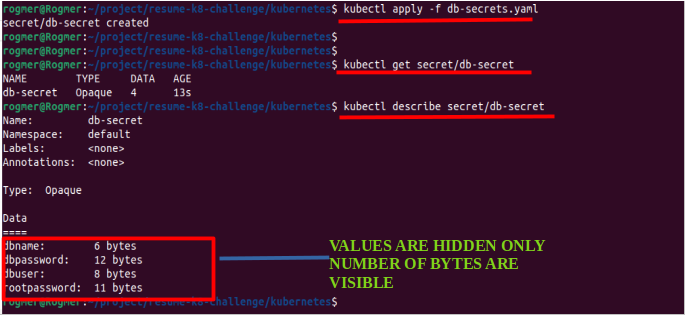
DB SECRETS
kubectl get secret/db-secret
kubectl describe secret/db-secret
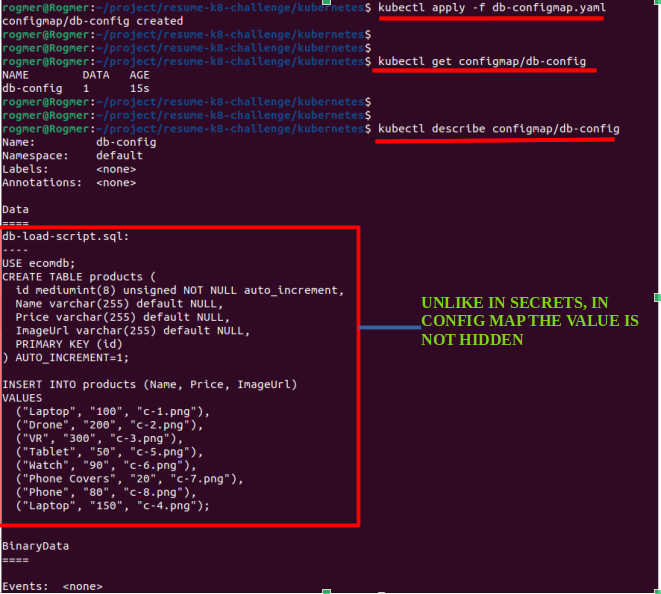
DB-CONFIGMAP
kubectl get configmap/db-config
kubectl describe configmap/db-config
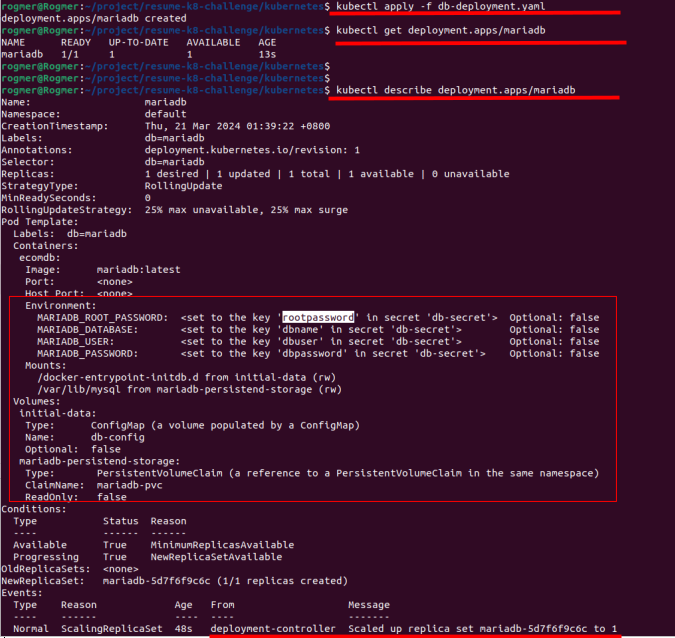
DB-DEPLOYMENT
kubectl get deployment.apps/mariadb
kubectl describe deployment.apps/mariadb
As you can see from the above output, there is a lot of information. Let’s dissect it one by one.
First, the db-deployment create replica-set name mariadb-5d7f6f9c6c which create one mariadb pod.
-This pod has environment variables, and the values are obtained from the secrets manifest or object.
It also has two mount points. The first is pointing to a ConfigMap object, and the second is pointing to a PersistentVolumeClaim.
If you run the command kubectl get pv mariadb-persistent-volume and kubectl get pvc mariadb-pvc, you will notice that some values have been updated.
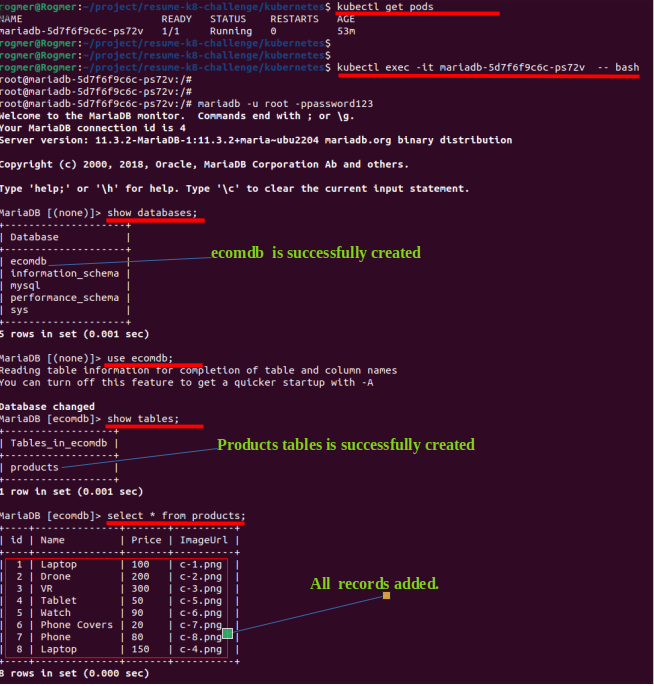
Now let’s check the status of our MariaDB pod to ensure it is working as expected and that all configurations are properly set up.
It seem, that all are properly setup. Its time to expose our mariab pods by the use of service manifest.
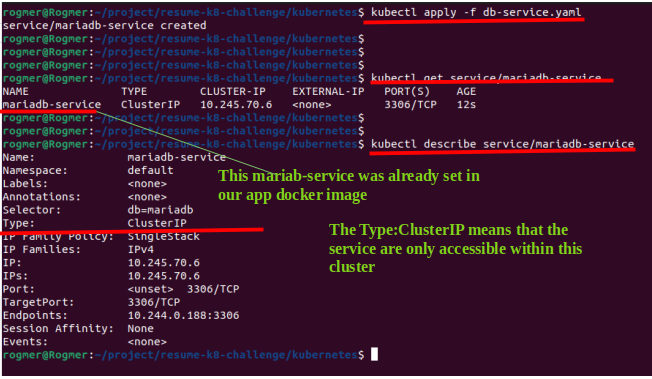
DB-SERVICE
kubectl get deployment.apps/mariadb
kubectl describe deployment.apps/mariadb
Now that our database are setup lets proceed to creating our ecomm-app configmap** deployment** and service manifest
APP-CONFIGMAP
kind: ConfigMap
metadata:
name: feature-toggle-config
data:
FEATURE_DARK_MODE: “false”
apiVersion: v1: Specifies the Kubernetes API version being used, which is the core/v1 version in this case.
kind: ConfigMap: Indicates that this YAML is defining a ConfigMap resource.
metadata.name: feature-toggle-config: Sets the name of the ConfigMap as feature-toggle-config.
data: Contains the actual data entries for the ConfigMap.
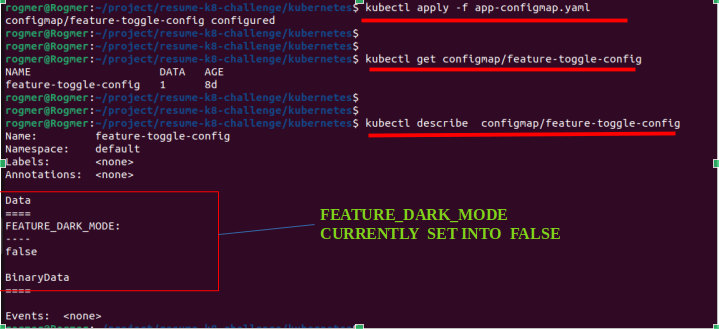
FEATURE_DARK_MODE: “false“: Defines a key-value pair within the ConfigMap. The key is FEATURE_DARK_MODE, representing a feature toggle for dark mode, and the value is “false”, indicating that dark mode is currently disabled.
APP-DEPLOYMENT
kind: Deployment
metadata:
name: ecomapp
labels:
app: ecomapp
spec:
selector:
matchLabels:
app: ecomapp
template:
metadata:
labels:
app: ecomapp
spec:
containers:
– image: robudex17/ecom-web:v2
name: ecomapp
imagePullPolicy: Always
ports:
– containerPort: 80
name: ecomapp
resources:
requests:
cpu: “250m”
memory: “128Mi”
limits:
cpu: “250m”
memory: “128Mi”
env:
– name: FEATURE_DARK_MODE
valueFrom:
configMapKeyRef:
name: feature-toggle-config
key: FEATURE_DARK_MODE
– name: DB_NAME
valueFrom:
secretKeyRef:
name: db-secret
key: dbname
– name: DB_USER
valueFrom:
secretKeyRef:
name: db-secret
key: dbuser
– name: DB_PASSWORD
valueFrom:
secretKeyRef:
name: db-secret
key: dbpassword
apiVersion: apps/v1: Specifies the Kubernetes API version being used, specifically the apps/v1 version for Deployments.
kind: Deployment: Indicates that this YAML is defining a Deployment resource.
metadata.name: ecomapp: Sets the name of the Deployment as ecomapp.
metadata.labels.app: ecomapp: Assigns a label app: ecomapp to the Deployment.
spec: Describes the desired state for the Deployment.
selector.matchLabels.app: ecomapp: Specifies that Pods managed by this Deployment should have the label app: ecomapp.
template: Defines the Pod template used by the Deployment to create and manage Pods.
metadata.labels.app: ecomapp: Assigns a label app: ecomapp to the Pods created from this template.
spec: Specifies the specifications for the containers running in the Pods.
containers: Defines the containers running in the Pod.
image: robudex17/ecom-web:v1: Specifies the container image to use for the application, pulled from robudex17/ecom-web:v1.
name: ecomapp: Sets the name of the container as ecomapp.
imagePullPolicy: Always: Specifies that Kubernetes should always pull the latest version of the container image.
ports: Specifies that the container exposes port 80 as ecomapp.
resources: Defines the resource requests and limits for the container (CPU and memory).
env: Specifies environment variables for the container.
name: FEATURE_DARK_MODE: Sets an environment variable FEATURE_DARK_MODE using a value retrieved from a ConfigMap named feature-toggle-config.
name: DB_NAME: Sets an environment variable DB_NAME using a value retrieved from a Secret named db-secret with the key dbname.
name: DB_USER: Sets an environment variable DB_USER using a value retrieved from a Secret named db-secret with the key dbuser.
name: DB_PASSWORD: Sets an environment variable DB_PASSWORD using a value retrieved from a Secret named db-secret with the key dbpassword.
APP-SERVICE
kind: Service
metadata:
name: app-service
spec:
type: LoadBalancer
ports:
– protocol: TCP
port: 80
targetPort: 80
selector:
app: ecomapp
apiVersion: v1: Specifies the Kubernetes API version being used. In this case, it’s using API version v1, which is the core Kubernetes API version.
kind: Service: Defines the type of Kubernetes resource being created, which is a Service. A Service in Kubernetes is an abstraction that enables access to a set of Pods in a uniform way.
metadata: Contains metadata about the Service, such as its name.
name: app-service: Specifies the name of the Service as “app-service”.
spec: Describes the desired state for the Service, including its type, ports, and selector.
type: LoadBalancer: Specifies the type of Service. In this case, it’s a LoadBalancer type, which exposes the Service externally using a cloud provider’s load balancer (if available).
ports: Defines the ports that the Service will listen on and where traffic will be directed.
protocol: TCP: Specifies the protocol used for the port, which is TCP in this case.
port: 80: Defines the port number on which the Service will listen within the cluster (internal port).
targetPort: 80: Specifies the target port on the Pods to which the traffic will be forwarded. In this example, traffic received on port 80 of the Service will be forwarded to port 80 on the Pods.
selector: Defines how the Service selects which Pods to target. In this case, it uses a label selector to target Pods with the label “app: ecomapp”. This means that the Service will route traffic to Pods that have the label “app” with the value “ecomapp”.
Now that all ecomapp manifest files are created, it’s time to apply them in this order.
APP-CONFIGMAP
kubectl get configmap/feature-toggle-config
kubectl describe configmap/feature-toggle-config
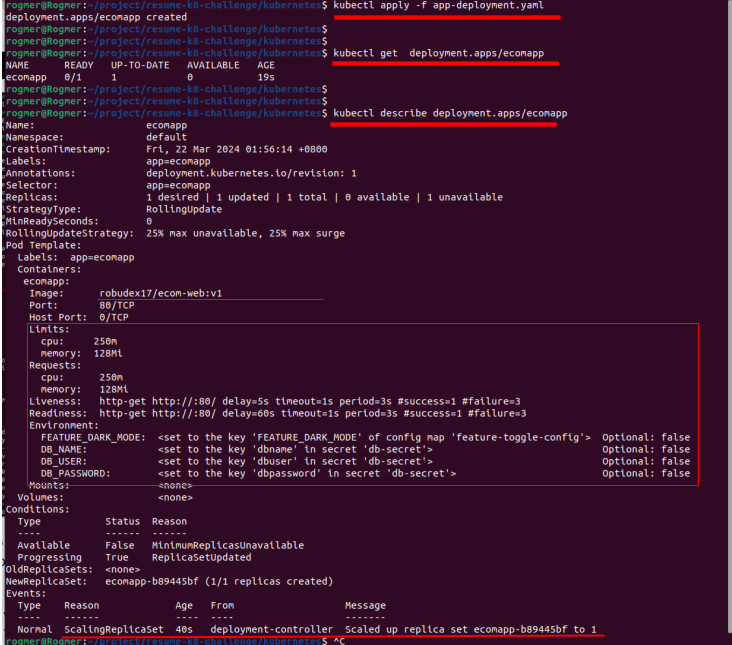
APP-DEPLOYMENT
kubectl get deployment.apps/ecomapp
kubectl describe deployment.apps/ecomapp
As you can see from the above output, there is a lot of information. Let’s dissect it one by one.
First, the app-deployment create replica-set name ecomapp-b89445bf which then create one ecomapp pod.
This Pod have environment variables and the values came from the secrets and configmap manifest.
It use our image /ecom-web:v1 that we create earlier
If you run the command kubectl get pods -o wide you will see that there’s one ecomapp pod created
Currently, our app can only be accessed within the Kubernetes cluster. To access it from the outside world, we need to expose it using a service.
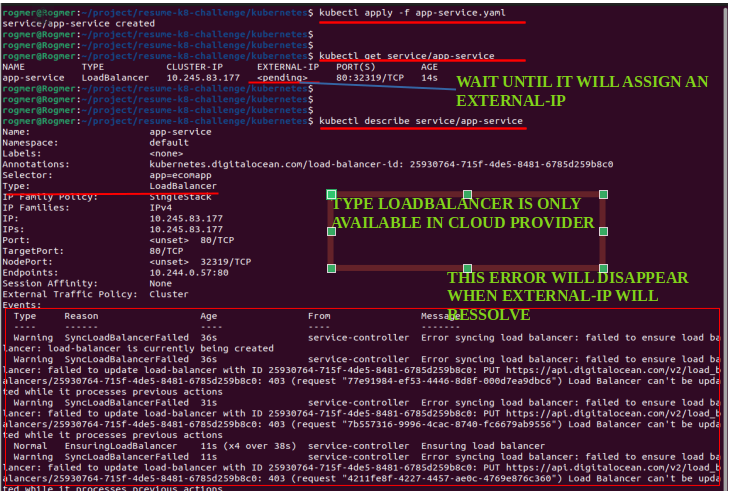
APP-SERVICE
kubectl get service/app-service
kubectl describe service/app-service
As you can see, the EXTERNAL-IP status is in pending mode. It takes some time for it to resolve. You can run kubectl get service/app-service to check the status.”
After a couple of minutes, it finally resolved the EXTERNAL-IP
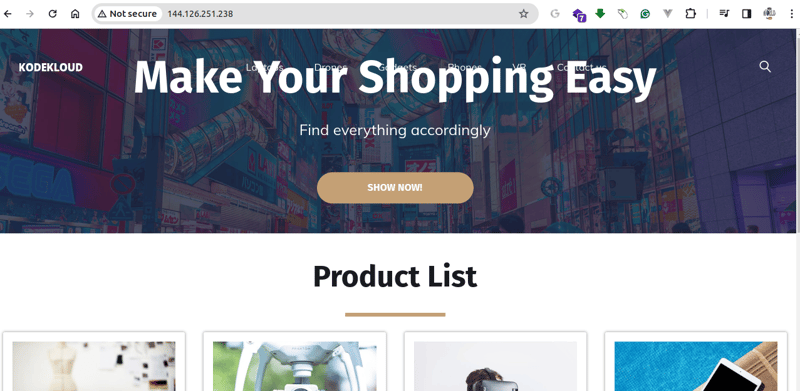
Copy the EXTERNAL-IP and paste it to the browser address bar.
And indeed it is working…
Let’s update our app to add a dark theme and use our app-config-map to toggle between themes. Currently, our FEATURE_DARK_MODE is set to false. Let’s set it so that when FEATURE_DARK_MODE is true, our app will use the dark theme, and if it’s false, it will return to its default white theme.
Here’s I do it.
In app/css I add dark-theme.css and add this css code.
body {
background-color: #1a1a1a;
color: #ffffff;
}
/* Style links */
a {
color: #ffffff;
}
/* Style headings */
h1, h2, h3, h4, h5, h6 {
color: #ffffff;
}
/* Style buttons */
button {
background-color: #333333;
color: #ffffff;
}
/* Style input fields and textareas */
input[type=”text”],
input[type=”email”],
input[type=”password”],
textarea {
background-color: #333333;
color: #ffffff;
border: 1px solid #666666;
}
/* Style hover effect for buttons and links */
button:hover,
a:hover {
opacity: 0.7;
}
Then, update the app/index.php file by adding this code at the top of the file.
$isDarkModeEnabled = getenv(‘FEATURE_DARK_MODE’) === ‘true’;
// Function to include the dark theme CSS based on the dark mode status
function includeDarkThemeCSS() {
global $isDarkModeEnabled;
if ($isDarkModeEnabled) {
echo ‘<link rel=”stylesheet” type=”text/css” href=”css/dark-theme.css”>’;
}
}
?>
<br>
Locate the and the code below it <?php includeDarkThemeCSS(); ?> and save the file.
Build and Push the Docker Image again with *v1 * tag.
docker login
docker push robudex17/ecom-web:v1
Change FEATURE_DARK_MODE in “app-configmap.yaml** to true
FEATURE_DARK_MODE: “true” and run *kubectl apply again *
Restart the Deployment and Refresh the browser
As you can see, the dark theme is enabled. You can revert to the default theme by first changing FEATURE_DARK_MODE to “false” in the app-configmap.yaml file and then running kubectl apply followed by kubectl rollout restart again.
kubectl rollout restart deployment ecomapp
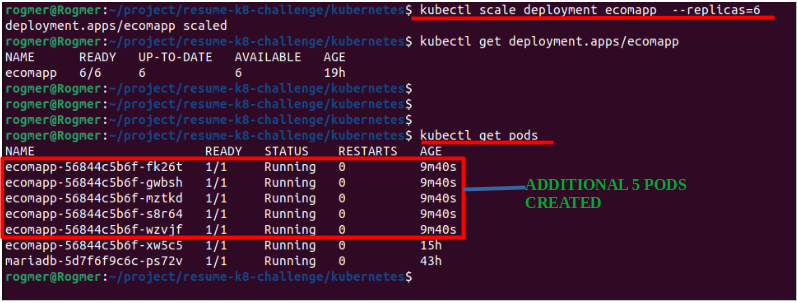
*Its Time to Scale our application *
If you run the kubectl get pods command, you will notice that there is only one ecommapp pod. We need an additional five pods by scaling it up to 6 replicas.
kubectl get deployment.apps/ecomapp
kubectl get pods
You can scale it down by adjusting the number of replicas. Let’s scale it down back to 1.
Perform a Rolling Update
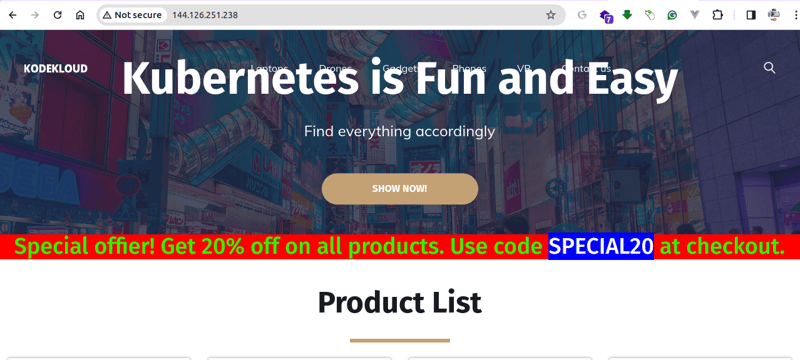
“Let’s update our application by adding a simple promotional banner. Open app/index.php location <!–==========End Slider area==========–> at the bottom, paste the this code
<section>
<div style=”background-color: #ff0000; text-align:center;”>
<h1 style=”color: #2ef207″>Special offier! Get 20% off on all products. Use code <span style=”background-color:blue; color: white”>SPECIAL20</span> at checkout.</h1>
</div>
</section>
Rebuild and Push the images with v2 tag
docker login
docker push robudex17/ecom-web:v2
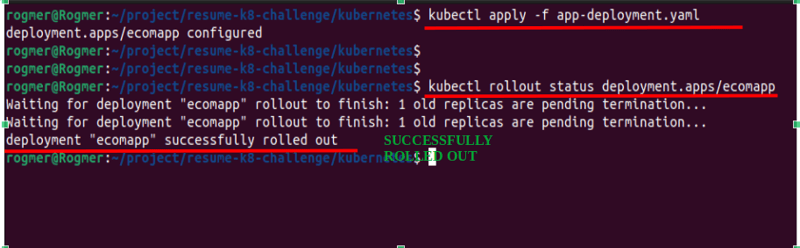
Open app-deployment.yaml and udpate the image from v1 to v2
(image: /ecom-web:v1 to image: /ecom-web:v2) and apply the changes
kubectl rollout status deployment.apps/ecomapp
Roll Back a Deployment
Suppose the new banner introduced a bug. Roll back to the previous version. We can undo the rollout with this command
Autoscale Your Application
First, let’s check if there is an existing metrics-server installed in the kube-system namespace.
If there is no metrics-server we need to deploy it.
kubectl get pods -n kube-system | grep metrics-server
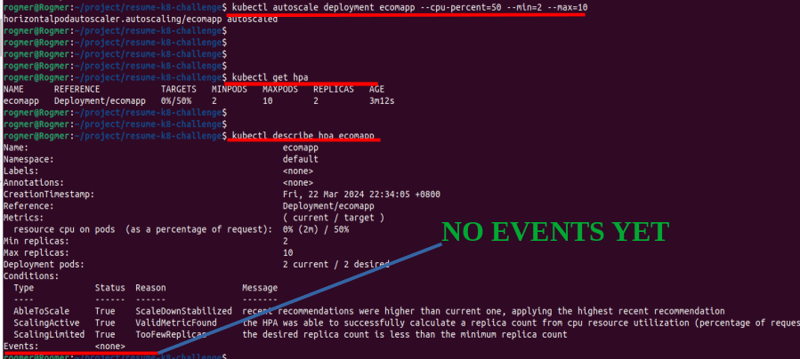
Implement HPA: Create a Horizontal Pod Autoscaler targeting 50% CPU utilization, with a minimum of 2 and a maximum of 10 pods.
As you can see, when you run ‘kubectl get pods’, an additional ecomapp pod is created to satisfy the minimum pods requirement of 2 set by the HPA..
Let’s simulate load by stressing the CPU using the ‘stress’ application. First, connect to the ecomapp pods, install the ‘stress’ app, and then run the stress command.
kubect exec -it ecomapp-*** — bash
apt update
apt install stress
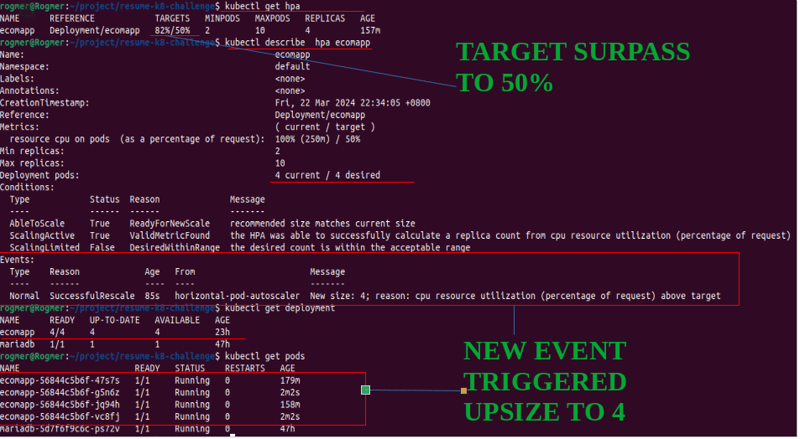
verify the HPA and the deployments
kubectl describe hpa ecomapp
kubectl get deployment
kubectl get pods
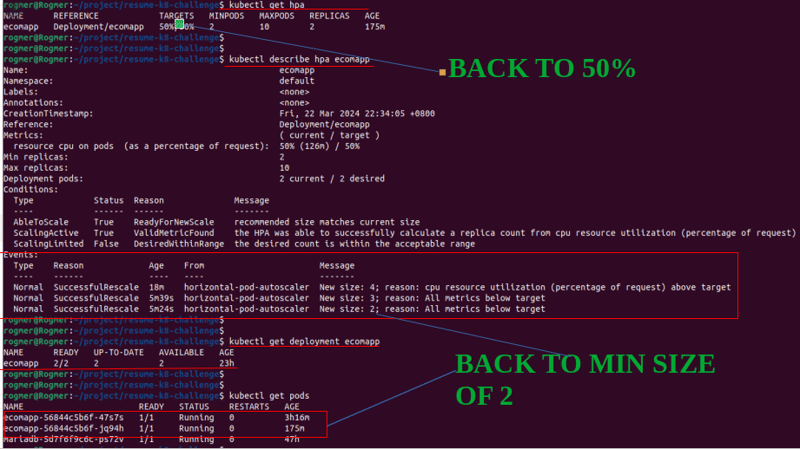
After the stress app finished running, and the average cpu load back 50% or less it back to original state.
Implement Liveness and Readiness Probes
Add liveness and readiness probes to app-deployment.yaml.Under spec->containers add code
httpGet:
path: /
port: 80
initialDelaySeconds: 5
periodSeconds: 3
failureThreshold: 5
readinessProbe:
httpGet:
path: /
port: 80
initialDelaySeconds: 30
periodSeconds: 3
livenessProbe: Configures a liveness probe for the container to check if it’s running properly.
– httpGet: Defines an HTTP GET request probe on the root path (/) of the container’s port 80.
– initialDelaySeconds: 5: Specifies a delay of 5 seconds before the first probe is performed.
– periodSeconds: 3: Sets the period for
– failureThreshold: 5: Sets the number of consecutive failures allowed before considering the liveness probe as failed. In this configuration, if the liveness probe fails 5 times in a row, the container will be considered as failing.
subsequent probes to 3 seconds.
– readinessProbe: Configures a readiness probe for the container to check if it’s ready to serve traffic.
– httpGet: Defines an HTTP GET request probe on the root path (/) of the container’s port 80.
– initialDelaySeconds: 60: Specifies a delay of 60 seconds before the first readiness probe is performed.
– periodSeconds: 3: Sets the period for subsequent readiness probes to 3 seconds.
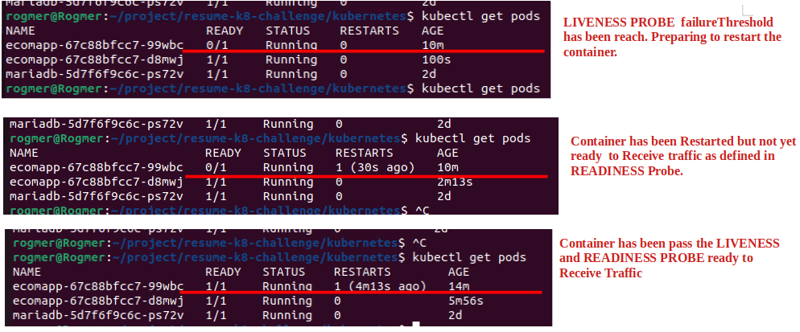
Let’s simulate failure scenarios by manually stopping the application or deleting the index.php file on one of the pods.
kubectl exec -it ecomapp-67c88bfcc7-99wbc — bash
rm index.php
After 15 seconds, which is the failureThreshold * periodSeconds, Pods will be marked as failed and restarted. Then, wait for 30 seconds before sending a health check again.
Implement Basic CI/CD Pipeline.
Update image tag from v2 to latest in app.deployment.yaml
Create Github repo name: resume-k8-challenge and run this commands to your project directory
git init
git add README.md
git commit -m “first commit”
git branch -M main
git remote add origin https://github.com/robudexIT/resume-k8-challenge.git
git push -u origin main
Under resume-k8-challenge repo, click Actions Tab click set up a workflow yourself Please paste the CI/CD code below and commit the changes
on: workflow_dispatch #manual trigger
# on:
# push:
# branches: main
permissions:
issues: write
jobs:
BuildAndPushForProduction:
runs-on: ubuntu-latest
steps:
– name: Code Checkout
uses: actions/checkout@v4
– name: Login to Docker Hub
uses: docker/login-action@v3
with:
username: ${{ secrets.DOCKERHUB_USERNAME }}
password: ${{ secrets.DOCKERHUB_TOKEN }}
– name: Build and Push docker image to Dockerhub
uses: docker/build-push-action@v5
with:
context: ./
push: true
tags: ${{ secrets.DOCKERHUB_USERNAME }}/${{env.DOCKER_REPO}}:latest
DeployToKubernetes:
runs-on: ubuntu-latest
needs: BuildAndPushForProduction
steps:
– name: Code Checkout
uses: actions/checkout@v4
– name: Setup Kubernetes Configuration
uses: tale/kubectl-action@v1
with:
base64-kube-config: ${{ secrets.KUBE_CONFIG }}
– name: Check for existing deployment
run: |
if kubectl get deployment shopping-cart-java-app -n app-namespace >/dev/null 2>&1; then
echo “Deployment exists, rolling out update”
kubectl rollout restart deployment deployment ecomapp
else
echo “Deployment not found, applying new resources”
kubectl apply -f kubernetes/app-deployment.yaml
fi
The GitHub Actions we just created are temporarily set to manual trigger (on: workflow_dispatch) so that they will not run automatically without user intervention. This is because the pipeline is not yet ready.
If you scan the code there are secrets variables that we need to configure first
secrets.DOCKERHUB_USERNAME -> your dockerhub user
secrets.DOCKERHUB_TOKEN -> your dockerhub password
secrets.KUBE_CONFIG -> your kubernetest config encode using base64. You can use https://www.base64encode.org/
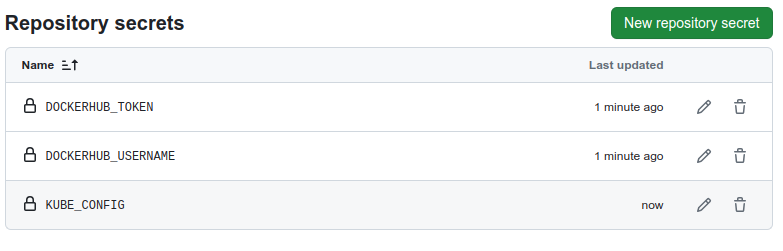
Under resume-k8-challenge, Click Settings. Under Security Click Secrets and variables and click Actions. Click ** New repository secret**
DOCKERHUB_USERNAME = your docker hub user
DOCKERHUB_TOKEN = your dockerhub password
KUBE_CONFIG = your kubernetes config.This is the cluster configuration file that you downloaded earlier in this project. Once done, you should see three secret variables shown below:
Under resume-k8-challenge Click Generals and Check Automatically delete head branches
Under resume-k8-challenge In the Code and automation section, click on ‘Branches‘ and then select ‘Add branch protection rule‘.”
In the Branch name pattern field, enter “main”.
Check the following options: “Require a pull request before merging,” “Require review from Code Owners,” “Require status checks to pass before merging,” “Require branches to be up to date before merging,” and “Do not allow bypassing the above settings.”
Click “Save” to apply the changes.
Now that all required settings are configured, navigate to your project directory and run git pull. After that, modify the event trigger in the .github/workflows/main.yml file, and then push the changes.”
on: workflow_dispatch
#TO
on:
push:
branches: main
As you may have noticed, committing directly to the main branch is prohibited.
We only allowed a pull request. Do this here’s the steps
After the change in the main branch, create a temporary branch and push the changes to it.
From GitHub, create a pull request, review, and merge or reject the pull request.
In the project directory, switch to the main branch and delete the temporary branch.
Great! You can proceed with making the change in the app/index.php file from “Make Your Shopping Easy” to “Kubernetes is Fun and Easy.”
vim app/index.php
git add .
git commit -m “update index.php”
git checkout -b tempbranch
git push –set-upstream origin tempbranch
As you can see, the push was successful.
On the GitHub repository, navigate to ‘Pull requests
Click the ‘Compare & pull request‘ button, add a description, and then click ‘Create pull request‘
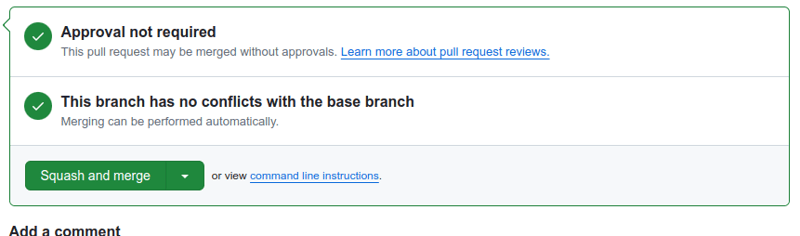
Please add a comment, then click ‘Squash and merge‘, and finally delete the branch.
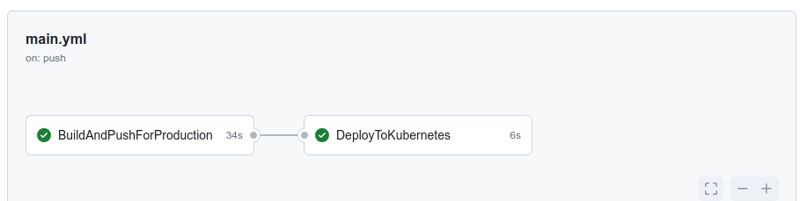
Click Actions and see that our workflow is now running…
Click on the workflow to see if our two jobs have been successfully executed.
Now, let’s check if our code changes are reflected in our application
AND THATS CONCLUDE THE DOCUMENTATION AND PROCESS I MADE. THANK YOU

