
Finicky is a macOS utility that allows you to configure rules for directing URLs to different web browsers or browser profiles. Using it to direct URLs to multiple Chrome profiles at the workplace can be useful for separating work-related browsing from personal activities or for managing different projects. With this optimal way, you can gain the benefit of not wasting your time to re-do actions to make it works well with your browser sessions.
It’s very helpful at some tasks like:
Handle URL clicks on other applications and direct it to the right profile:
Open personal URLs (e.g. social media, unrelated-to-work URLs) with personal profile. For example: Twitter, StackOverflow, Google Search,…
Open related-to-work URLs with work profile (e.g. company sites, company sites on cloud). For example: Jira, GitLab, GitHub, internal websites,…
Open project URLs under a Google profile for that project.
Redirect the url for local Docker sites to localhost
Any URLs you could use by open under a browser.
Here’s a guide on how to do it:
Step 1: Install Finicky
If you haven’t already, install Finicky on your macOS device. You can download and install it from its GitHub repository or by using a package manager like Homebrew:
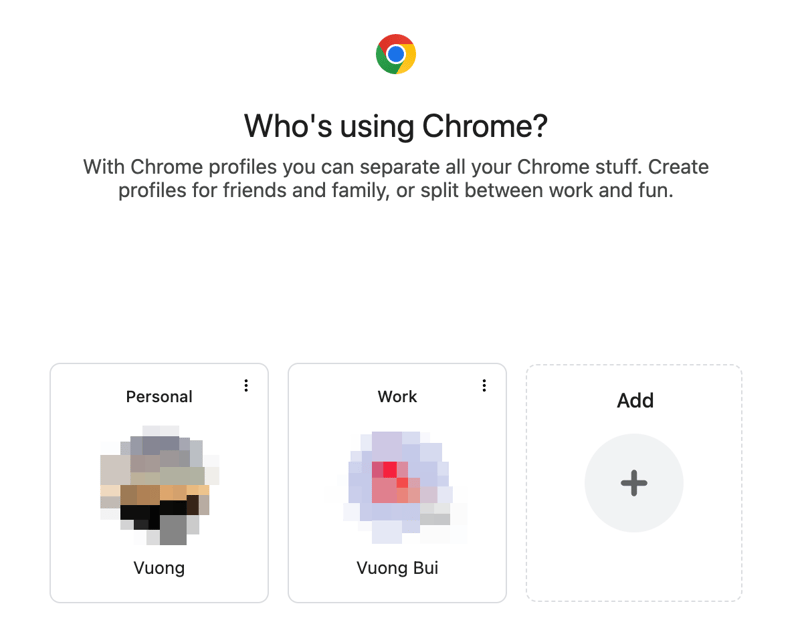
Step 2: Set up Chrome Profiles
Make sure you have multiple Chrome profiles set up for different purposes. You can create these profiles in Chrome’s settings by these steps:
On your computer, open Chrome.
At the top right, click Profile .
Click Add. If you choose to Sync to your Google Account, your profile name will automatically be your Account name.
Choose a name, photo and color scheme.
Step 3: Configure Finicky
Once Finicky is installed, you need to create a configuration file named .finicky.js in your home directory (~). You can use a text editor of your choice to create and edit this file.
Open .finicky.js in a text editor and add the following configuration:
defaultBrowser: {
name: “Google Chrome“,
profile: “Default“,
},
options: {
hideIcon: false,
checkForUpdate: true,
},
handlers: [
{
match: [
// all sub domains of company
// and all company subdomains of other sites
“*company.*/*“,
// to handle localhost with port
“localhost/*“,
“localhost:*/*“,
“*.companyDevTools.team/*“,
“*.datadoghq.eu/*“,
“*.amazonaws.com/*“,
“docs.google.com/*“,
“drive.google.com/*“,
],
browser: {
name: “Google Chrome“,
profile: “Profile 1“, // Main work profile
},
},
],
rewrite: [
{
match: () => true, // Execute rewrite on all incoming urls to make this example easier to understand
url: ({ url }) => {
const removeKeysStartingWith = [“utm_“, “uta_“]; // Remove all query parameters beginning with these strings
const removeKeys = [“fbclid“, “gclid“]; // Remove all query parameters matching these keys
const search = url.search
.split(“&“)
.map((parameter) => parameter.split(“=“))
.filter(([key]) => !removeKeysStartingWith.some((startingWith) => key.startsWith(startingWith)))
.filter(([key]) => !removeKeys.some((removeKey) => key === removeKey));
return {
…url,
search: search.map((parameter) => parameter.join(“=“)).join(“&“),
};
},
},
{
// Docker container names to localhost, remember to expose the ports first
// For the case that s3mock is a likely AWS S3 on local, I write its URL inside a container, I saw the logs which included URL, I click on the URL, then Finicky handles it by rewriting and open as localhost in the right profile
match: ({ url }) => [
“s3mock“
].includes(url.host),
url: ({ url }) => ({
…url,
host: “localhost“,
}),
}
],
};
In this configuration:
defaultBrowser: Specifies the default browser to use if a URL doesn’t match any rules.
hideIcon: Hides the Finicky icon in the macOS menu bar (optional).
handlers: Defines rules for directing URLs to specific browsers and profiles.
match: Specifies conditions for matching URLs. You can use regular expressions or functions.
browser: Specifies the browser to open the URL.
profile: Specifies the Chrome profile to use for the URL.
How to find a profile name?
Use this command and find your profiles:
Adjust the match conditions, browser, and profile values according to your requirements and the URLs you want to route to specific Chrome profiles.
Step 4: Test the Configuration
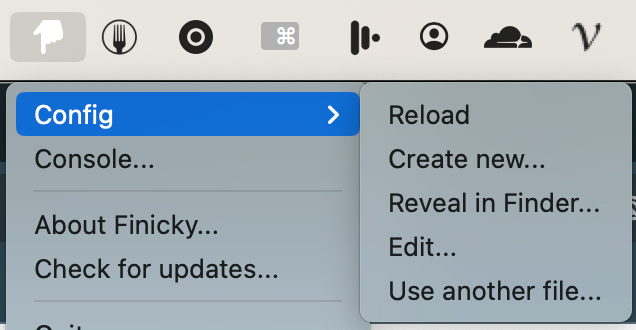
Save the .finicky.js file and it will be reloaded automatically, as long as you enabled this option in Finicky settings.
If you disabled auto reload, so just click Config > Reload manually on the taskbar icon.
Now, open URLs that match the rules defined in your .finicky.js configuration, and Finicky should direct them to the appropriate Chrome profiles based on your rules.
Additional Tips:
Remember to adjust your configuration file if your workplace’s URLs or your Chrome profiles change.
You can add as many rules as needed to handle different URLs and profiles.
Be mindful of the performance impact of running multiple Chrome profiles simultaneously, especially if your computer has limited resources.
Console… could help for debugging a link and also show you how the links get handled by Finicky.
A good alternative is Choosy. Finicky also supports other browsers. But I’m happy with Finicky on Chrome.
