In this tutorial, we’ll learn how to create a basic CRUD application using JavaScript ES6 and Local Storage. By the end of this guide, you’ll know how to implement CRUD with local storage in your own projects. Let’s get code together.
Prerequisites:
Basic knowledge in the following:
HTML
Javascript
CSS
Set up
File Structure:
Set up your file first with your choosen IDE.
index.html
index.js
Inital Code
CSS
Copy this CSS code into your index.css.
HTML
Copy this index.html into your index.css.
JavaScript
We’re utilizing the dialog as our modal, so we don’t have to code the modal manually. Simply copy the code below into your index.js.
const showButton = document.querySelector(‘#btn-add’);
const closeButton = document.querySelector(‘#btn-close’);
showButton.addEventListener(‘click’, () => {
dialog.showModal();
});
closeButton.addEventListener(‘click’, () => {
dialog.close();
});
Exploring our Initial App:
Since our focus is to build a small application using JavaScript and localStorage as our database, we’ll skip the HTML part and dive directly into explaining how we will build the functionality.
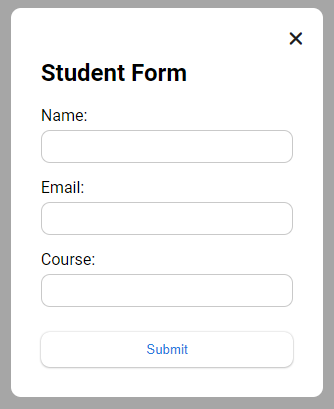
Let’s explore our app first. Click the “Add Student” and see the form with fields name, email and course.
Now, let’s move on to the table display. You’ll notice the following columns:
ID: Unique identification of the student data
Name, Email, Course: Personal Info of the student
Actions: Perform Edit and Delete record in this columns
Since you already know what our app. Let’s start to code.
START
Copy this code first; we’ll use it later. Make sure it’s positioned below your main code for better organization.
/* put your code here… */
// utilities
function populateTable() {
let tableRow = ”;
getStudentList().forEach((student) => {
tableRow += tableRowHTML(student);
});
table.innerHTML = tableRow;
}
const generateRandomId = () => Math.floor(Math.random() * 99999);
const formDataToObject = (formData) => {
const object = {};
formData.forEach((value, key) => {
object[key] = value;
});
return object;
};
function resetForm() {
document.querySelector(‘#student-id’).value = ”;
studentForm.reset();
}
function tableRowHTML(student) {
return `<tr id=’std_${student.id}’>
<td>${student.id}</td>
<td>${student.name}</td>
<td>${student.email}</td>
<td>${student.course}</td>
<td class=”actions”>
<button student-id=”${student.id}” action-type=”edit” class=”edit-btn”>Edit</button>
<button student-id=”${student.id}” action-type=”delete” class=”delete-btn”>Delete</button>
</td>
</tr>`;
}
function getStudentList() {
return JSON.parse(localStorage.getItem(‘studentList’)) || [];
}
Declarations:
const studentForm = document.getElementById(‘student-form’);
const table = document.querySelector(‘table tbody’);
Getting the studentForm and table from our DOM, we’ll add event listeners later.
CREATE
Add Form Function
formData.append(‘id’, generateRandomId());
const student = formDataToObject(formData);
studentList.push(student);
localStorage.setItem(‘studentList’, JSON.stringify(studentList));
const newRow = table.insertRow(-1);
newRow.id = ‘std_’ + student.id;
newRow.innerHTML = tableRowHTML(student);
};
The function above, addForm, adds new student data to the application. It generates a random ID for the student, appends it to the form data, and converts the form data into a student object. The student object is then added to the studentList array, which is stored in local storage. Additionally, a new row is inserted into the HTML table to display the new student’s information.
FORM SUBMISSION:
addSubmit function to the form.
event.preventDefault();
const formData = new FormData(studentForm);
addForm(formData);
resetForm();
dialog.close();
});
To test if it’s working, go to the localStorage in the inspect tab under the “Application” section, and check if the data has been added successfully. If it’s working, proceed to the next step.
READ
We have a function called populateTable. Its purpose is to display the existing data in the localStorage during the first load of our application. It retrieves data from the getStudentList() function.
Call populateTable() after all the our variable declarations.
const table = document.querySelector(‘table tbody’);
populateTable(); // add this code
This will display the student info on the first load of the application if there’s an existing data.
UPDATE
Displaying Student Information in a Modal for Editing.
const target = event.target;
const id = target.getAttribute(‘student-id’);
if (target.classList.contains(‘edit-btn’)) {
dialog.showModal();
const student = getStudentList().find((student) => id == student.id);
document.getElementById(‘student-id’).value = student.id;
document.getElementById(‘name’).value = student.name;
document.getElementById(’email’).value = student.email;
document.getElementById(‘course’).value = student.course;
}
});
The code snippet above enables editing of student details directly within the table. When a user clicks an edit button in a row, it triggers a dialog displaying the student’s information fetched from the getStudentList() function based on the student ID. The data retrieved is then utilized to update the input values for each field using document.getElementById(‘input-id’).
EDIT
const studentForm = formDataToObject(formData);
const studentList = getStudentList();
const studentIndex = getStudentList().findIndex(
(student) => studentForm.id == student.id
);
if (studentIndex == -1) return;
studentList[studentIndex] = {
…studentList[studentIndex],
…studentForm,
};
localStorage.setItem(‘studentList’, JSON.stringify(studentList));
document.querySelector(‘#std_’ + studentForm.id).innerHTML =
tableRowHTML(studentForm);
};
The editForm function edits student details by updating the student list with new form data and saving it back to local storage. It first converts form data to an object, retrieves the student list, finds the index of the student being edited, updates their information using tableRowHTML, and then updates the corresponding row in the HTML table with the new data.
FORM SUBMISSION:
event.preventDefault();
const formData = new FormData(studentForm);
const isEditMode = formData.get(‘id’) != ”;
if (isEditMode) {
editForm(formData);
} else {
addForm(formData);
}
resetForm();
dialog.close();
});
We’ve improved our form to handle both updating and adding student data using just one form. Now, if the form has an id field, it’s for editing, so we call the editForm function. Otherwise, if there’s no id field, it’s for adding new data, so we call the addForm function. This tweak makes it easier for users to manage student information in our application.
DELETE
const target = event.target;
const id = target.getAttribute(‘student-id’);
if (target.classList.contains(‘edit-btn’)) {… code for edit …}
} else if (target.classList.contains(‘delete-btn’)) {
const row = target.parentNode.parentNode;
const newStudentList = getStudentList().filter(
(student) => id != student.id
);
document.querySelector(‘table’).deleteRow(row.rowIndex);
localStorage.setItem(‘studentList’, JSON.stringify(newStudentList));
});
Let’s modify our code for table.addEventListener(). We’ve added a new condition for the delete button if it’s triggered. Then, we’ll retrieve the row of the table using target.parentNode.parentNode. Afterward, we’ll use filter to return a new list without the student ID of the selected student item in the table. Following this, we’ll delete the selected row using deleteRow. Lastly, we’ll update the new localStorage with our new student list. This functionality allows our users to delete user records directly from the table interface while keeping the data synchronized.
END OF CODE
That’s all for the CRUD functionality. I hope you found this tutorial helpful. If you encounter any issues, feel free to refer to our source code for comparison. I also include the demo link below so you can test the application yourself.
CLICK HERE FOR DEMO
INITAL CODE
CRUD SOURCE CODE
Thank you for reading my blog.
If you have any suggestions or corrections, please leave a comment below. I’ll gladly respond and consider your input.