
Written by Oduah Chigozie✏️
Nushell is a modern, cross-platform shell that is built with Rust. It’s performant, extensible with plugins, and has a modern look and feel compared to traditional shells like Bash, PowerShell, and Zsh.
In this article, we’ll go through an overview of Nushell, explore its pros, cons, and how to install it, and get started writing scripts in Nushell. So let’s begin.
Overview of Nushell
Nushell is a command-line shell like Bash, PowerShell, Command Prompt, and Zsh. It’s cross-platform and can easily be installed on any operating system. Most Zsh and Bash commands also work in Nushell.
Right out of the box, if you’re coming from Unix-like shells like Bash, you won’t notice a substantial change in the commands you already use. However, one thing you will notice is the outputs of some commands — particularly commands that display structured information.
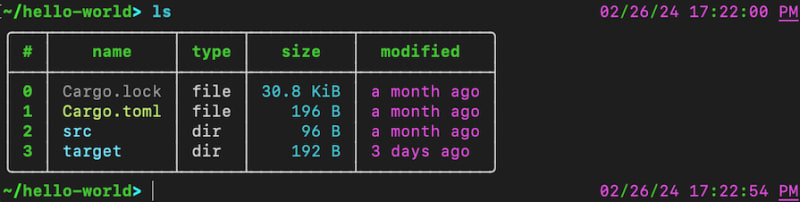
Let’s take a look at an example of Nushell in action: Nushell emphasizes accepting, displaying, and working with structured data. If you typed the ls command in a traditional shell — Zsh, in this example — you’d get something like this instead: These examples show the difference this emphasis makes. Zsh only displays the files in the directory, while Nushell shows a table of the files. Using the table, Nushell is also able to display more information about each file.
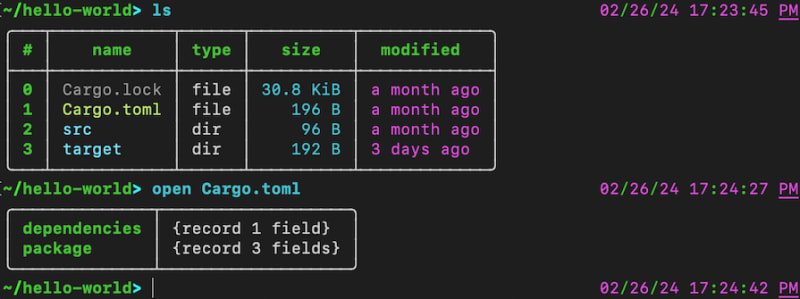
ls is one of the commands in Nushell that processes structured data and presents it in a table. Nushell introduces an open command that reads a file and displays its content in a tabular format if that file contains structured data.
If you run the open Cargo.toml command, you’ll get a table representing the contents: As of now, open can only process files with the following file formats: CSV, EML, ICS, INI, JSON, Nuon, ODS, SQLite, SSV, TOML, TSV, URL, VCF, XLSX or XLS, XML, and YAML or YML.
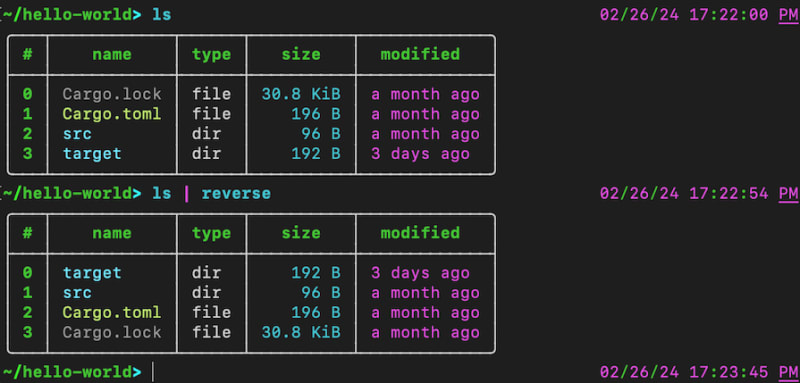
Like traditional shells, Nushell allows you to stream the output of one command to another command in Nushell with a pipeline | character. Let’s take a look at this example: In this example, we stream the ls command output to the reverse command with the pipeline | character. ls finds the files and folders in the current working directory and displays them in a table. reverse reads a table from a stream and reverses the order in which its rows appear.
We can do the same for the open command:
Benefits of using Nushell
Now that we’ve taken a glimpse at Nushell, it’s important to be aware of the benefits that you get with Nushell. Among these benefits are:
Nushell is one of the only shells that allows you to specify data structures and data types
Nushell allows you to create, install, and uninstall plugins easily
Nushell is easy to use and understand. It’s also backed by a detailed documentation where you can find all the information you need
Nu pipelines use structured data so you can safely select, filter, and sort the same way every time. So you don’t need to spend extra time writing scripts for parsing strings
While you get these benefits with Nushell, it is important to consider that it is new compared to Bash, PowerShell, and many traditional shells. Nushell doesn’t have as much community support or adoption as the traditional shells.
Installing Nushell
Now, let’s go into how you can install Nushell on your system.
The first method is through downloading the pre-built binaries. With this method, you don’t need to install anything other than Nushell’s dependencies. Once you’ve downloaded the binaries, add them to your system’s environment path to run it directly in your terminal.
Another method is through your operating system’s package manager, Node’s npm package manager, or Rust’s Cargo package manager.
Nushell is available in many package managers. You would find Nushell as nu or nushell in the package manager. For example, here are some common installation commands:
Winget: winget install nushell
Chocolatey: choco install nushell
Scoop: scoop install nu
macOS Homebrew: brew install nushell
Node.js npm: npm install -g nushell
Rust Cargo: cargo install nu
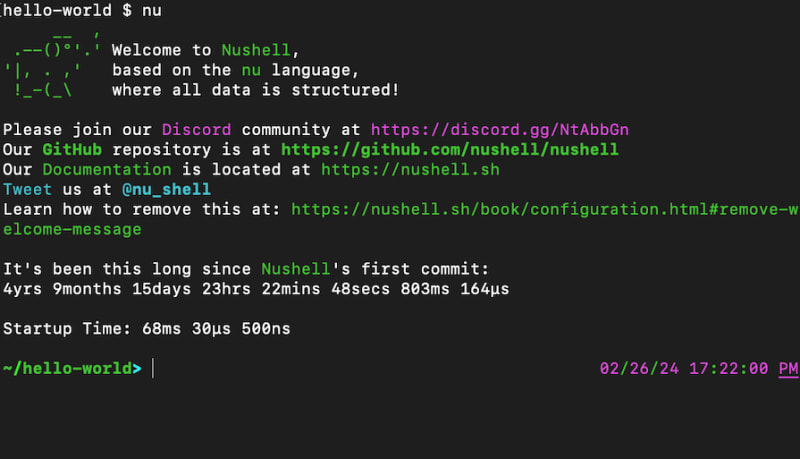
As of now, Nushell is only supported by these package managers: Once you’ve gotten Nushell installed on your system, run this command in your terminal to activate the shell:
When you run the command, you should see an introduction message followed by the command prompt, similar to this image: You can use most of the commands you already use in traditional shells — and some extra ones — right after you install Nushell. If you want to see all the commands that Nushell already allows you to use, check out Nushell’s command reference.
Scripting in Nushell
Like most traditional shells, Nushell has its own scripting language called Nu. Nu allows you to automate tasks and write scripts.
In this section, I’ll cover some basic things you can do with Nushell. These include running Nushell scripts, creating and using variables, and creating and working with custom commands.
Running Nushell scripts
There are two ways to run Nushell scripts:
The nu command
A shebang #!
To run the file with the nu command, all you have to do is type the command followed by the file name. For example:
The file extension for Nushell scripts is .nu. Shebangs are another way to run scripts on Unix-like systems. All you have to do is add a shebang pointing to the interpreter in the first line of your script. For example:
echo “Hello, world”
# … rest of the script
Then, make the file executable with the chmod command:
Then you’ll be able to run the file directly in the terminal:
Creating and using variables
In Nushell, there are three types of variables that you can define: mutable, immutable, and constant variables.
Mutable variables can change while your script is running after you’ve declared them. To declare a mutable variable use the mut keyword:
mut num2 = 7
$num1 += 1
$num1 + $num2 # output -> 13
Immutable variables cannot change after you’ve declared them. Trying to modify immutable variables will result in a needs to be a mutable variable error. To declare an immutable variable you have to use the let keyword:
let num2 = 7
# “$num1 += 1“ would result in an error
$num1 + $num2 # output -> 12
Constant variables are similar to immutable variables. What distinguishes constant variables from immutable variables is that constant variables hold variables that are already determined before the script runs. To declare a mutable variable, use the const keyword:
const num2 = 7
$num1 + $num2
Nushell also allows you to execute subexpressions and work with its results. Let’s look at this example:
$files
Subexpressions are wrapped in parentheses (). In the code above, the result of the subexpression is saved in the files variable, allowing us to work with it. Commands in a subexpression should be separated by pipelines |, semicolons ;, or the and keyword.
Note that only mutable and immutable variables can contain subexpression values. This is because constant values require their values to be determined before the script is executed, but the values of the subexpressions cannot be determined before the script runs.
Creating custom commands in Nushell
Custom commands in Nushell are similar to functions and subroutines in programming languages and in traditional shells.
The syntax for creating a custom command is as follows:
# command‘s tasks
“return value”
}
After defining the custom command, the way you call it is as follows:
Let’s look at a simple example:
$txt1 + “, “ + $txt2
}
comma “Hello“ “world“ # output -> Hello, world
In this example, we create a command called comma using the syntax above. The command joins two strings with a comma and space “, “. When you run the command with “Hello” and “world” string arguments, it outputs “Hello, world”.
For commands without any parameter, follow this format:
# command‘s tasks
“return value”
}
You can call the command above the same way you’d call any other command:
Nushell also allows you to specify parameter datatypes, specify default values for parameters, and make certain parameters optional in your custom commands.
To specify the datatypes of parameters, add a colon : followed by the datatype you want the parameter to have. For example:
$num1 + $num2
}
add 1 2 # output -> 3
As of this article’s writing, Nushell is on v0.86.0 and only supports 21 datatypes: any, binary, bool, cell-path, closure, datetime, directory, duration, error, filesize, float, glob, int, list, nothing, number, path, range, record, string, and table.
Passing an incorrect type to one of the parameters will result in an error. Let’s see what will happen if we run add 1 “2”: To specify a default value for a parameter, add an equals = character followed by the value you want to be the default after the parameter. For example:
$num1 + $num2
}
add 1 2 # output -> 3
add 1 # output -> 1
In this code, when you don’t specify a value for the num2 parameter, it becomes 0 by default. This gives us an output of 1.
Conclusion
In this article, we looked at various aspects of Nushell. We took a brief look at Nushell and its benefits, then covered the process of setting it up, and basic scripting in Nushell’s scripting language, Nu.
When comparing Nushell with Bash, Zsh, and PowerShell, it’s important to consider whether your project would benefit from Nushell’s strengths or requires features offered in other shells.
For example, Nushell emphasizes accepting, displaying, and working with structured data. However, some tasks that involve manipulating large amounts of data may consume much of your system’s resources.
Also, while Nushell is written in Rust, which provides performance and efficiency benefits, resource-intensive tasks will consume resources regardless of the benefits they receive from Rust. You should consider alternatives like bash or zsh for those tasks, especially if your task doesn’t benefit from Nushell’s data structuring.
If you want enhanced customization ability, Nushell is one of the most customizable shells by default. Shells like Zsh and Bash offer limited customization out of the box, but they both have community-driven frameworks that offer similar customizability to Nushell.
One last thing is that Nushell doesn’t have the ability to replace command-line shells like Powershell. These shells usually include enhanced integration with services and systems, which may not be as easily achieved with other command-line shells. Powershell, for example, is deeply integrated with Microsoft services and the Windows Operating System.
While Nushell is a relatively new shell, it is powerful, extensible, and provides a rich user interface compared to most traditional shells. I hope that by following this article, you’ll get a more grounded understanding of Nushell.
LogRocket: Full visibility into web frontends for Rust apps
Debugging Rust applications can be difficult, especially when users experience issues that are hard to reproduce. If you’re interested in monitoring and tracking the performance of your Rust apps, automatically surfacing errors, and tracking slow network requests and load time, try LogRocket.
LogRocket is like a DVR for web and mobile apps, recording literally everything that happens on your Rust application. Instead of guessing why problems happen, you can aggregate and report on what state your application was in when an issue occurred. LogRocket also monitors your app’s performance, reporting metrics like client CPU load, client memory usage, and more.
Modernize how you debug your Rust apps — start monitoring for free.


