
I usually code on my Windows machine because it’s cozy and convenient 😊. But for launching my projects, I use a Linux server. I thought about getting a second server for testing new ideas. Then, a great idea struck! 🌟 Why not use a virtual machine on my current setup? It’s like having a small test lab without needing extra hardware.
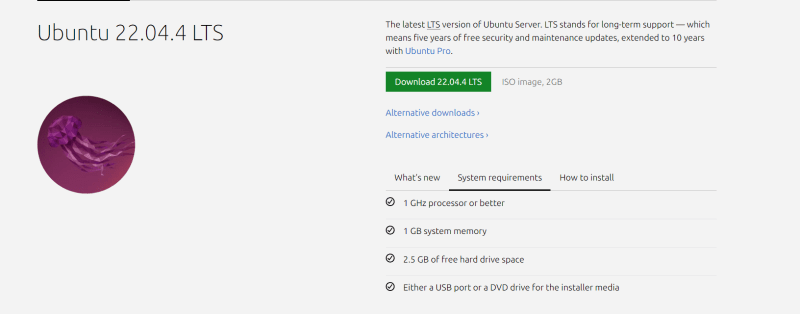
I prefer using VMWare 🖥️ to create virtual machines, and I install Ubuntu on them. You can find VMWare here. Also, make sure to grab an ISO of the latest Ubuntu server version, which is currently 22.04.4. You can download it here. This setup helps me ensure that my digital sandbox is always ready for action! 🚀
System Requirements: (As Official Ubuntu Page Suggests)
Now Lets Create the Virtual machine at VMware
🎉 Kick things off by creating a new Virtual Machine! 🎉
Click that big shiny “Create a New Virtual Machine” button and feel like a boss! 🚀
📀 Now, grab that ISO you snagged from Ubuntu! 📀
Time to pick the ISO file you downloaded earlier. It’s like choosing the perfect topping for your ice cream! 🍦
🖊️ Time to name your new digital baby and pick its home! 🖊️
What’s in a name? Everything! Name your VM and choose where it’s going to live on your computer. Like setting up a room for a new pet! 🐾
💾 How much space will your VM need? Pack its digital suitcase! 💾
Slide that bar to give your VM room to stretch its legs. More GBs, more fun! 🎢
🎬 Hit ‘Finish’ and let the magic happen! 🎬
All set? Smash that Finish button like you’re launching a rocket to Mars! 🚀🌌
Now Lets Install Ubuntu 22.04 LTS Server Edition
🚀 Step 1 – Let’s Get This Boot-y Party Started with Ubuntu ISO! 🚀
Plug in that shiny new Ubuntu 22.04 bootable USB drive you prepared. Time to wake up your system with a jolt of Ubuntu energy! ⚡️
When your system starts, you’ll be greeted by the Grub menu, like a doorman at a fancy club. By default, it’s all set to take you straight to the “Try or Install Ubuntu Server” option—like the VIP entrance! 🌟
Just sit back and let it whisk you away into the live system, no clicks needed. It’s like your computer is on autopilot! 🛫
🌍 Step 2 – Pick Your Linguistic Adventure for the Ubuntu Installer! 🌍
After a short techno intermission (just a few seconds!), you’ll dive into the language selection window. It’s like choosing the language for your epic adventure in the Ubuntu world! 🗺️
I go with “English” because it’s classic and straightforward, like ordering vanilla at an ice cream shop—but hey, vanilla goes with everything! 🍦
Press ENTER and stride confidently into the next phase. It’s like hitting the “Next” button on your journey to tech greatness! ⭐️
Step 3 – Keyboard Configuration
Choose your preferred keyboard layout. I go with English US.
🛠️ Step 4 – Select Your Ubuntu Installation Flavor! 🛠️
Time to lay the foundation! You’ll see two savory options pop up:
Ubuntu Server: The classic choice, packed with all the essentials for a robust server. It’s like the full meal deal!
Ubuntu Server (minimized): Stripped down for speed, perfect for systems where human logins are as rare as a unicorn sighting! 🦄
I stick with the hearty standard: Ubuntu Server. Just hit enter and keep cruising on your setup journey! 🚀
🌐 Step 5 – Hook Up Those Network Connections! 🌐
Now, let’s get your server chatting! It’s time to configure at least one network interface to make sure your server can mingle with other systems. 🤝
Got a DHCP server on your network? Great! By default, your server is set to automatically snag an IP address from the DHCP server—like getting a free pass to the internet party! 🎫
Just leave it as is to continue seamlessly. Your server is about to get connected without lifting a finger! 🎉
🔗 Step 6 – Configure Proxy 🔗
Need a proxy to access the internet? Enter the details now. If not, just leave it blank and hit ENTER to continue. 🚀
📡 Step 7 – Choose Your Ubuntu Archive Mirror 📡
The installer automatically selects the nearest archive mirror for your server. If you prefer a different one, just enter your chosen mirror’s details. Otherwise, you’re all set to go with the default!
Step 8 – Update Installer (Optional)
You might get a prompt about a new Ubuntu installer update. Fancy the latest features? Choose “Update to the new installer” and hit ENTER. It’ll download and refresh your setup process.
Prefer to keep things classic? Select “Continue without updating”.
I’m going for the update to check out the new installer TUI! 🔄
Step 9 – Disk Partitioning
Time to decide on disk space! Let the installer automatically partition your drive or customize it manually. Choose what suits your setup best!
If you want to automatically partition the disk, simply choose “Use an entire disk” option.(I will choose this because I have a virtual machine)
Step 10 – Set Hostname and User Details
Now, name your Ubuntu server (hostname) and set up your username and password. These details will be your keys to logging in later!
Step 11 – Enable Ubuntu Pro
If you have an Ubuntu Pro account, select “Enable Ubuntu Pro” to upgrade your server. This ensures security updates until 2032.
Step 12 – Configure SSH
In step, you can setup SSH. Check the “Install OpenSSH Server” check-box and choose “Done” and hit ENTER
Step 13 – Select Featured Server Snaps
Next up, choose from popular snap applications to install on your server. Use the SPACEBAR to select or deselect your preferred apps, then hit ENTER to continue.
Installation Begins
Your Ubuntu server installation is now underway! It’s downloading and installing numerous packages, so grab a coffee and hang tight—it’ll be worth the wait! ☕🕒
Step 14 – Reboot Ubuntu Server
After the installation wraps up, choose “Reboot Now” and press ENTER to restart your Ubuntu server and bring all the changes to life!
Congratulations! 🎉 Ubuntu 22.04 LTS server is successfully installed! You’re all set to start using your new server. Great job!
Log in to Ubuntu Server
Time to dive in! Log in to your newly installed Ubuntu server using the username and password you set up during the installation. You’re ready to start exploring your new server environment! 🚀
Update Ubuntu
Right after installation, it’s crucial to get the latest updates. For Ubuntu, fire up your terminal and run these commands to ensure everything is up-to-date:
To fetch the list of available updates:
To upgrade all your packages to the latest versions:
This will keep your server secure and running smoothly.
During the installing updates task, you will be prompted to restart some services. Choose OK to do so.
Clean Up and Reboot
After updating, it’s good practice to clean up any unnecessary files or packages. Here’s how you can tidy up your Ubuntu server:
Remove packages that are no longer required:
Clean up the local repository of retrieved package files:
Once that’s done, give your system a fresh start with a reboot:
This ensures your server is lean, clean, and up to date!
To utilize the Linux server now ready on VMware, you can directly access it, but for those who prefer a visual directory structure for file editing, Visual Studio Code is a great option. You can connect to the server via SSH through Visual Studio Code. It’s important to note that the virtual machine must remain running for the duration of your connection session with Visual Studio Code. Here’s how to set this up for a more efficient workflow.
Let’s connect to our VPS with visual studio Code
Step 1 — Install the Remote-SSH Plugin
Search Remote-SSH on extensions Marketplace and install it
Step 2 — Configuring the Remote-SSH Plugin and Connecting To Your Server
Now that you have the plugin installed you can configure it to connect to a server. To do so, you’ll need the following pieces of information:
The server’s IP or hostname.
The server’s IP or hostname.
The username you’ll connect with.
The private key you’ll use to authenticate your user.
You’ll use this information to create an SSH configuration file that Visual Studio Code can use to SSH to the server to sync files and execute code on your behalf. You will create this configuration using Visual Studio Code.
Now that you have the Remote-SSH plugin installed, you’ll see a small green box in the bottom left-hand corner of the Visual Studio Code interface.
Click the button, and a dialog box appears in the top center. Select Remote-SSH: Open Configuration File… from the list:
The next prompt will ask you which configuration file you want to open. If you’re on Windows, you’ll see two locations: one in your personal user directory, and one in the installation location for SSH. You should use the file in your user directory when configuring the server.
Select the file and your editor will open the config file. Add the following code to the file to define the connection to your server, replacing the highlighted sections with the information for your server:
HostName your_server_ip_or_hostname
User sammy
IdentityFile /location/of/your/private/key
Visual Studio Code is now configured and ready to connect to your server. Click on the green Open a remote window button in the bottom left-hand corner and select Remote-SSH: Connect to Host…
Once you’ve done this all the available and configured servers will appear in the dropdown menu. Select the server that you want to connect to from this list.
If this is the first time you have connected to this server from your machine, you’ll likely be prompted with the SSH Fingerprint verification dialog, like the one in the following image:
This is to ensure that you are really connecting to the server you think you are. You can verify this by logging in to your server manually and running ssh-keygen -l -f /etc/ssh/ssh_host_key.pub to view the fingerprint of the server. If this fingerprint is the same as the one being presented to you in Visual Studio Code, then you are indeed connecting to the server you think you are so you can click Continue.
Visual Studio Code defaults to opening a new window when a new connection is made. A new window will appear with the welcome screen. You’ll know that your connection was successful if you see SSH: your_ip_address_or_hostname in the green box in the bottom left-hand corner. This means that Visual Studio Code is connected and communicating with your remote server.
Next let’s clean and update the server
Run the following commands
Nginx
Nginx, pronounced like “engine-ex”, is an open-source web server that, since its initial success as a web server, is now also used as a reverse proxy, HTTP cache, and load balancer.
Installing Nginx
UFW
Uncomplicated Firewall (UFW) is a program for managing a netfilter firewall designed to be easy to use. It uses a command-line interface consisting of a small number of simple commands, and uses iptables for configuration. UFW is available by default in all Ubuntu installations since 8.04 LTS.[1] UFW has been available by default in all Debian installations since 10.
Install ufw
ufw enable
Give nginx full control of firewall
Now you have a full configured ubuntu server. You can run Node.js, dotNet core, static websites , database servers and many other things into your machine
Tell me if you want to to make a new post on how to run some of them in your server.
Thanks for your time.
Leave a question or comment below.


