Introduction
Project Structure
Stack Diagram
Docker images
Django image
Nginx image
Redis image
Docker Compose
Environment Variables
The file
Deploying
Building
Deploying with Docker Compose
After many iterations, this is my current process to deploy a django application.
The cool thing is that I’m now deploying with only an .env file and nothing else.
Note that this is just a single instance of the stack, without Kubernetes or any kind of load balancer.
Introduction
My stack consists on:
A Postgres database
A Redis database
A django instance
Celery beat and workers
I won’t go into details of how to set up anything like this here, if you want to learn more about celery in their docs.
Project Structure
To understand the docker-compose.yml file below, it’s important to see how I structure my django project:
├── core # settings.py lives here
├── app1/
│ ├── migrations
│ ├── models.py
│ └── …
├── app2/
│ ├── migrations
│ ├── models.py
│ └── …
├── data # A data directory where I store stuff like logs
├── nginx/
│ ├── certs/
│ │ ├── fullchain.pem
│ │ └── privkey.pem
│ ├── conf/
│ │ ├── default.conf
│ │ ├── prod.conf
│ │ └── staging.conf
│ └── Dockerfile
├── Dockerfile
├── entrypoint-django.sh
├── entrypoint-beat.sh
├── entrypoint-worker.sh
├── Pipfile
└── …
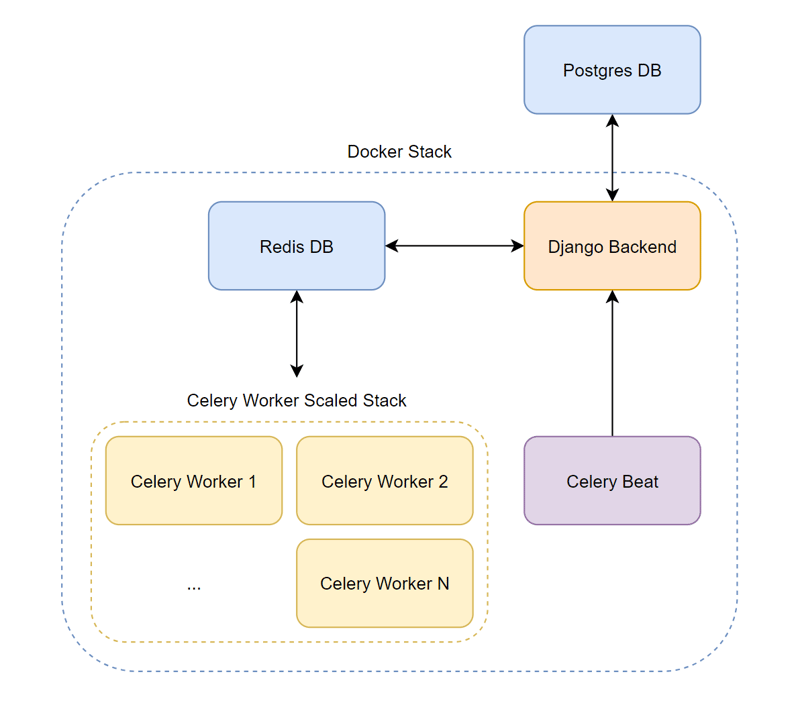
Stack Diagram
To visualize the flow better here’s a diagram that describes how everything is interconnected:
Docker images
The stack, though it might seem complicated, is only composed of 3 images, 2 of which are custom:
Django image
This is a custom image built from python.
This image will be used for django, celery workers and celery beat containers.
Here’s the Dockerfile for it:
# I use bullseye because I’m more comfortable with it
# but you can use Alpine for a more lightweight container
FROM python:3.11-bullseye
# Exposes port 8000
# Make sure to change this to your used port
EXPOSE 8000
# Keeps Python from generating .pyc files in the container
ENV PYTHONDONTWRITEBYTECODE=1
# Turns off buffering for easier container logging
ENV PYTHONUNBUFFERED=1
# Working directory
WORKDIR /app/backend
# Install pipenv
# This is not necessary if you use pip in your code
RUN pip install -U pipenv
# Install pipenv requirements
# Turns the Pipfile to a requirements.txt
# so it can be installed globally with pip
COPY Pipfile Pipfile.lock /app/backend/
RUN pipenv requirements > requirements.txt
RUN pip install -r requirements.txt
RUN rm -rf ./Pipfile ./Pipfile.lock
# Copy all the code over
COPY . .
# Create the media directory
RUN mkdir -p /app/backend/media
# Create a volume for the media directory
VOLUME /app/backend/media
# Create a volume for the static directory
VOLUME /app/backend/django_static
# Make the entrypoint scripts executable
# There’s one entrypoint for each service that uses this image
RUN chmod +x /app/backend/entrypoint-django.sh
RUN chmod +x /app/backend/entrypoint-worker.sh
RUN chmod +x /app/backend/entrypoint-beat.sh
# Set the default entrypoint in case this Dockerfile is run
# by itself
ENTRYPOINT [“/app/backend/entrypoint-django.sh”]
These are the entry point files for each service:
django entry point
# Migrate any new migrations to the database on deployment
echo “Migrating…”
python manage.py migrate –no-input
# Collect static files
echo “Collecting static files…”
python manage.py collectstatic –no-input
# Ensure the data directory exists
# I use the data directory to store files such as logs
mkdir -p data
# Start gunicorn
echo “Starting server…”
gunicorn core.wsgi:application –forwarded-allow-ips=“*” –bind 0.0.0.0:8000
Worker entry point
# Wait until the backend directory is created
until cd /app/backend
do
echo “Waiting for server volume…”
done
# run a worker
# I like having only one task per worker but you can change it
# by increasing the concurrency
echo “Starting celery worker…”
celery -A core worker -l info –concurrency 1 -E
Beat entry point
# Wait until the server volume is available
until cd /app/backend
do
echo “Waiting for server volume…”
done
# run celery beat
echo “Starting celery beat…”
celery -A core beat -l info
Nginx image
This container serves the application.
I create a custom nginx image that includes my certificates and configuration, so I don’t have to copy them over to the server.
Note: I don’t use certbot, as I find it more straightfoward to generate the certificates from cloudflare and just store them in the custom image
This means that the image should be secure in a private registry with authentication, otherwise you risk security of your web app.
Here’s the Dockerfile for it:
# Export ports 80 and 443
EXPOSE 80
EXPOSE 443
# Copy the nginx configuration files to the image
COPY ./conf/default.conf /etc/nginx/conf.d/default.conf
COPY ./conf/prod.conf /etc/nginx/conf.d/prod.conf
COPY ./conf/staging.conf /etc/nginx/conf.d/staging.conf
# Copy the CloudFlare Origin CA certificate to the image
COPY ./certs/fullchain.pem /etc/nginx/certs/fullchain.pem
COPY ./certs/privkey.pem /etc/nginx/certs/privkey.pem
Redis image
I just use the default Redis image for this.
Just want to note that, because this is a single instance deployment, I like deploying Redis directly here as I find it’s enough.
It is recommended, though, to spin up a Redis database somewhere more centralized.
Docker Compose
Environment Variables
Before I get into the gist of the Docker Compose file here are some environment variables I put in my .env file for deployment:
DOCKER_REGISTRY: My private, authentication enabled, docker registry where I upload the build images
DJANGO_DOCKER_IMAGE: The name I give the django image
NGINX_DOCKER_IMAGE: The name I give the NGINX image
DOCKER_TAG: Usually the version I want to deploy, i.e.: 1.5 or latest
The file
services:
redis:
container_name: redis
restart: unless-stopped
image: redis:7.2.0-alpine
expose:
– 6379
backend:
restart: unless-stopped
image: ${DOCKER_REGISTRY}/${DJANGO_DOCKER_IMAGE}:${DOCKER_TAG}
env_file:
– ./.env
entrypoint: /app/backend/entrypoint-django.sh
ports:
– 8000:8000
volumes:
– ./data:/app/backend/data
healthcheck:
test: [“CMD”, “curl”, “-f”, “http://localhost:8000/healthcheck/”]
interval: 30s
timeout: 10s
retries: 3
start_period: 20s
worker:
restart: unless-stopped
image: ${DOCKER_REGISTRY}/${DJANGO_DOCKER_IMAGE}:${DOCKER_TAG}
env_file:
– ./.env
entrypoint: /app/backend/entrypoint-worker.sh
volumes:
– ./data:/app/backend/data
depends_on:
backend
condition: service_healthy
redis
condition: service_started
beat:
restart: unless-stopped
image: ${DOCKER_REGISTRY}/${DJANGO_DOCKER_IMAGE}:${DOCKER_TAG}
env_file:
– ./.env
entrypoint: /app/backend/entrypoint-beat.sh
volumes:
– ./data:/app/backend/data
depends_on:
backend
condition: service_healthy
redis
condition: service_started
nginx:
restart: unless-stopped
image: ${DOCKER_REGISTRY}/${NGINX_DOCKER_IMAGE}:${DOCKER_TAG}
ports:
– 80:80
– 443:443
depends_on:
backend
condition: service_healthy
As you can see, the compose file has the 5 services, Redis, django, celery worker, celery beat and NGINX.
Deploying
Building
First I build the images and push them to the registry. Before, I did this manually, now I use a GitHub action. You can learn more about this automation here.
Deploying with Docker Compose
Then I head to the server where I want to deploy this. Make sure that the .env file is updated and then just:
docker compose down: Spin the old instance down
docker system prune -a -f: This makes sure I remove the latest image to force the download of the new one from the registry.
docker compose up –scale worker=5 -d: Spin the new instance up
That’s it!