

Ubuntu is a free and easy to install flavor of the Linux operating system, and it’s for desktops and servers. A lot of technologies used for the web, data science and software development are designed for Linux. You can run them using command-line. I’ve used Ubuntu when creating and hosting web pages, setting up SQL databases and Elasticsearch clusters, and managing containers with Docker.
In this blog post, we will explore the steps involved in setting up a Linux virtual machine using Ubuntu Server. By default, SSH access to virtual machines often relies on public key authentication for enhanced security. However, in this blog, we will use password-based authentication preferably.
We will also demonstrate how to prevent unexpected SSH disconnections due to idle sessions, it’s important to extend the idle timeout for your IP address to prevent unexpected logouts.
Also, apart from deleting your resource group that houses your virtual machine and its dependents, I will show you how you can disassociate your IP address from the virtual machine when not in use to ensure cost optimization.
Let’s get Started!!
SIGN IN TO AZURE PORTAL
As a prerequisite, If you don’t have an Azure subscription, log in here to create a free account before we get started. Now that you have created your Azure subscription, sign in to the Azure portal using your mail and password to get started.
CREATE YOUR VIRTUAL MACHINE
a. In the search bar, type “Virtual Machine”
b. From the search results, select “Virtual Machine” from the list of resources shown
c. Click on the “Create” button
d.) Select the virtual machine highlighted
e)You will be directed to the “Basics” page.
Project Details
In the project details category, we have the subscription and resource group;
a) Subscription
An Azure subscription in simple terms means a membership or access pass to use Microsoft Azure. It’s similar to subscribing to a service or signing up for a subscription plan. With an Azure subscription, individuals or organizations can use and benefit from the various services and resources provided by Azure at a cost depending on your type of subscription. However, it also offers free and trial options, giving you a chance to explore and experiment with Azure before committing to a paid subscription.
b)Resource Group
A resource group in Azure is like a container or folder that helps you organize and manage the different resources such as virtual machines and databases that you use in the Azure cloud.
Imagine you have a room with different items scattered all over the place. It becomes challenging to find what you need when everything is upside down. In this scenario, the room represents your Azure cloud environment, and the resources are the items in the room. Now, imagine you decide to tidy up and arrange your items where they are initially meant to be. Each compartment keeps related items organized and makes it easier to find what you need.
In the how-to guide, select your resource group or click on “Create new” to create a new resource group.
Instance Details
a) Give your virtual machine a name
b) In the region section, select the location you want your virtual machine to be.
A region refers to a specific geographical location with data centers that host infrastructure and services. Each region operates independently and is designed to be self-contained, with its own set of resources and infrastructure.
c) Next, click on the drop-down to select your availability option and availability Zone.
In Azure, a region can consist of three availability zones, known as Zone 1, Zone 2 and Zone 3. Each zone has one or more data centers that are kilometers apart from each other.
These data centers are equipped with independent power, networking, and cooling infrastructure to minimize the impact of failures and disruptions. What physically Links these data centers together is Fibre Optic Cable. Fiber optic technology allows for high-speed data transmission over long distances while maintaining low latency and high bandwidth capabilities.
d) Select your security type from the drop-down
e) In the image section, select any Ubuntu Server.
Ubuntu is a Linux Operating System. An image is an operating system. It’s like a blueprint for creating virtual machines or computer systems. It has all the instructions and settings needed to set up a computer with a specific operating system and software.
f) Select the size of your virtual machine from the drop-down or click on “See all sizes”. Leave the other information in its default state.
Administrator Account
a) Select the password authentication type.
Password-based authentication involves using a username and secret password to access a system as shown below.
While SSH public key authentication relies on key pairs and cryptographic algorithms for secure remote access. Public key authentication offers stronger security and protection against various attacks, making it a preferred choice for secure remote connections.
However, for the purpose of this demo, we will use Password.
b) Type your username and your password.
Inbound Port Rules
a) In this category, select SSH (22) as your inbound port to connect to the Linux server.
b) Click “Next: Disk>” to direct you to the disk page
Disk
a) On the Disk page click on the OS disk type drop-down and select Premium SSD or any disk type of your choice as shown below. Leave the other columns as default.
b) Leave the networking, management, monitoring and advanced pages as default. Skip to the Tag page.
Tag
a) Give your tag a name
Tags are a way to label and organize resources in cloud computing environments. The purpose of tags is to provide metadata or additional information that helps in managing, organizing, and tracking resources within a cloud infrastructure.
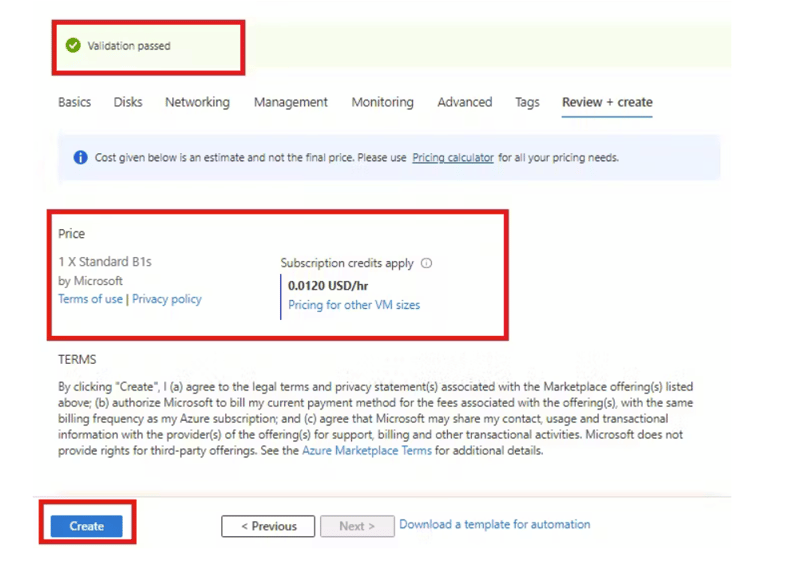
b) Next, click on Review+create
c) Review the summary of your virtual machine configuration and click on the “Create” button to begin the deployment process
d)Once the deployment is complete, click on “Go to resource”.
CONNECT TO YOUR VIRTUAL MACHINE
a) Click on the connect button to SSH to your Virtual Machine
b) Scroll down to No 4, Copy the command in the red box and delete the command in the blue box. This will give you:
ssh username@ipaddress
c) Open PowerShell on your Laptop and input the command, Press enter
d) You would be asked if you want to continue connecting, type “yes” and press enter
e)At this stage, my connection has closed because it took me a while to run the command. If you got this, the next thing to do is to go back to Azure portal and locate your virtual machine.
f)On the overview page, click on your IP address.
g) Click on Configuration and increase the idle timeout to 30 minutes. Once you are done, ensure to save it.
h) Go back to your Powershell and input the ssh username@ip, press enter.
NOTE: If your connection did not time out/close, once you type yes and press enter, it would ask that you input your password.
i) Now input your password and press enter.
j) Once you press enter, you would be logged in to your virtual machine as shown below.
How To Disassociate IP Address
Situations may arise where you need to save cost running your virtual machine.One way to optimise cost is to disassociate your IP address from your virtual machine.
a) Click on your IP address
b) Click on the Overview.
c) On the overview page, click on dissociate at the top-right of the page.
d) It will ask you to confirm dissociation, click “Yes’. Once you click yes, your IP address will be dissociated from your Virtual Machine.
How To Associate IP Address
a)To associate your IP, simply click on the Associate button.
b) A page will open up, choose the Resource type as Network interface. Select your IP address and click on OK.
c) Your IP will be associated back to your virtual machine.

