
This project is built using Vercel, Neon, and Rust. It is a link-managing application that has a CLI to create, read, and delete short URLs. I have used Vercel to deploy a serverless function for redirection to long URLs, it is easy, fast, and free.
What is a URL shortener and why do we need it?
URL shortener is a service that is used to create short URLs that work as an alias for long URLs, this is important when you have a long URL (e.g. https://chart.apis.google.com/chart?chs=500×500&chma=0,0,100,100&cht=p&chco=FF0000%2CFFFF00%7CFF8000%2C00FF00%7C00FF00%2C0000FF&...) and sharing this is not that neat when it comes to branding, email marketing, and what if you snap out some characters at the end of the URL while copying? invalid URL now.
It becomes really hard this way, that is where we can use a URL-shortening service that can generate an alias for the long URLs having comparatively shorter lengths. The other benefits of having short URLs or aliases are you can customize how you want your URL to appear(e.g. https://foo.baz/2fGH553), generate analytics like the number of users clicked, country of origin, protect with passwords, and many more.
Many big companies like Twitter or X use this service for sharing any content outside their application. This helps them to maintain brand aesthetics, market themselves better, and keep things clean and concise.
How does it work?
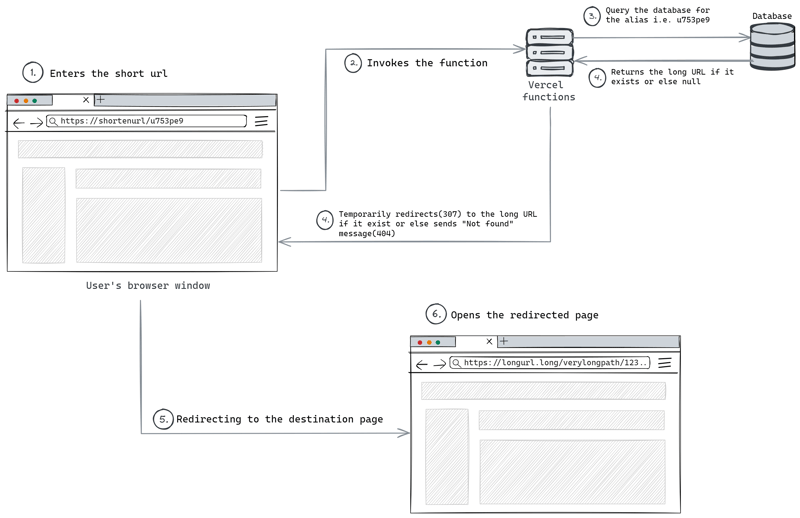
The user enters the short URL, and every short URL must have a path, the path acts as a unique identifier, and using this we query the database to find the record.
If there exists a record then we will send the browser the long URL to the browser to redirect the user to the destination page, the redirection can be temporary or permanent there are trade-offs on using one over the other. Once the browser receives the it will open the redirected page.
If the record doesn’t exist or the path is not what was expected then the user will get a 404 status page.
As simple as that!!!
Pre-requisites
NodeJS – Link
PNPM – Link (optional)
Rust – Link
Vercel CLI – Link
Setup
Open your terminal window, clone the repository at any desired location in your machine, and go inside the project folder using these commands:
cd shorten-url
Create a Postgres database
I appreciate Neon and the team behind it, they ingeniously crafted everything around the standard Postgres database so neatly and expanded the scope to use Postgres in different domains without any overhead. Not to mention they also have a humble open-source community.
Go to their website, log in, or create an account.
Create a project and a database, name them whatever you want:
Go to your project dashboard, select your database, and copy the connection string, you will need this connection string later:
Deploy serverless function Vercel
Deploying projects on Vercel is completely free in hobby accounts, and you can add custom domains to your projects if you have however by default Vercel will generate a production URL for your project.
Build the serverless function:
vercel build –prod –cwd ./shorten-url-functions
–prod flag will build the function with all the configurations needed by Vercel to deploy and run this function in the production environment.
After the build is completed it generates .vercel directory in the root, which has all the directories and configuration files containing lots of information like the runtime, project name, entry point, filesystem mappings, target environment, packages used, commands to be executed and so on.
If you are curious to know more about it then go ahead and tweak things here and there (at your own risk) as long as everything works as expected.
Deploy the build output:
vercel deploy –prebuilt –prod –cwd ./shorten-url-functions
–prebuilt flag is for Vercel to locate the output directory inside the .vercel and deploy it to production
Only if this is the first time you are deploying this project then you have to answer some of the prompts. This is needed by Vercel to make sure your project is deployed properly wiht any alternate approach you may have.
Add environment variables:
vercel env add DATABASE_URL –cwd ./shorten-url-functions
a prompt will appear asking for the value, paste the database connection string copied from the Neon project dashboard.
You will need to deploy the function again using the command from step 2 so that the deployed function can use the newly added environment variable, most of the time it is not needed but it’s better to make sure
That’s it with the serverless function deployment, now we need to get the domain.
If you have a custom domain and want to use it as the domain for creating short URLs then follow this doc link
Or else if you want to use the domain generated by Vercel for your project then go to the project dashboard and copy the domain name.
Install and configure CLI
To install the CLI run this command:
cargo install –path ./shorten-url-cli
Configuring the CLI:
run the below command and use these when prompted:
shortenurl config
Get these:
Postgres connection string from Neon projects dashboard
Domain name of the deployed serverless function
And use it when prompted
? Provide postgres connection string:
? Provide primary domain configured in Vercel(e.g. foo.com):
After the migration completes, your config will be saved in a shortenurl.toml file inside the config directory. Look up at these locations depending on your Operation System to locate the config file:
vim /home/<username>/.config/shortenurl/shortenurl.toml
“`
vim C:Users<username>AppDataRoamingshortenurlshortenurl.toml
“`
vim /Users/<username>/Library/Application Support/shortenurl/shortenurl.toml
“`
That’s it, we have finally completed the setup.
Usage
Create a short URL
This will generate an alias for the short URL and creates a record in the database. If the provided URL already exists then it will throw an error.
Get long and short URLs by alias
If you have an alias (e.g. U9uaR8C) but are not sure which long URL it belongs to then use this command.
List all records
This command will list out all the short URLs and the respective long URLs
Remove a record by the alias
To remove a short URL and its respective long URL, you can use this command by providing the alias(e.g. U9kHB4Z)
Remove all records
Like it says flushes out everything.
Be careful when you remove a record because you may have used these short URLs at some other places, removing them and using these short URLs again will give 404.
Conclusion
This was a fun project for me and has lots of scope for new features like analytics, caching, real-time logging, URL grouping by domain name, and so on. But for now, this is it, if you think this project can be used as an alternative to other similar products out there because of the control, minimal to no cost, and hell lot of customizations it provides then let me know here, I would be happy to craft this for production use.
Signing out!!!

