
We will build curl from scratch by accepting the coding challenge posted on Coding Challenges FYI.
Before moving ahead, you must know how TCP client-server connections work.
You can read more about GeeksforGeeks.
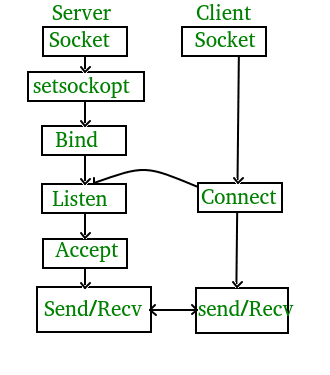
On Server Side: –
Socket:- Socket object to expose our endpoints.
setsockopt:- This function sets the extra options for the sockets if needed.
Bind:- It binds the socket with the IP and port.
Listen:- Socket is now in listening state, and listen at the specified port for the incoming connection request. Here it queues incoming client requests to connect. The second argument specifies the maximum number of requests it can queue.
Accept:- In this phase, the server calls the accept function, which initiates the 3-way handshaking. The client sends a SYN packet to the server, the server responds with the SYN-ACK packet, and blocks(waits) the connection until it finally gets the ACK packet.
Send/Recv:- Once ACK is received from the client, communication can proceed to and fro.
On Client Side: –
Socket initialization:- In this setup, the socket is defined with all the configurations needed to connect.
Connect:- In this phase, the client calls the connect function, which sends the SYN packet to the server with the intent to connect.
Send/Recv: Once the connection is established, the client can send and receive the data.
We are doing to achieve in a few steps: –
Getting the CLI arguments
Creation of socket connection
Sending the request
Parsing the response
1. Getting the CLI arguments.
We will be using the library for Clap – A simple-to-use, efficient, and full-featured library for parsing command line arguments and subcommands.
The clap library provides two different ways to build parse objects. First is the Builder pattern(a creational design pattern to create complex things by the step-by-step process) and second Derive pattern in which the library automatically generates code based on the macros.
We are using the Builder pattern for our CLI tool.
But you can implement Derive pattern at doc.rs/clap/_derive
‘cli.rs‘
pub fn get_arguments()-> ArgMatches{
Command::new(“Ccurl – custom curl”)
.about(“It helps to make HTTP methods”)
.version(“1.0”)
.author(“Praveen Chaudhary <chaudharypraveen98@gmail.com>”)
.arg(Arg::new(“url”).index(1).required(true))
.arg(
Arg::new(“x-method”)
.help(“Http method which you want to use”)
.long(“x-method”)
.short(‘X’),
)
.arg(
Arg::new(“data”)
.help(“Payload you want to send with the request”)
.long(“data”)
.short(‘d’),
)
.arg(
Arg::new(“headers”)
.help(“Request header”)
.long(“header”)
.short(‘H’)
.action(ArgAction::Append),
)
.arg(
Arg::new(“verbose”)
.help(“verbose mode”)
.long(“verbose”)
.short(‘v’)
.action(clap::ArgAction::SetTrue),
)
.get_matches()
}
Firstly, we have to define the basic info like about, author, and version.
We have defined all the arguments needed for our curl. We have made one positional required argument url.
Argument matching or parsing
Clap makes it easier to match arguments.
For verbose, we have used action method .action(clap::ArgAction::SetTrue) because it will not contain any subsequent value.
For headers, similarly, we have used action method .action(ArgAction::Append), Append will append new values to the previous value if any value has already encountered.
For others, we have simply used get_one method to get the value.
let url = matches.get_one::<String>(“url”).unwrap();
let data = matches.get_one::<String>(“data”);
let method = matches.get_one::<String>(“x-method”);
let headers: Vec<&str> = matches
.get_many::<String>(“headers”)
.unwrap_or_default()
.map(|s| s.as_str())
.collect();
2. Drafting request with input information [ HTTP 1.1 – RFC9110.]
We will be using the RFC9110 for HTTP 1.1 client.
we will start with an empty string, and append all the information needed for the Request according to RFC.
protocol: &str,
host: &str,
path: &str,
data: Option<&String>,
method: Option<&String>,
headers: Vec<&str>,
) -> String {
let default_method = String::from(“GET”);
let method = method.unwrap_or(&default_method);
let mut res = String::new();
res += &format!(“{} /{} {}rn”, method, path, protocol);
res += &format!(“Host: {}rn”, host);
res += “Accept: */*rn”;
res += “Connection: closern”;
….
….
….
res += “rn”;
res
}
For PUT and POST, we need to add headers and data.
protocol: &str,
host: &str,
path: &str,
data: Option<&String>,
method: Option<&String>,
headers: Vec<&str>,
) -> String {
….
….
if method == “POST” || method == “PUT” {
if headers.len() > 0 {
for head in headers {
res += head;
}
res += “rn”
} else {
res += “Content-Type: application/jsonrn”;
}
if let Some(data_str) = data {
let data_bytes = data_str.as_bytes();
res += &format!(“Content-Length: {}rnrn”, data_bytes.len());
res += data_str;
res += “rn”;
}
}
….
res
}
According to RFC, for POST or PUT, we need to provide Content-Length and Content-Type header.
So now we have a complete request string. Let’s move to the socket connection, sending this request string to the server.
protocol: &str,
host: &str,
path: &str,
data: Option<&String>,
method: Option<&String>,
headers: Vec<&str>,
) -> String {
let default_method = String::from(“GET”);
let method = method.unwrap_or(&default_method);
let mut res = String::new();
res += &format!(“{} /{} {}rn”, method, path, protocol);
res += &format!(“Host: {}rn”, host);
res += “Accept: */*rn”;
res += “Connection: closern”;
if method == “POST” || method == “PUT” {
if headers.len() > 0 {
for head in headers {
res += head;
}
res += “rn”
} else {
res += “Content-Type: application/jsonrn”;
}
if let Some(data_str) = data {
let data_bytes = data_str.as_bytes();
res += &format!(“Content-Length: {}rnrn”, data_bytes.len());
res += data_str;
res += “rn”;
}
}
res += “rn”;
res
}
3. Creation of socket connection
We will be using the standard rust network library for socket connection with the host server.
….
….
let tcp_socket = TcpStream::connect(socket_addr);
match tcp_socket {
Ok(mut stream) => {
….
….
}
Err(e) => {
eprintln!(“Failed to establish connection: {}”, e);
}
}
….
….
}
Once we are successfully connected, we can listen and send your request to the server.
4. Sending the request
First we have to check if verbose mode is enabled, and then we print out the request.
We have used the write_all to ensure our that our whole buffer is added to the stream.
Create a new empty buffer, and provide this buffer to the stream, to read the response data from the host.
Converts that bytes string to UTF-8 string using the from_utf8_lossy.
Print the response header and body.
….
….
match tcp_socket {
Ok(mut stream) => {
if verbose_enabled {
let lines = buffer_str.lines();
for line in lines {
println!(“> {}”, line)
}
}
stream
.write_all(buffer_str.as_bytes())
.expect(“Failed to write data to stream”);
//initializing the buffer reads data from the stream and stores it in the buffer.
let mut buffer = [0; 1024];
stream
.read(&mut buffer)
.expect(“Failed to read from response from host!”);
// converts buffer data into a UTF-8 encoded string (lossy ensures invalid data can be truncated).
let response = String::from_utf8_lossy(&buffer[..]);
// dividing the response headers and body
let (response_header, response_data) = parse_resp(&response);
if verbose_enabled {
let lines = response_header.split(“rn”);
for line in lines {
println!(“< {}”, line)
}
}
println!(“{}”, response_data);
}
Err(e) => {
eprintln!(“Failed to establish connection: {}”, e);
}
}
….
….
}
5. Time for Testing
cli – cargo run — http://eu.httpbin.org:80/get
response –
“args”: {},
“headers”: {
“Accept”: “*/*”,
“Host”: “eu.httpbin.org”,
“X-Amzn-Trace-Id”: “Root=1-65fec214-25771a3e732101c433ce67a7”
},
“origin”: “49.36.177.79”,
“url”: “http://eu.httpbin.org/get”
}
Similarly, you can test others.
Hurray!! We have been able to make our curl.
Source Code
If this helps you, Do star and contribute.
Ccurl
Happy Hacking
Rustaceans!


