
Recently, I had the pleasure of attending DeveloperWeek in Oakland, CA. In addition to working the Akamai booth, making new friends, and spreading the good word of cloud computing, my team mate, Talia and I were tasked with creating a demo to showcase the new VPC product.
Background
A Virtual Private Cloud (VPC) enables private communication between two cloud compute instances, isolating network traffic from other internet users, thus improving security.
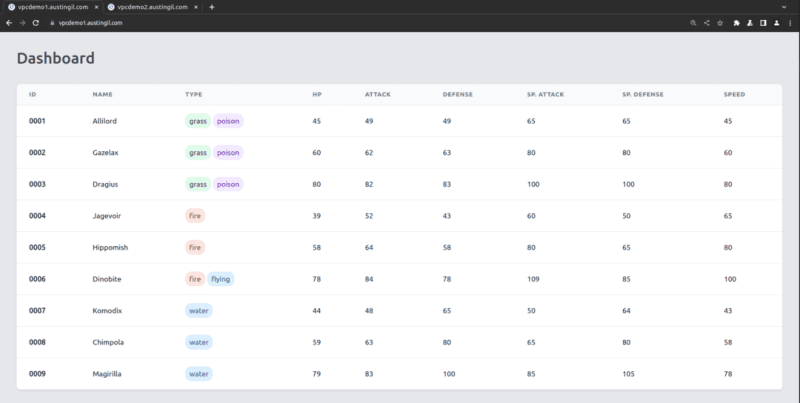
So, how did I decide to showcase this? By building a little Pokémon dashboard, of course.
I deployed two apps, each consisting of an app server and a database server (four servers total). The first app + database server pair is deployed normally, the second is configured to run within a VPC.
Each app’s front end is built with Qwik and uses Tailwind for styling. The server-side is powered by Qwik City (Qwik’s official meta-framework) and runs on Node.js hosted on a shared Linode VPS. The apps also use PM2 for process management and Caddy as a reverse proxy and SSL provisioner. The data is stored in a PostgreSQL database that also runs on a shared Linode VPS. The apps interact with the database using Drizzle, an Object-Relational Mapper (ORM) for JavaScript. The entire infrastructure for both apps is managed with Terraform using the Terraform Linode provider, which was new to me, but made provisioning and destroying infrastructure really fast and easy (once I learned how it all worked).
If you’re interested, you can find all the code here: github.com/AustinGil/linode-vpc-demo
Demo
As I mentioned above, the demo deploys two identical apps. There isn’t anything remarkably special about it, but here’s a screenshot.
(I had to change the Pokémon names for reasons…)
There’s nothing special about this tech stack. I chose these tools because I like them, not necessarily because they were the best tools for the job.
The interesting part is the infrastructure.
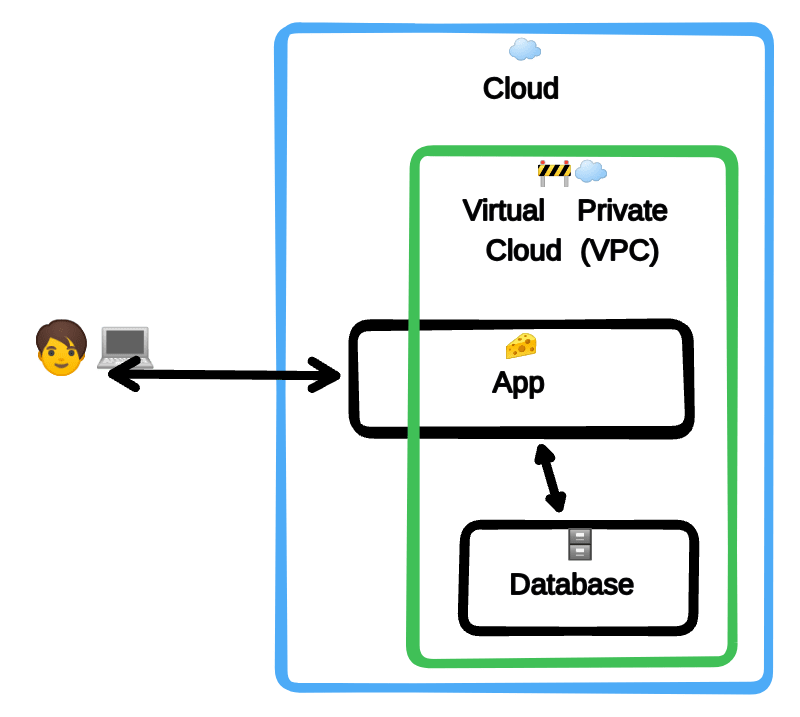
When we consider app #1, it’s essentially made up of two servers hosted inside the Akamai cloud, one server for the app and one server for the database. When a user loads the app, the app server pulls the data from the database, constructs the HTML, and returns the result to the user.
The problem here is how the database connection is configured. In some cases, you may deploy a database server without knowing the IP addresses of the computers you want to allow access from (like the app server). In these cases, it’s not uncommon to allow any computer with the right credentials to connect to the database. This presents a security vulnerability because it could allow for a bad actor to connect to the database and steal sensitive data.
A bad actor would still need the database host, port, username, and password to get access, so it’s not trivial. And as I said, this is not an uncommon practice, but we can do better.
If you know the IP address for every computer that needs access, a good solution might be to set up a firewall or VLAN. But if your infrastructure is more dynamic, with servers coming up and down, maintaining lists of IP addresses can be cumbersome. And that’s where VPCs shine. You can configure servers to live within a VPC, and allow communication to flow freely, only between other computers in the network.
That’s how app #2 is set up. Users can connect to the app server, which allows traffic from the public internet, but also lives within the VPC. The app server connects to the database, which is also in the VPC and only allows connections from within the same network. Then the app server takes the data, builds the HTML, and returns the page to the user.
For a normal user, the experience is identical. The browser loads the table with the modified Pokémon data just fine. The VPC doesn’t change anything for normal users.
For bad actors, however, the experience is different. Even if they somehow manage to get the database access credentials, they would not be able to connect because the network isolation from the VPC. Here, the VPC acts as a virtual firewall, ensuring that only devices with the same network are able to access the database.
(This concept is sometimes referred to as “segmentation”)
Evidence
It’s cool to show a demo and talk about the infrastructure with cute diagrams, but I always want to prove, even if just to myself, that things work as expected. So I thought a good way to test it would be to try connecting directly to both databases using my database client, DBeaver.
For database #1, I set up a Postgres connection using the host IP address I got from my Akamai dashboard and the port, username, and password I had set up in my Terraform script. The connection worked as expected.
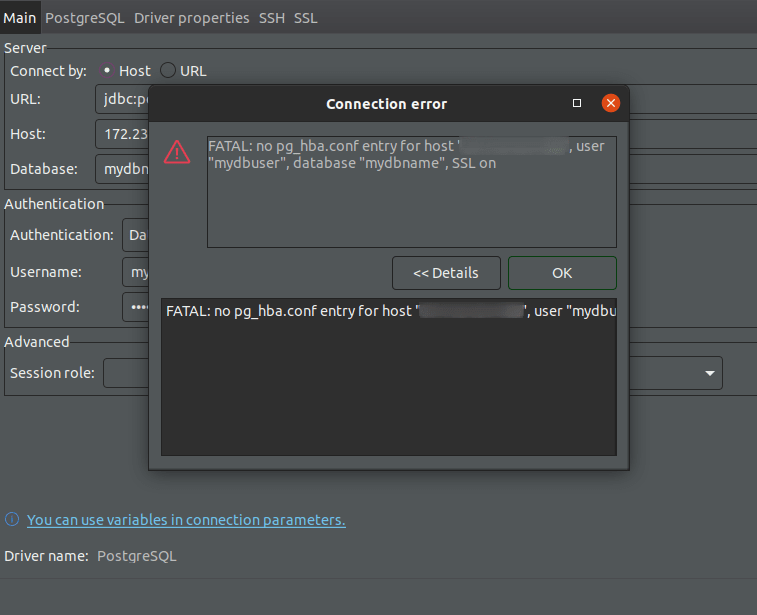
For database #2, all I had to change was the IP address, since all the database provisioning was handled by the same script using Terraform. The only difference was that the database server was put inside the same VPC as the app server, and it was configured to only allow connections from any computer within the same network.
As expected, I got an error when trying to connect, even though I had all the correct information.
The error doesn’t mention anything about the VPC. It just says that my IP address is not in the allowed list in the configuration file. This makes sense. I could explicitly add my home’s IP address and gain access to the database if needed, but that’s beside the point.
The key point is that I did not explicitly add any IP address to the Postgres allow-list. Yet, the app server was able to connect just fine, and everyone else was blocked, thanks to the VPC.
Code
The last thing I’ll touch on is the Terraform code for deploying this application. You can find the whole file here: github.com/AustinGil/linode-vpc-demo/blob/main/terraform/terraform.tf
It’s also worth mentioning that I tried to make this Terraform file reusable for other people (or future me). That required a bit more variable and config setup based around the tfvars file: github.com/AustinGil/linode-vpc-demo/blob/main/terraform/terraform.tfvars.example
Anyway, I’m just going to highlight the key parts.
1. Configure Terraform Provider
First, since I used the Linode Terraform provisioner, it makes sense to know how to set that up:
required_providers {
linode = {
source = “linode/linode”
version = “2.13.0”
}
}
}
variable “LINODE_TOKEN” {}
provider “linode” {
token = var.LINODE_TOKEN
}
This part sets up the provider as well as a variable which Terraform will either ask you for, or you can provide with the tfvars file.
2. Set Up VPC and VPC Subnet
Next, I set up the actual vpc resource along with a subnet resource. This part required a lot of learning on my part.
label = “${local.app_name}-vpc”
region = var.REGION
}
resource “linode_vpc_subnet” “vpc_subnet” {
vpc_id = linode_vpc.vpc.id
label = “${local.app_name}-vpc-subnet”
ipv4 = “${var.VPC_SUBNET_IP}“
}
Servers can only be added to VPCs in the same region. At the time of writing, there are thirteen regions where VPCs are supported. For the most up-to-date details, refer to the docs: linode.com/docs/products/networking/vpc/.
I tried deploying my servers to San Francisco and ran into errors several times before realizing that it wasn’t an available region. So I went with Seattle (“us-sea”) instead.
The subnets were also a learning point for me. As a web application developer, I haven’t had to do much networking, so when I was asked to provide “The IPv4 range of this subnet in CIDR format” I had to research.
Turns out, there are three IPv4 address ranges that are reserved for private networks (such as a VPC):
10.0.0.0 – 10.255.255.255
172.16.0.0 – 172.31.255.255
192.168.0.0 – 192.168.255.255
You have to choose one of these three options, but you have to use CIDR format, which is a way of representing the IP range you want to use. Don’t ask me for more details, because that’s all I know. Akamai has more documentation around the subnets. I just went with 10.0.0.0/24.
Every server in the private network will have an IPv4 address within that range.
3. Set Up Application Servers
For Terraform to deploy my application servers, I used the linode_instance resource. I also used the stackscript resource to create a reusable deployment script for installing and configuring software. It’s like a Bash script that lives in your Akamai cloud dashboard that you can reuse on new servers.
I won’t include the code here, but it installs Node.js 20 via NVM, installs PM2, clones my project repo, runs the app, and sets up Caddy. You can view the StackScript contents in the source code, but I want to focus on the Terraform stuff.
depends_on = [
linode_instance.database1
]
image = “linode/ubuntu20.04”
type = “g6-nanode-1”
label = “${local.app_name}-application1″
group = “${local.app_name}-group”
region = var.REGION
authorized_keys = [ linode_sshkey.ssh_key.ssh_key ]
stackscript_id = linode_stackscript.configure_app_server.id
stackscript_data = {
“GIT_REPO” = var.GIT_REPO,
“START_COMMAND” = var.START_COMMAND,
“DOMAIN” = var.DOMAIN1,
“NODE_PORT” = var.NODE_PORT,
“DB_HOST” = linode_instance.database1.ip_address,
“DB_PORT” = var.DB_PORT,
“DB_NAME” = var.DB_NAME,
“DB_USER” = var.DB_USER,
“DB_PASS” = var.DB_PASS,
}
}
resource “linode_instance” “application2” {
depends_on = [
linode_instance.database2
]
image = “linode/ubuntu20.04”
type = “g6-nanode-1”
label = “${local.app_name}-application2″
group = “${local.app_name}-group”
region = var.REGION
authorized_keys = [ linode_sshkey.ssh_key.ssh_key ]
stackscript_id = linode_stackscript.configure_app_server.id
stackscript_data = {
“GIT_REPO” = var.GIT_REPO,
“START_COMMAND” = var.START_COMMAND,
“DOMAIN” = var.DOMAIN2,
“NODE_PORT” = var.NODE_PORT,
“DB_HOST” = var.DB_PRIVATE_IP,
“DB_PORT” = var.DB_PORT,
“DB_NAME” = var.DB_NAME,
“DB_USER” = var.DB_USER,
“DB_PASS” = var.DB_PASS,
}
interface {
purpose = “public”
}
interface {
purpose = “vpc”
subnet_id = linode_vpc_subnet.vpc_subnet.id
}
}
Configuring the two resources is almost identical, with only a few significant things to note:
Application #2 includes configuration to add it to the VPC.
The StackScript needs the IP address for the database. Application #1 uses the public IP address from database #1 (linode_instance.database1.ip_address). Application #2 uses a variable (var.DB_PRIVATE_IP). This variable will come up later, but it’s the private IP address assigned to database #2, running within the VPC. This can be manually assigned, so I set it to 10.0.0.3.
Also note that they are deployed to the same region as the VPC, for the reasons I mentioned above.
4. Set Up Database Servers
The databases are also set up using the linode_instance and linode_stackscript resources. Once again, I’ll skip the StackScript contents which you can find in the repo. It installs Postgres, sets up the database and credentials, and provides some configuration options.
image = “linode/ubuntu20.04”
type = “g6-nanode-1”
label = “${local.app_name}-db1″
group = “${local.app_name}-group”
region = var.REGION
authorized_keys = [ linode_sshkey.ssh_key.ssh_key ]
stackscript_id = linode_stackscript.configure_db_server.id
stackscript_data = {
“DB_NAME” = var.DB_NAME,
“DB_USER” = var.DB_USER,
“DB_PASS” = var.DB_PASS,
“PG_HBA_ENTRY” = “host all all all md5”
}
}
resource “linode_instance” “database2” {
image = “linode/ubuntu20.04”
type = “g6-nanode-1”
label = “${local.app_name}-db2″
group = “${local.app_name}-group”
region = var.REGION
authorized_keys = [ linode_sshkey.ssh_key.ssh_key ]
stackscript_id = linode_stackscript.configure_db_server.id
stackscript_data = {
“DB_NAME” = var.DB_NAME,
“DB_USER” = var.DB_USER,
“DB_PASS” = var.DB_PASS,
“PG_HBA_ENTRY” = “host all all samenet md5”
}
interface {
purpose = “public”
}
interface {
purpose = “vpc”
subnet_id = linode_vpc_subnet.vpc_subnet.id
ipv4 {
vpc = var.DB_PRIVATE_IP
}
}
}
As with the application servers, the two database servers are mostly the same, with just a couple of key differences:
The second database includes configuration to add it to the VPC.
Different settings are written to the Client Authentication file (pg_hba.conf). Database #1 allows all internet connections (“host all all all md5”) while database #2 only allows access from the same network (“host all all samenet md5”).
It’s also worth noting that we explicitly assign the server’s private IP address when configuring the VPC settings (var.DB_PRIVATE_IP). This is the same static value that was given to the application server so it can connect to the database from within the VPC.
Closing
Hopefully this post has opened our eyes to what VPCs are, why they’re cool, and when you might consider one. It’s like having your own little private internet. It’s not strictly a replacement for VLANs or firewalls, but it’s a great addition to any existing security practice, or at least something to keep in the back of your head.
Building out the demo was interesting in itself, and there were a lot of things that were totally new to me. I spent a lot of time learning:
What VPCs are and how they work.
It was my first time using Terraform, so that involved installation, usage, terminology, etc.
I’ve used Postgres before, but have never had to manually configure client access.
This was my second project using Drizzle and although it was very limited, the migrations process was challenging.
I learned more than I care to know about networking, computer interfaces, IP ranges, and CIDR. I have much more respect for folks working on the networking layer.
Linode StackScripts are also super cool. It was my preferred way to configure a server using Terraform and I want to see how they work otherwise.
There were also a couple of resources that I found particularly helpful:
Terraform’s Linode provider documentation
And in case you want to keep going on with this or related topics, Talia put together some excellent posts recently:
Talia’s review of DeveloperWeek
Crafting a Resilient VPC Landscape using Terraform
When should I use a Private IP vs. VLAN vs. VPC?
And of course, if you are interested in trying out the VPC or any other Akamai cloud computing products, new users can sign up at linode.com/austingil and get $100 in free credits 🙂
Thank you so much for reading. If you liked this article, and want to support me, the best ways to do so are to share it, sign up for my newsletter, and follow me on Twitter.
Originally published on austingil.com.
